Electronics / Cameras
Amcrest 12MP POE Fisheye Camera Quick Start Guide
Quick start guide for the Amcrest 12MP POE Fisheye Camera, covering physical installation, microSD card setup, device initialization, and mobile app configuration.
Table of contents
Manual images
Jump to the sectionQuick guide from the manual
This document provides essential steps for the physical installation and initial software setup of the Amcrest 12MP POE Fisheye Camera. Before beginning, ensure the camera is powered via a POE+ switch or a 12V DC power adapter and that your computer or mobile device is on the same network.
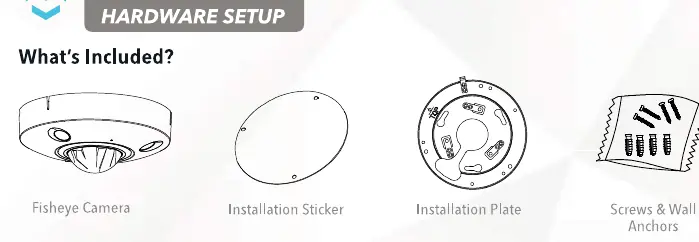
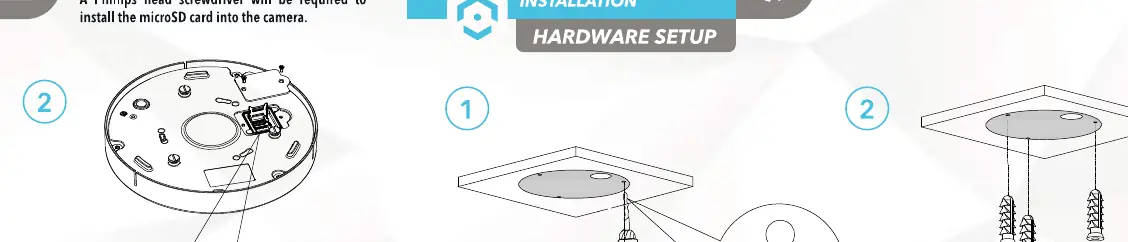
Physical installation
The camera includes an installation plate, sticker, screws, wall anchors, and a torx wrench. Follow these steps to mount the device:

- Use the installation sticker to mark and drill holes on the mounting surface.
- Insert wall anchors into the drilled holes.
- Align the installation plate with the holes and secure it using a Phillips head screwdriver.
- Connect the necessary wiring (Ethernet, etc.) to the camera.
- Align the camera screws with the installation plate, twist to secure, and lock in place using the included torx wrench.
MicroSD card installation
The camera supports microSD cards up to 256GB for local storage.
- Locate the hatch on the bottom of the camera and remove it using a Phillips head screwdriver.
- Open the microSD card clasp, insert the card into the slot, and slide the clasp back to secure it.
- Reattach the hatch to the camera.
Device initialization
Before accessing the camera on other platforms, it must be initialized:
- Download and install the Amcrest IP Config tool on your computer.
- Locate the camera's IP address and enter it into a web browser.
- Set the region, date, time, and a password (8-32 characters, including letters, numbers, and symbols).
Setup with Amcrest View Pro
Ensure the camera is initialized before proceeding:
- Download the Amcrest View Pro app from the App Store or Google Play.
- Tap the Start button and select PoE Camera.
- Choose P2P Connection.
- Scan the QR code on the camera or manually enter the serial number.
- Assign a name to the camera and enter the credentials to start live view.
Troubleshooting
For AI features like people counting or intrusion detection, note that these rules cannot be enabled simultaneously. To view AI recordings, a class 10 or above microSD card formatted to FAT32 is required.
Manufacturer information
Amcrest
Practical help
Common problems
AI features not working simultaneously
People counting and IVS rules cannot be enabled at the same time; choose the specific rule required for your detection area.
Cannot view AI recordings
Ensure a Class 10 or above microSD card formatted to FAT32 is installed in the camera.
App cannot find camera
Verify that both the camera and the mobile device are connected to the same network and that the camera has been initialized via the IP Config tool.
Before use
- Ensure a POE+ switch or 12V DC power adapter is available.
- Have a Phillips head screwdriver ready for hardware installation.
- Download the Amcrest IP Config tool for initial setup.
- Install the Amcrest View Pro or Amcrest Cloud app on your mobile device.
- Ensure your mobile device has location permissions enabled for the app.
Specs in practice
- MicroSD Support
- Supports up to 256GB for local storage; Class 10/FAT32 required for AI recordings.
- Password Requirements
- Must be 8-32 characters long, containing a combination of letters, numbers, and symbols.
Images and diagrams
- The manual provides a visual breakdown of the camera components including the installation plate, Ethernet protectors, and torx wrench.
- Step-by-step illustrations show the exact location of the microSD card hatch and the mounting process.
Model compatibility
- Compatible with Amcrest View Pro and Amcrest Cloud apps.
- Supports third-party software like Amcrest Blue Iris.
- Android users require version 8.0 or above; iOS users require version 13.0 or above.

Manual page author
David Miller
Documentation analyst
Organizes user manual content into clear summaries, with attention to model details, product context, and everyday usability.