Health / Dental Equipment
User Manual for Anthogyr Surgical Instruments
Quick guide for Anthogyr surgical instruments (Axiom BL, TL, 2.8, Mini). Includes usage instructions, cutting speeds, compatibility, sterilization, and safety warnings.
Table of contents
Important Information from the Manual
This document provides instructions for the use of standard and guided surgery instruments within the Anthogyr Axiom BL, TL, 2.8, and Mini implant systems. These instruments are delivered non-sterile and must be cleaned and sterilized before use. Practitioners must be trained in implantology and familiar with these handling instructions.
Product Description
Anthogyr instruments are categorized by their function:
- Planning: X-ray templates.
- Implant bed preparation: Guided and non-guided cutting instruments (initial drills, step drills, pointer drills, taps, gingival cutters, bone mills, cortical burs).
- Auxiliaries: Gauges, drill guides, drill stops, pins, sleeves.
- Torque transmission: Mandrels, wrenches, implant holders, mandrel extensions.
- Gripper components: Grippers, gripping wrenches.
- Kits: Reusable containers for organizing and sterilizing instruments.
Warnings and Safety
- Inhalation/Swallowing: Protect products against inhalation or swallowing when handled in the mouth.
- Inspection: Do not use damaged, corroded, or dull instruments. Always inspect before use.
- Nerve Damage: Avoid the mandibular nerve canal area during preparation and insertion.
- Torque: Do not exceed recommended insertion torques to prevent bone necrosis and fracture.
- Over-drilling: Account for 0.5 mm of apical over-drilling.
- Guided Surgery: Do not apply radial load to sleeves. Ensure drills are not in a rotated position when inserting/removing from sleeves.
Operational Guidelines
Cutting Speeds
Adhere to the following speed limits for surgical stages:
- Gingival cutter: 50 rpm.
- Pointer drill, Round bur, Lindemann bur: 1500 rpm.
- Cortical bur, Bone mill: 500 rpm.
- Axiom initial drills: 1500 rpm.
- Axiom step drills: 1000 rpm (2.8 step drills: 1200 rpm).
- Tapping: 25 rpm.
Guided Surgery Protocols
Guided drills must be used with corresponding sleeves. Inspect drill sleeves for operational safety before each procedure. The FIRST DRILL and INTEGRAL guided surgery protocols have specific limitations regarding implant diameter (not applicable for diameters > 4.6mm and lengths > 14mm).
Cleaning and Sterilization
Instruments are delivered non-sterile. Follow the cleaning and sterilization protocol available at ifu.anthogyr.com. Anthogyr declines responsibility for re-sterilized components if the protocol is not followed. Do not use if packaging is damaged.
Lifespan and Maintenance
Instruments have a defined product lifespan based on the number of uses (e.g., 10, 20, 50, 100, or 250 uses depending on the device). Discard instruments if there are signs of deterioration, such as illegible markings, coating damage, or corrosion. One use is equivalent to one implant channel or one reprocessing cycle.
Compatibility
Only use Anthogyr parts compatible with the implant connection. Drilling diameters are indicated by colored rings on the instruments (e.g., Green: 2.4mm, Orange: 2.6mm, Red: 3.0mm, Black: 1.5mm, Yellow: 3.6mm, White: 4.2mm, Blue: 4.8mm, Purple: 5.4mm, Brown: 6.0mm). The drilling guide (Ref. INGPPA) is only compatible with Axiom BL implants and the 1.5mm pointer drill.
Official resources from the manual
Practical help
Common problems
Instrument blockage or damage
Ensure the drill bit is not in a rotated position when inserting or removing it from a sleeve.
Implant connection damage
Use only instruments compatible with the specific implant type. Do not use non-compatible tools.
Over-drilling
Account for 0.5 mm of apical over-drilling during the planning phase.
Drilling depth inaccuracy
Use drill stops, depth gauges, and recommended surgical plans. Ensure depth gauge is inserted to the full depth of the drilling.
Before use
- Inspect all instruments for damage, corrosion, or dullness.
- Verify that all components are sterile.
- Check the proper hold of the instrument in the contra-angle or wrench by pulling on it slightly.
- Ensure the X-ray template is in good condition and not copied.
- Verify compatibility of the instrument with the implant system.
Specs in practice
- Cutting Speed
- Maximum RPM allowed for specific surgical stages to prevent bone damage.
- Product Lifespan
- Maximum number of uses allowed before the instrument must be discarded.
Images and diagrams
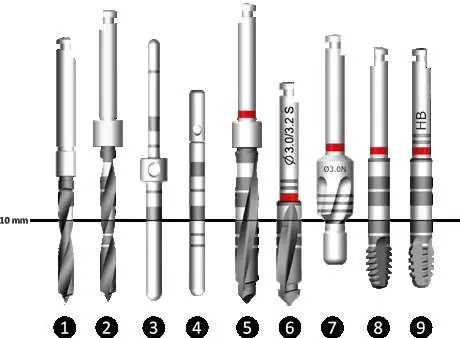
- Figure 1 illustrates the various types of instruments including initial drills, gauges, step drills, cortical drills, and taps.
Model compatibility
- Guided surgery protocols (FIRST DRILL, INTEGRAL) are not applicable for implants with diameter > 4.6mm and length > 14mm.
- Drilling guide (Ref. INGPPA) is only compatible with Axiom BL implants and the 1.5mm pointer drill.
- Taps should only be used in D1 bone.

Manual page author
Michael Turner
Technical manual editor
Reviews PDF manuals for structure, safety notes, and practical product details so readers can find the right information quickly.