Garden / Snow Removal
User Manual for Anykit 13.2-Inch Cordless Snow Shovel ASYSN0133540
Comprehensive user guide for the Anykit 13.2-Inch Cordless Snow Shovel (ASYSN0133540). Includes assembly, operation, battery charging, safety, and troubleshooting instructions.
Table of contents
Manual images
Click an image to enlargeQuick Guide from the Manual
The Anykit 13.2-Inch Cordless Snow Shovel (ASYSN0133540) is designed for clearing snow from sidewalks, steps, decks, and small driveways. Important: The unit requires two battery packs to operate. Always remove the battery pack before performing any assembly, adjustments, or maintenance. The optimal clearing depth is under 6 inches (15 cm).
Product Description
The snow shovel consists of the following main components:
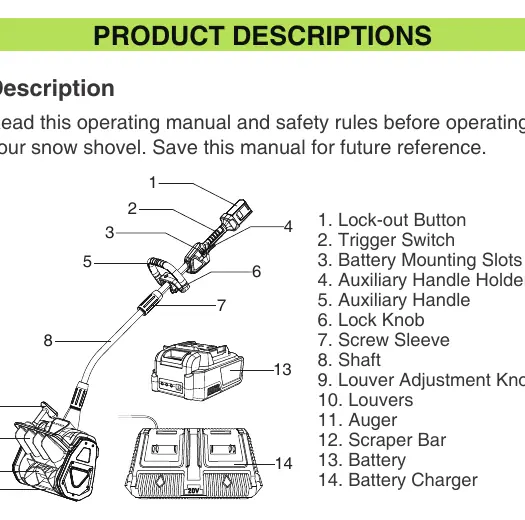
- Lock-out Button & Trigger Switch: Used to start the motor.
- Auxiliary Handle: Adjustable for comfortable operation.
- Shaft: Connects the handle assembly to the auger housing.
- Louver Adjustment Knob: Controls the direction of snow discharge (left, center, right).
- Auger & Scraper Bar: The working components that clear the snow.
- Battery Mounting Slots: Holds two battery packs.
Assembly and Adjustment
Before assembly, ensure the appliance is switched off and the battery is removed.
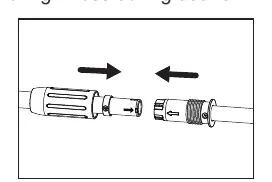
Connecting the Shaft
- Pull the snow shovel shaft out from the screw sleeve.
- Align the arrow on the shaft with the arrow on the coupler and push the shaft into the coupler.
- Tighten the screw sleeve securely.
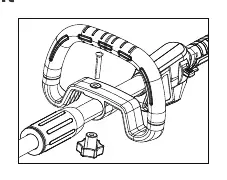
Mounting the Auxiliary Handle
- Remove the knob from the handle.
- Attach the auxiliary handle to the shaft.
- Set the handle to a comfortable position.
- Insert the bolt through the holes and tighten with the knob.
Operating Instructions
Starting the Snow Shovel:
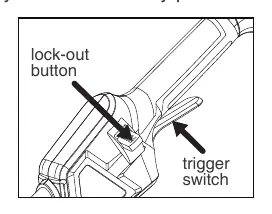
- Ensure both battery packs are inserted into the battery compartments.
- Press and hold the lock-out button.
- While holding the lock-out button, press and hold the trigger switch.
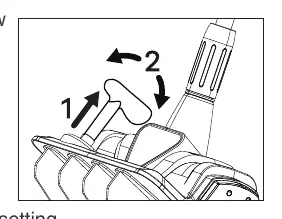
Adjusting Discharge Direction:
- Use the louver adjustment knob to change the direction of snow discharge.
- Pull up on the knob and turn it to the desired setting (left, center, or right).
- The maximum range is 60° (30° left or right).
Charging the Battery Pack
The battery pack features indicator lights to show remaining capacity:
- 3 Lights: 66% to 100%
- 2 Lights: 33% to 66%
- 1 Light: 0% to 33%
Use the provided charger. The charger light indicates status: Red for charging, Green for fully charged. Charge both battery packs at the same time to keep capacities balanced.
Maintenance and Storage
- Cleaning: Never use hands to clear a clogged rotor housing. Shut off the motor, remove the battery, wait 10 seconds for blades to stop, and use a clean-out tool.
- Storage: Remove the battery pack. Store in a dark, dry, frost-free, and well-ventilated place. Charge the battery to more than 66% before storage. Recharge every 3-6 months to prevent over-discharge.
Troubleshooting
If the snow shovel does not start, check if the batteries are secure and charged. If the machine shuts down unexpectedly, it may be overloaded or jammed; remove snow from the auger and allow the tool to cool down. If the scraper bar is worn, contact customer support at [email protected].
Safety Information
Always wear eye protection (ANSI Z87.1). Keep children and bystanders away. Do not use on gravel surfaces unless adjusted properly. Never use the snow shovel on rooftops, frozen lakes, or ice. If the tool strikes a foreign object, stop the motor, remove the battery, and inspect for damage before restarting.
Practical help
Common problems
The snow shovel does not start
Ensure both battery packs are installed and secure. Check if the battery has sufficient charge.
Unexpected shutdown during work
The machine may be overloaded or the auger jammed. Remove snow from the auger and reduce load intensity. Allow the tool to cool down.
Battery cannot be charged
The battery pack may have overheated. Allow it to cool down before attempting to charge.
Snow shovel leaves a thin layer
The scraper bar may be worn. Contact customer support at [email protected].
Before use
- Fully charge the battery pack before first use.
- Ensure the area is clear of stones, wires, and gravel.
- Wear eye protection, stout shoes, and long trousers.
- Check that all guards and shields are in place.
- Verify the discharge chute is properly positioned.
- Ensure both battery packs are installed.
Specs in practice
- Rated voltage
- DC 40V (requires two 20V batteries).
- Clearing width
- 13.2 inches (335 mm).
- Maximum snow intake height
- 8 inches (200 mm).
- Maximum throwing distance
- 26.5 feet (8 m).
Images and diagrams
- The product diagram identifies the lock-out button, trigger switch, battery mounting slots, auxiliary handle, and auger assembly.
- The battery indicator shows 66-100% (3 lights), 33-66% (2 lights), and 0-33% (1 light).
Model compatibility
- Requires two battery packs to operate.
- Optimal clearing depth is under 6 inches.

Manual page author
Emily Carter
User documentation editor
Prepares concise manual descriptions and highlights the most useful setup, operation, and maintenance information for readers.