Home Appliances / Washing Machines
Arrow 16GA 3-in-1 Flooring Nailer and Stapler
Professional 3-in-1 flooring tool designed for 15.5GA staples and 16GA L-cleats or T-cleats. Features adjustable base for various floor thicknesses and ergonomic design.
Table of contents
Product Overview
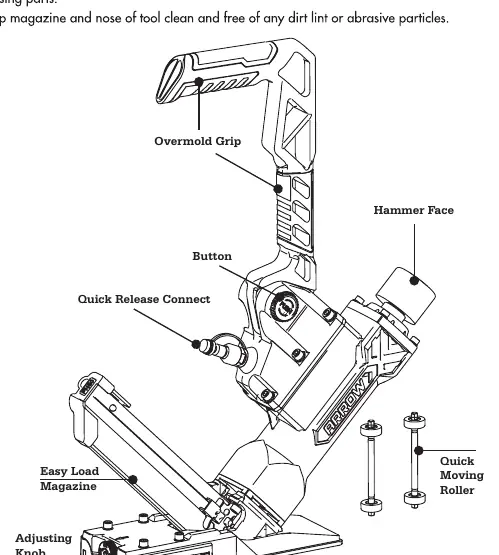
The Arrow 16GA 3-in-1 Flooring Nailer and Stapler is a versatile tool engineered for professional flooring installation. It is compatible with 15.5GA flooring staples, 16GA L-cleats, and 16GA T-cleats, ranging from 1-1/2 to 2 inches (38-50mm) in length. The tool features an adjustable base to accommodate 5/8 and 3/4 inch flooring thicknesses, a comfortable overmold grip, and a quick-release nosepiece for efficient jam clearing.
Technical Specifications
- Capacity: 100 fasteners
- Operating Pressure: 70-100 PSI (5-7 bar)
- Air Inlet: 1/4 inch N.P.T.
- Weight: 9.52 lbs (4.32 kg)
- Dimensions: 18.23 x 3.86 x 12.24 inches
Safety Guidelines
Always wear safety glasses and ear protection during operation. Ensure the tool is disconnected from the air supply before loading fasteners, performing maintenance, or clearing jams. Never use oxygen or combustible gases as a power source. Keep the tool pointed away from yourself and others at all times. Operate only in well-lit, clean, and ventilated areas to minimize exposure to dust and debris.
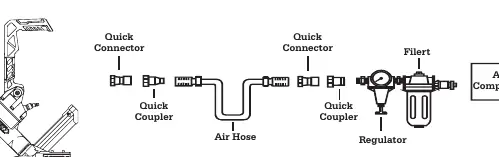
Operating Instructions
Connect the tool to a clean, dry, and regulated air supply. Before use, test the driving depth on a sample piece of wood and adjust the regulator if necessary. To load, pull the pusher to the tail of the magazine, insert fasteners, and release the pusher. Place the tool on the work surface, press the base firmly, and strike the hammer face to drive the fastener.
Maintenance and Troubleshooting
Regular lubrication is essential for optimal performance. Add a few drops of pneumatic tool oil through the air inlet before operation or after one hour of continuous use. Keep the magazine and nose clean. If the tool jams, disconnect the air supply, remove the cover plate, and clear the obstruction. If the tool leaks air or lacks power, check the O-rings, air pressure settings, and ensure the exhaust channel is free of debris.
Related manuals
Related manuals from the same brand or category.

Manual page author
David Miller
Documentation analyst
Organizes user manual content into clear summaries, with attention to model details, product context, and everyday usability.