Electronics / Gaming Consoles
Battery Upgrade Guide for AtGames Sega Genesis Portable
A step-by-step DIY guide for upgrading the battery of your AtGames Sega Genesis Portable to a 1500mAh capacity. Includes safety warnings, ribbon cable modification instructions, and installation tips.
Table of contents
Manual images
Click an image to enlargeImportant Safety Information
Warning: Modifying Lithium-ion batteries is dangerous. Improper handling can lead to battery swelling, leaking, or explosion. Always handle batteries with extreme care. This guide involves cutting and modifying electrical components; proceed at your own risk.
Required Materials
- 1500mAh NP-60 Lithium-ion battery
- Spare ribbon cables (e.g., salvaged from an old printer)
- Very sharp exacto knife
- Clear/scotch tape
- Optional: Illuminated head magnifier for precision work
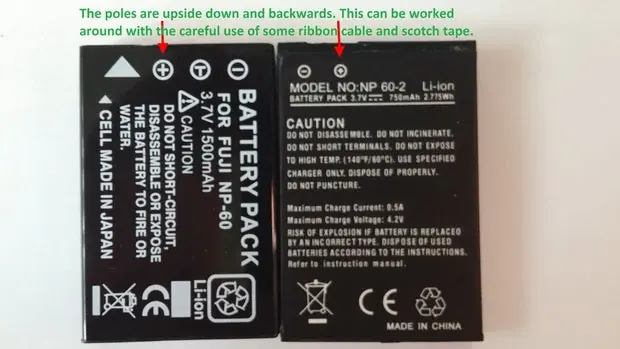
Battery Selection
You must find a battery that matches the replacement type (NP-60). Note that replacement battery terminals may be upside down or backwards compared to the original. This modification uses ribbon cable and tape to create custom jumpers to bridge the connection.
Modification Steps
Step 1: Prepare Ribbon Cables
Gather spare ribbon cables. Try to find cables with undamaged ends, as they are easier to work with. Safely exposing the metal surface on a ribbon cable is difficult.
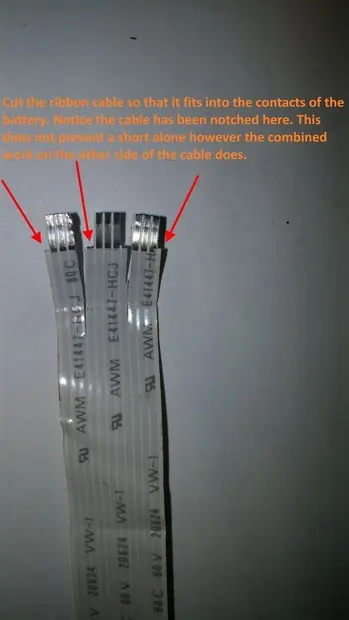
Step 2: Cut and Notch the Cable
Carefully cut the ribbon cable so it fits into the battery contacts. Notch the cable to ensure it fits snugly into the plastic surrounding the contacts. Pay close attention to the gaps between the wires to avoid short circuits. There is very little insulation to cut away, so precision is key.
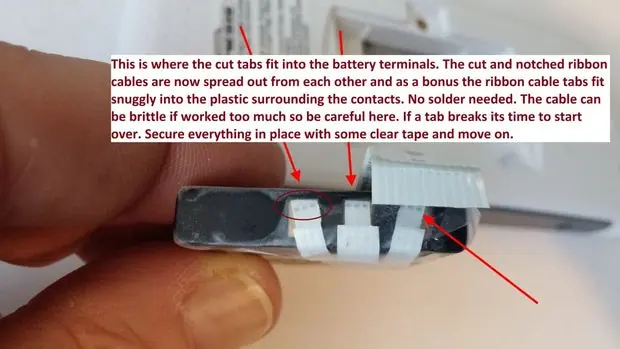
Step 3: Connect to Battery Terminals
Spread out the cut and notched ribbon cable tabs. They should fit snugly into the plastic surrounding the battery contacts. No soldering is required. Secure everything in place with clear tape. If a tab breaks, you must start over.
Step 4: Align and Expose Contacts
Wrap the ribbon cable tightly around the back of the replacement battery. Line up the contacts and mark the area on the ribbon cable that needs to be exposed. Use a sharp exacto knife to carefully remove layers of insulation. Leave as many unexposed contacts or wires as possible to prevent short circuits. Be careful not to scrape too hard, as it is easy to puncture the wire.
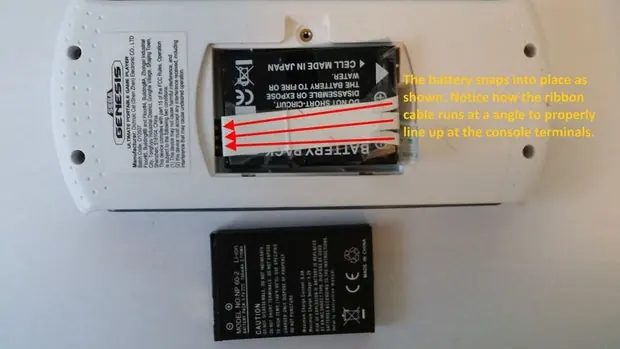
Step 5: Final Installation
Tape the ribbon cable into place. The end of the ribbon cable should wrap around to the other side of the battery, which helps put pressure on the battery to keep it in place. Ensure the ribbon cable runs at an angle to properly line up with the console terminals.
Testing the Upgrade
Once installed, test the new battery. If the modification was successful, the device should hold a charge for up to 6 hours or more, compared to the original 2 hours or less.
Practical help
Common problems
Battery terminals do not align
Use ribbon cable and clear tape to create custom jumpers to bridge the connection.
Short circuit risk
Carefully remove insulation only where contacts are needed; leave unexposed areas to prevent shorts.
Brittle ribbon cable
Handle carefully; if a tab breaks, you must start over with a new cable.
Scraping too deep
Be gentle when removing insulation to avoid putting a hole in the wire.
Before use
- Ensure you have a 1500mAh NP-60 Lithium-ion battery
- Gather spare ribbon cables (e.g., from an old printer)
- Prepare a very sharp exacto knife
- Have clear/scotch tape ready
- Ensure good lighting or use a head magnifier
Images and diagrams
- The ribbon cable acts as a bridge between the battery terminals and the console contacts.
- Notching the cable helps it fit snugly into the plastic housing.
Model compatibility
- Modification is intended for the AtGames Sega Genesis Portable.
- Requires specific battery type NP-60.

Manual page author
Michael Turner
Technical manual editor
Reviews PDF manuals for structure, safety notes, and practical product details so readers can find the right information quickly.