Assembly Guide for Avantco 2 Bulb Food Warmers
A concise assembly guide for Avantco 2 Bulb Food Warmers. Includes step-by-step instructions for frame assembly and bulb installation for models 177W62, 177W62BLK, 177W62GLD, 177W62GRN, 177W62RD, and 177W62SS.
Quick answers from the manual
Quick answer
- This document provides assembly instructions for the Avantco 2 Bulb Food Warmer. It guides the user through connecting the lamp frames and installing the bulbs. p. 1
Key actions
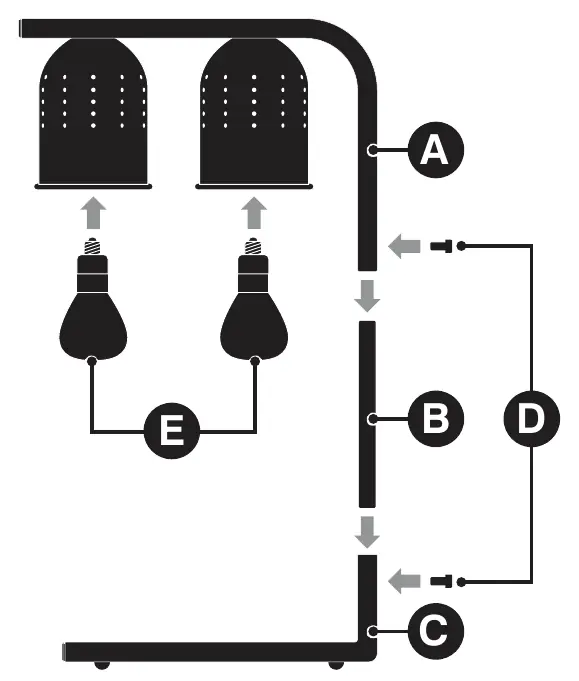
- Assemble the lamp frames by inserting the Middle Lamp Frame (B) into the Bottom Lamp Frame (C) and the Top Lamp Frame (A) into the Middle Lamp Frame (B), securing both with Screws (D). p. 1
First start
- Place the unit on a stable surface, assemble the frames, screw in the bulbs, and plug into an appropriate socket. p. 1
Where to find it in the PDF
- Assembly Guide p. 1
Table of contents
Quick Assembly Guide
This document provides the necessary steps to assemble your Avantco 2 Bulb Food Warmer. Ensure you have all parts (A, B, C, D, E) before beginning. The unit must be placed on a stable, flat surface before operation.
Assembly Instructions
- Prepare the base: Place the Bottom Lamp Frame (C) on a stable, flat surface.
- Assemble the middle section: Insert the Middle Lamp Frame (B) into the Bottom Lamp Frame (C) and secure it using the provided Screw (D).
- Assemble the top section: Insert the Top Lamp Frame (A) into the Middle Lamp Frame (B) and secure it with the remaining Screw (D).
- Install bulbs: Screw the provided shatterproof bulbs (E) into the sockets.
- Power on: Plug the power cord into an appropriate electrical socket and switch the unit on to verify the bulbs are functioning.
Usage
Once the assembly is complete and the bulbs are installed, the appliance is ready for use. Ensure the unit is placed on a heat-resistant, stable surface during operation.
Manufacturer information
Avantco Equipment
Practical help
Before use
- Ensure the surface where the unit will be placed is stable and flat.
- Verify all parts (A, B, C, D, E) are included in the box.
- Ensure the power cord is accessible to an appropriate electrical outlet.
- Confirm the bulbs are shatterproof (included).
Images and diagrams
- The diagram illustrates the vertical assembly of the lamp frames.
- Parts A, B, and C connect sequentially from top to bottom.
- Screw D is used to secure the frame connections.
- Part E represents the bulbs to be installed into the sockets.

Manual page author
Michael Turner
Technical manual editor
Reviews PDF manuals for structure, safety notes, and practical product details so readers can find the right information quickly.