Furniture / Sofas & Couches
Bed Bath And Beyond 1821-WT1 Wall Sconce User Manual
Quick guide for installing and operating the Bed Bath And Beyond 1821-WT1 wall sconce. This manual covers both plug-in and hardwired installation methods, wiring diagrams, and assembly steps.
Table of contents
Manual images
Click an image to enlargeQuick Guide from the Manual
This document provides assembly and installation instructions for the Bed Bath And Beyond 1821-WT1 wall sconce. The fixture supports two installation methods: Plug-in (using a wall outlet) or Hardwired (connecting directly to a junction box). Ensure all installation work is performed by an accredited professional. Always shut off the power supply at the fuse or circuit breaker before beginning.
Installation Preparation
Before starting, carefully remove the fixture from the carton and locate the yellow bag containing all parts. Ensure you have the necessary tools, including a screwdriver and a drill. Verify the installation method you intend to use, as the mounting plates differ between the plug-in and hardwired options.
Installation Method 1: Plug-in
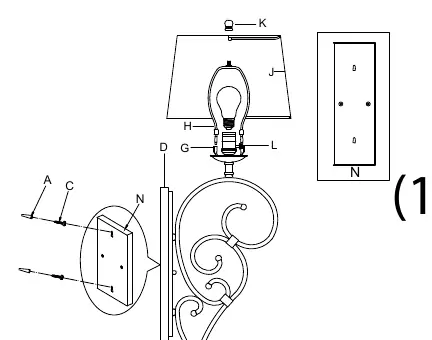
- Ensure the mounting plate (N) is attached to the backplate (D).
- Hold the fixture against the wall to determine the placement. Ensure it is horizontal and perpendicular to the ground.
- Mark the keyhole distance on the wall, drill holes, and insert plastic screw anchors (A).
- Insert mounting screws (C) into the anchors, leaving 2-3mm of the threads exposed.
- Hang the fixture by hooking the mounting plate (N) onto the screws (C).
- Proceed to the assembly section.
Installation Method 2: Hardwired
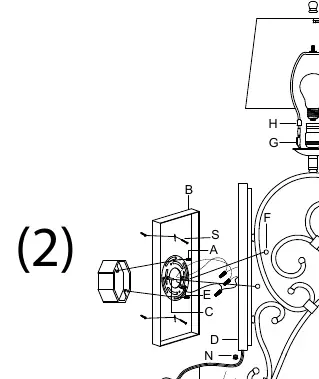
- Remove the mounting plate (N) from the backplate (D) and install the mounting plate (B) instead.
- Hold the mounting plate (B) against the junction box and mark the installation holes.
- Drill holes, insert plastic anchors, and secure the mounting plate (B) to the junction box using mounting screws (A).
- Trim the plug from the cord (M) using wire cutters, leaving 8-10 inches of cord for wiring.
- Pull the cord through the hole in the bottom of the backplate (D) and plug the hole with the stopper (N).
- Connect the wires as described in the wiring section.
- Secure the backplate (D) to the mounting strap (B) using decorative nuts (F).
Wiring Instructions
If hardwiring the fixture, follow these steps:
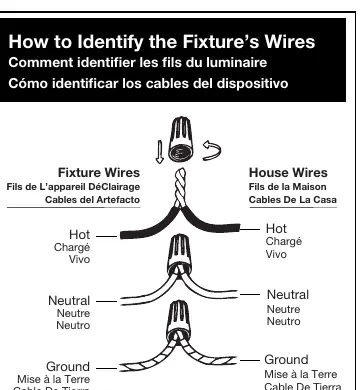
- Hot to Hot: Connect the fixture's hot wire (smooth, black, or transparent with black inner thread) to the house hot wire.
- Neutral to Neutral: Connect the fixture's neutral wire (ribbed, white, or transparent with white inner thread) to the house neutral wire.
- Ground to Ground: Connect the fixture's ground wire (green, copper, or transparent with green inner thread) to the house ground wire.
- Use wire connectors to secure the pairs, ensuring all twists are in the same direction.
- If no house ground wire exists, wrap the fixture's ground wire around the ground screw (E) on the mounting bracket.
Assembly
- Unscrew the finial (K) from the harp fitter (H) and set it aside.
- Place the harp fitter (H) into the saddle (G) until the caps slide down.
- Install a light bulb (not included) according to the fixture's specifications. Do not exceed the maximum recommended wattage.
- Place the cloth shade (J) on the top thread of the harp fitter (H) and secure it with the finial (K).
- If using the plug-in method, plug the cord into the nearest outlet.
- Twist the knob (L) clockwise to turn the fixture on or off.
Safety Warnings
- All installation work should be done by an accredited professional.
- Always shut off the power supply at the fuse or circuit breaker before starting.
- Use only the specified bulbs and do not exceed the maximum wattage.
Practical help
Common problems
Fixture does not turn on
Ensure the bulb is installed correctly and not exceeding the max wattage. Check that the knob (L) is turned clockwise. Verify the power supply at the outlet or junction box.
Wiring confusion
Identify wires by texture: Hot is smooth/black, Neutral is ribbed/white, Ground is green/copper/bare metal.
Before use
- Shut off power at the circuit breaker.
- Remove old fixture and mounting strap.
- Identify installation method (Plug-in vs. Hardwire).
- Ensure you have a screwdriver and drill.
- Verify bulb wattage does not exceed the maximum recommended.
Specs in practice
- Neutral Wire
- Completes the circuit (White, Ribbed, or Transparent with white inner thread).
Images and diagrams
- Diagram 1: Illustrates the plug-in installation process using mounting plate (N).
- Diagram 2: Illustrates the hardwired installation process using mounting plate (B) and junction box.
Model compatibility
- Requires professional installation for hardwiring.
- Compatible with dimmers if used with dimmable bulbs.

Manual page author
Emily Carter
User documentation editor
Prepares concise manual descriptions and highlights the most useful setup, operation, and maintenance information for readers.