HVAC / Heaters & Fireplaces
User Manual for Beldray 12V Wet and Dry Vac
Quick guide for the Beldray 12V Wet and Dry Vac. Learn how to install the wall bracket, operate the vacuum, empty the dust container, and maintain your device for optimal performance.
Table of contents
Manual images
Click an image to enlargeQuick guide from the manual
Before using your Beldray 12V Wet and Dry Vac for the first time, it must be charged for 24 hours. Subsequent charges will take between 10 and 12 hours. Always ensure the dust container and filter are correctly fitted before use. This appliance is designed for domestic use only and should not be used to pick up flammable liquids, hot ashes, or sharp objects like glass or nails.
Description of Parts
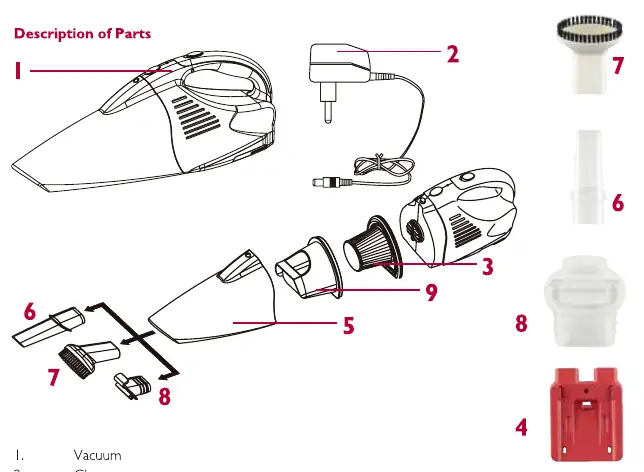
- 1. Vacuum
- 2. Charger
- 3. Filter
- 4. Wall Mounted Stand
- 5. Dust Bin
- 6. Crevice Nozzle
- 7. Round Brush
- 8. Rubber Nozzle
- 9. Waterproof Shelter
Installing the Wall Bracket
The wall bracket should be located close to a mains socket. Ensure there are no electrical, plumbing, or gas supplies under the wall surface before drilling. Hold the bracket to the wall, mark the holes, drill, and attach the bracket securely using appropriate fixings. Store the attachments on the wall bracket and slide the cleaner onto the bracket ensuring it engages with the supporting ribs.

Using the Vacuum Cleaner
To charge, connect the power adaptor to the rear of the cleaner or via the wall bracket. The indicator light will illuminate red while charging and green when fully charged. To use, remove the charging lead and slide the On/Off switch forward. Use the crevice tool for narrow openings, the brush attachment for upholstery, and the rubber nozzle for spills.
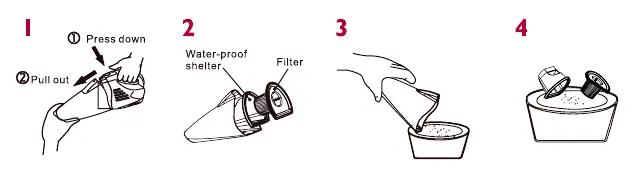
Emptying the Dust Container
The dust container must be emptied regularly, especially when suction power is reduced or the dust level reaches the Max mark. Hold the vacuum with the dust container facing downwards, press the release button, and remove the container from the main unit. Remove the filter assembly and waterproof cover, then empty the bin. Refit the cover and filter assembly after cleaning if necessary.
Cleaning and Maintenance
The main body of the vacuum must not be immersed in water. The bin, cover, and filter can be cleaned using cold water. Rinse the bin and filter once a month and allow them to dry completely before refitting. Do not use detergent, solvents, or abrasive cleaning agents.
Troubleshooting
- Cleaner does not charge: Ensure the connector is correctly fitted to the vacuum cleaner and the power is switched on.
- Poor suction: Remove the nozzle and clear any obstructions, empty the dust container, or clean the filter.
Technical Specification
Mains supply: 230V 50HzBattery: 12V 2.6Ah Sealed Lead Acid
Battery Removal and Disposal
The vacuum contains a sealed lead acid battery. To remove it at the end of the product's life, unscrew the 2 screws holding the battery cover on the base of the unit, slide the cover off, and unclip the live and neutral terminal connections. Dispose of the battery correctly through your local authority's designated sites.
Manufacturer information
Beldray
Practical help
Common problems
Cleaner does not charge
Ensure the connector is correctly fitted to the vacuum cleaner and the power is switched on.
Poor suction
Remove the nozzle and remove any obstructions, empty the dust container, or clean the filter.
Before use
- Remove the vacuum from the box.
- Remove all packaging.
- Charge the vacuum for 24 hours before first use.
- Ensure the dust container and filter are in position.
Specs in practice
- Mains supply
- 230V 50Hz
Images and diagrams
- The vacuum includes a crevice tool for awkward places and a brush tool for upholstery.
- The wall-mounted stand allows for easy storage and charging.
Model compatibility
- For domestic use only.
- Do not use to pick up flammable liquids, hot ashes, or sharp objects like glass or nails.

Manual page author
Emily Carter
User documentation editor
Prepares concise manual descriptions and highlights the most useful setup, operation, and maintenance information for readers.