Computers / Crypto Miners
User Manual for Bitmain Antminer D7 Server
Quick guide for the Bitmain Antminer D7 server. Learn how to set up, configure mining pools, monitor performance, update firmware, and manage network settings.
Table of contents
Manual images
Click an image to enlargeQuick guide from the manual
The Bitmain Antminer D7 is a high-performance server designed for mining. This guide provides essential steps for installation, network configuration, and ongoing maintenance. Ensure the server is connected to an earthed mains socket and that both power inputs on the APW12 power supply are connected simultaneously for the unit to operate.
Server Components
The D7 server features a controller board and an integrated APW12 power supply. The controller front panel includes:
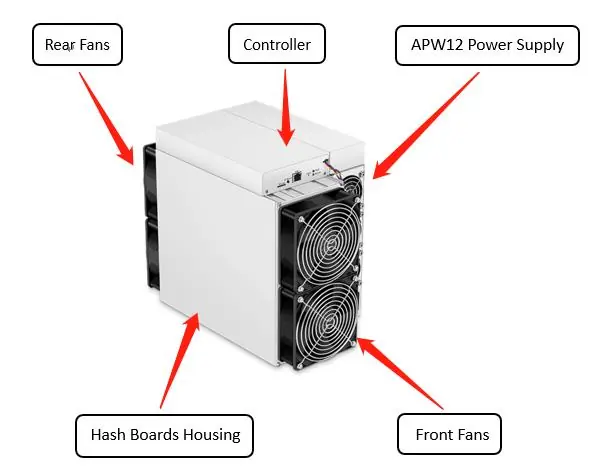
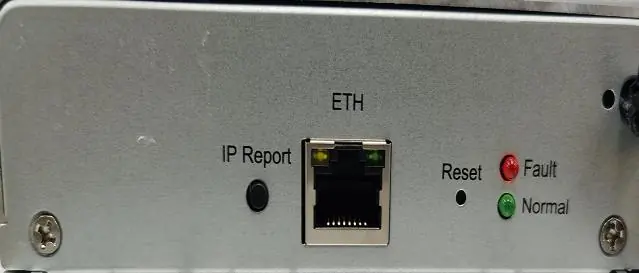
- IP Report Pushbutton: Used to identify the server's IP address on the network.
- Ethernet Connector: For network connectivity.
- Reset Button: Used to restore initial settings.
- Status Indicators: Includes a Fault indicator (red) and a Normal operation indicator (green).
- SD Card Slot: Used for firmware or system maintenance.
Setting Up the Server
To configure the server on your network, follow these steps:
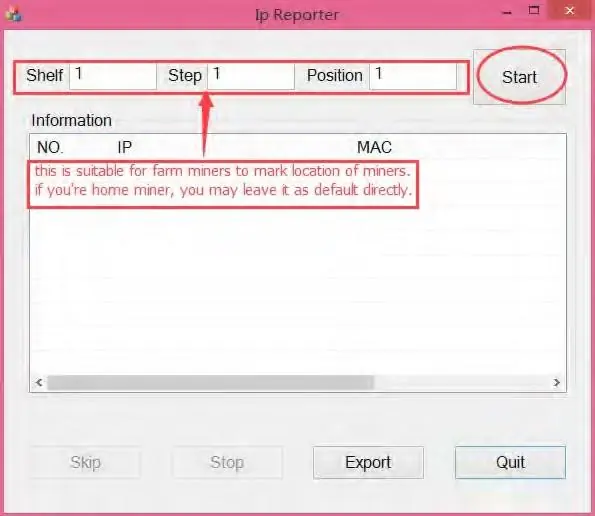
- Download the IPReporter tool from the official Bitmain support website (Windows only).
- Extract the file and run IPReporter.exe as an Administrator.
- Select your preferred option (Shelf, Step, Position for farm setups, or Default for home use) and click Start.
- On the server controller board, press and hold the IP Report button for approximately 5 seconds until it beeps.
- The server's IP address will appear on your computer screen.
- Enter the IP address into your web browser.
- Log in using root for both the username and password.
- In the Protocol section, you can assign a static IP address if required, then click Save.
Configuring the Server
To begin mining, you must configure your mining pools:
- Navigate to the Settings tab in the web interface.
- Enter the Mining Address, Worker Name, and Password for your chosen pools.
- The server supports up to three pools with decreasing priority. The system will automatically switch to lower priority pools if higher priority ones are offline.
- Click Save to apply the configuration.
Monitoring Your Server
Use the Dashboard tab to monitor the server's status. Key metrics include:
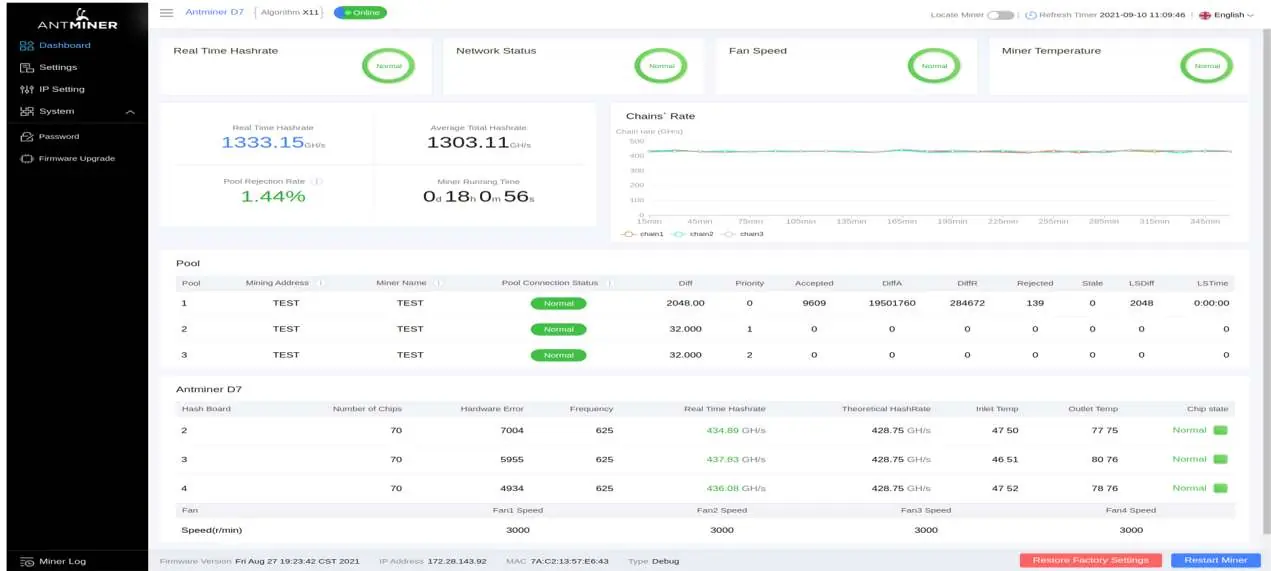
- Real-time Hashrate: Displays the performance of each hash board.
- Temperature: Monitor Inlet and Outlet temperatures. The server will stop if the outlet temperature reaches 75°C.
- Chip State: A green icon indicates normal operation, while a red icon indicates an abnormality.
Administering Your Server
Regular maintenance ensures optimal performance:

- Checking Firmware: View the current firmware version at the bottom of the dashboard.
- Upgrading Firmware: Go to System, then Firmware Upgrade. Select your upgrade file and click Update. Ensure the server remains powered during this process.
- Modifying Password: Change your login credentials under the Password tab in the System menu.
- Restoring Initial Settings: If needed, turn on the server, let it run for 5 minutes, then press and hold the Reset button on the controller panel for 10 seconds.
Environmental Requirements
To ensure longevity and performance, operate the server within these parameters:
- Operating Temperature: 0 to 40°C.
- Operating Humidity: 10% to 90% RH (non-condensing).
- Altitude: Below 2000m.
- Environment: Keep the server away from industrial pollution sources (smelters, coal mines, chemical industries) and high-power electromagnetic interference (transformers, high-voltage lines).
Official resources from the manual
Practical help
Common problems
Server does not run
Ensure both power supply sockets on the APW12 unit are connected simultaneously.
Overheating error
Check if the outlet temperature has reached 75°C. The system will stop running and display an error in the kernel log.
Cannot find server IP
Use the IPReporter tool on a Windows computer and press the IP Report button on the controller board for 5 seconds.
Before use
- Ensure the server is connected to an earthed mains socket.
- Verify that two power cords are available for the APW12 power supply.
- Download the IPReporter tool on a Windows computer.
- Ensure the operating environment is free of industrial pollution and dust.
- Check that the server is placed away from high-power radio transmitters and transformers.
Specs in practice
- Power Consumption
- 3148 Watt at 25°C
- Operating Temperature
- 0-40°C
Images and diagrams
- Control Panel: Shows the location of the IP Report button, Ethernet port, Reset button, and status LEDs.
- Power Supply: Shows the two power input sockets on the APW12 unit.
Model compatibility
- IPReporter tool is supported by Microsoft Windows only.

Manual page author
David Miller
Documentation analyst
Organizes user manual content into clear summaries, with attention to model details, product context, and everyday usability.