Electronics / Routers
Calex Smart 1080p Indoor IP Camera
Comprehensive setup and operation guide for the Calex Smart 1080p wireless indoor camera. Learn how to connect to WiFi, manage settings, and ensure safe usage.
Table of contents
Product Overview
The Calex Smart 1080p Indoor IP Camera is a wireless security solution designed for indoor monitoring. It features high-definition video capture, local storage support via microSD card, and seamless integration with the Calex Smart app. The device is powered by a 5V DC adapter and is designed for easy installation and configuration within a 2.4GHz WiFi network environment.
Getting Started
Before beginning the installation, ensure you have your WiFi network name and password ready. The camera requires a 2.4GHz WiFi connection; it is not compatible with 5GHz networks. Download the Calex Smart app from the Google Play Store or Apple App Store. Create an account if you are a first-time user. Power on the device, wait for the indicator light to blink blue, and follow the in-app instructions to add the camera. You will need to scan a QR code displayed on your phone screen using the camera lens to complete the pairing process.
Understanding Status Lights
The status light on the front of the camera provides immediate feedback on the device's operational state:
- Solid Red: The camera network is abnormal.
- Blinking Red: The camera is awaiting WiFi connection.
- Solid Blue: The camera is running correctly.
- Blinking Blue: The camera is currently connecting to the network.
Safety and Maintenance
This device is intended for indoor use only. It is classified as Safety Class II, meaning it is double-insulated and does not require an earthed socket. Always use the original power adapter provided with the product. If the cable or the device itself appears damaged, disconnect it from the power source immediately and discontinue use. Do not attempt to open or repair the device yourself; maintenance should only be performed by authorized technicians. To disconnect the device from power, simply pull the plug from the socket.
Disposal and Warranty
The product is constructed from high-quality materials that can be recycled. Please adhere to local regulations regarding the disposal of electronic waste and do not discard the unit in standard household trash. Any unauthorized modifications or changes to the product will void the manufacturer's warranty. The manufacturer is not liable for damages resulting from incorrect use of the device.
Manufacturer information
Calex
Practical help
Common problems
Camera not connecting to WiFi
Ensure you are using a 2.4GHz network, not 5GHz. Check that your WiFi signal is strong and the password is correct.
Device not in pairing mode
Press and hold the reset button for 5 seconds until you hear a sound and the indicator light starts blinking.
Before use
- Write down your WiFi network name and password
- Ensure a strong WiFi signal is available
- Download the Calex Smart app
- Verify the power source is 5V DC
- Check that the camera is for indoor use only
Specs in practice
- WiFi Frequency
- Supports 2.4GHz networks only.
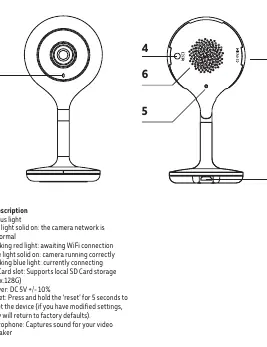
Images and diagrams
- 1: Status light for network and connection feedback
- 2: MicroSD card slot for local storage
- 3: Power input port
- 4: Reset button for factory defaults
- 5: Microphone for audio capture
Model compatibility
- Requires 2.4GHz WiFi network
- Compatible with Calex Smart app on iOS and Android

Manual page author
Emily Carter
User documentation editor
Prepares concise manual descriptions and highlights the most useful setup, operation, and maintenance information for readers.