General / Other Manuals
User Guide for Chicco KidFit ZIPO PLUS 2-in-1 Booster
Comprehensive user guide for the Chicco KidFit ZIPO PLUS 2-in-1 Booster. Includes assembly instructions, installation steps for High-Back and Backless modes, safety guidelines, and maintenance tips.
Quick answers from the manual
Quick answer
- The Chicco KidFit ZIPO PLUS is a 2-in-1 booster seat for children 4 years and older, weighing 40-110 lbs and 38-57 inches tall. It can be used in High-Back mode (40-100 lbs) or Backless mode (40-110 lbs). p. 4, 10, 11
Key actions
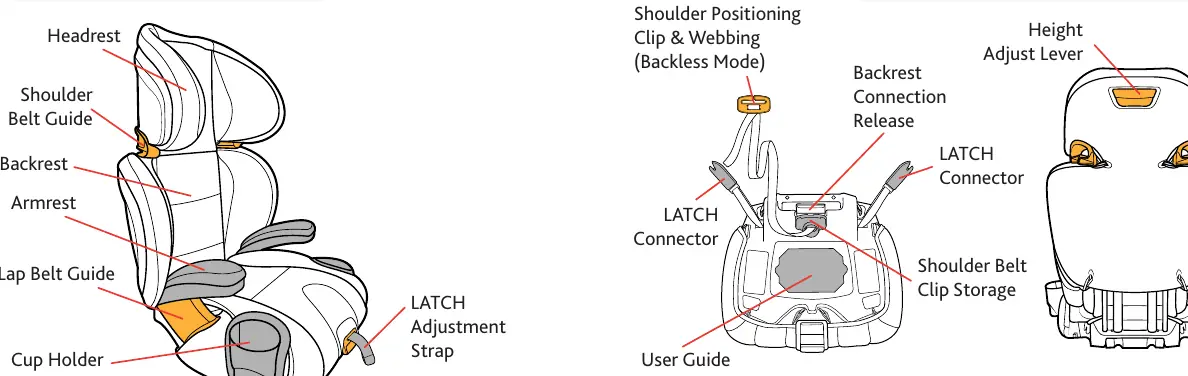
- Assemble the seat by attaching the cup holder, armrests, and backrest. p. 26, 28, 30
- Install in the vehicle using the vehicle's 3-point lap-shoulder belt. p. 34
First start
- Assemble the booster seat components (cup holder, armrests, backrest) before installation. p. 26, 28, 30
Problems and fixes
Vehicle head restraint interference
Raise or remove the vehicle head restraint, or switch to Backless Mode.
p. 34Technical specifications
| Parameter | Value | Meaning | Pages |
|---|---|---|---|
| Weight Capacity | 40-110 lbs | Total weight range for booster seat usage. | p. 4 |
| Height Capacity | 38-57 inches | Total height range for booster seat usage. | p. 4 |
Where to find it in the PDF
- Assembly p. 26, 28, 30
- High-Back Mode p. 16, 34, 38
- Backless Mode p. 18
Table of contents
Manual images
Click an image to enlargeQuick guide from the manual
The Chicco KidFit ZIPO PLUS is a 2-in-1 booster seat designed for children who can sit relatively still in a seat belt. Before use, ensure your child meets the following requirements:
- Age: At least 4 years old.
- Weight: 40 to 110 lbs (18 to 50 kg).
- Height: 38 to 57 inches (97 to 145 cm).
Important: This seat must be used with a vehicle's 3-point lap-shoulder belt. Never use it with a lap-only belt. It is not certified for aircraft use.
Assembly
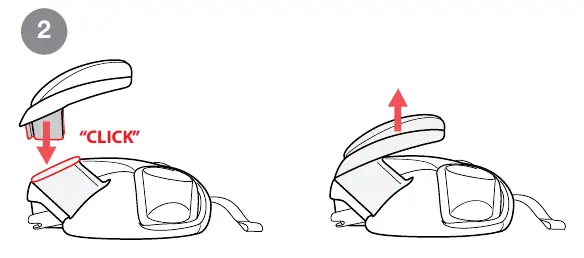
Before installing the booster seat in your vehicle, assemble the components:
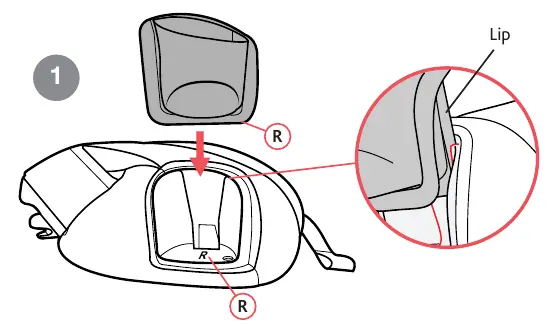

- Cup Holder: Match the letter (L or R) on the cup holder with the corresponding letter on the booster seat bottom. Insert until the lip fits behind the groove.
- Armrests: Press firmly onto the booster seat bottom until they click into place. Pull up to ensure they are secure.
- Backrest: Hook the backrest over the seat bar hinge on the seat bottom. Slide the fabric panel between the cover and the frame, then rotate the backrest up until it clicks into an upright position.
High-Back Mode
Use High-Back Mode for children weighing 40-100 lbs (18-45.3 kg).
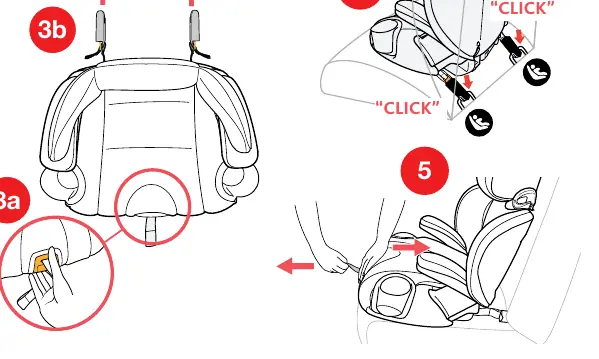
- Installation: Place the seat against the vehicle seat back. If the vehicle head restraint interferes, raise or remove it if possible.
- LATCH (Optional): You may use LATCH connectors to secure the booster seat itself. Pull the LATCH release handle to extend connectors, attach to vehicle lower anchors, and pull the adjustment strap to snug the seat.
- Securing Child: Place the child in the seat. Ensure the shoulder belt guide is at or slightly above the child's shoulders. Route the lap belt under the 1st armrest, and both the lap and shoulder belt under the 2nd armrest. Buckle the seat belt. Slide the shoulder belt through the orange shoulder belt guide.
Backless Mode
Use Backless Mode for children weighing 40-110 lbs (18-50 kg).
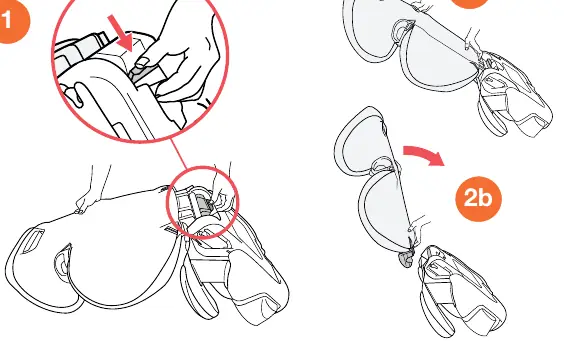
- Removing Backrest: Turn the seat over, press the backrest connection release, and rotate the seat back to remove it from the bottom. Tuck the fabric panel into the seat surface.
- Installation: Place the booster on the vehicle seat. LATCH installation is optional and follows the same procedure as High-Back mode.
- Securing Child: Place the child in the seat. Route the lap belt under the 1st armrest, and both the lap and shoulder belt under the 2nd armrest. Buckle the seat belt.
- Shoulder Belt Clip: Use the shoulder positioning clip to ensure the shoulder belt lays flat and snug across the child's chest. Adjust the clip height as needed.
Vehicle Information
This booster seat must be installed in a forward-facing vehicle seat equipped with a 3-point lap-shoulder belt. Do not use in seats with active frontal airbags unless they can be turned off. Never use with motorized shoulder belts, door-mounted belts, or lap-only belts.
Cleaning and Maintenance
- Fabrics: Spot-clean or hand wash with mild soap and water. Machine wash in cold water on a delicate cycle. Hang to dry.
- Foam Insert: Hand rinse and air dry.
- Plastics: Sponge clean with warm water and mild soap. Towel dry.
- LATCH Hardware: Sponge clean with warm water. Do not use soaps or lubricants.
Practical help
Common problems
Vehicle head restraint interferes with booster
Raise or remove the vehicle head restraint if possible. If not, use the seat in Backless Mode.
Shoulder belt does not lay flat across child's chest
Adjust the backrest height (High-Back Mode) or the shoulder positioning clip (Backless Mode).
LATCH connectors are difficult to release
Pull firmly on the LATCH release handle while pulling the booster seat away from the vehicle seat.
Before use
- Verify child is at least 4 years old.
- Verify child weight is 40-110 lbs.
- Verify child height is 38-57 inches.
- Ensure vehicle seat has a 3-point lap-shoulder belt.
- Check that the vehicle seat is forward-facing.
Specs in practice
- High-Back Mode
- Configuration for children 40-100 lbs.
- Backless Mode
- Configuration for children 40-110 lbs.
Images and diagrams
- Page 9: Components overview.
- Page 15-17: Assembly steps for cup holder, armrests, and backrest.
- Page 20: High-Back installation steps.
- Page 25-26: Removing backrest for Backless mode.
- Page 28-29: Backless installation steps.
Model compatibility
- Not certified for aircraft use.
- Must use 3-point seat belt (lap and shoulder).
- Never use with lap-only belt.
- Do not use in front seat with active frontal airbag.

Manual page author
David Miller
Documentation analyst
Organizes user manual content into clear summaries, with attention to model details, product context, and everyday usability.