Electronics / Amplifiers Receivers
Crown ALW 100T Washing Machine User Manual
Quick guide for the Crown ALW 100T washing machine. Includes installation steps, program selection, maintenance, and troubleshooting fault codes.
Table of contents
Manual images
Click an image to enlargeQuick Guide
This guide provides essential information for operating your Crown ALW 100T washing machine. Before first use, ensure all transit bolts are removed to prevent damage. The machine has a maximum capacity of 5kg and a spin speed of 1000 RPM.
Installation
Proper installation is critical for the machine's longevity and performance.
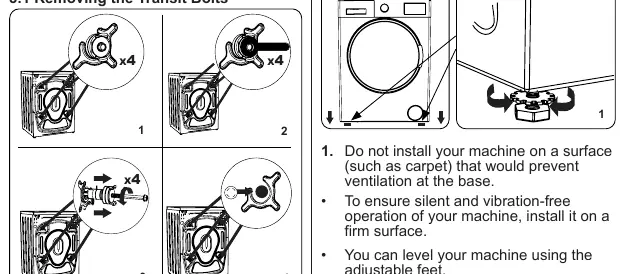
- Transit Bolts: You must remove the 4 transit bolts and rubber spacers from the rear of the machine before operation. Failure to do so will cause heavy vibration and potential malfunction.
- Leveling: Install the machine on a firm, flat surface. Use the adjustable feet to level the machine; tighten the locking nuts once level. Do not use cardboard or wood to level the machine.
- Water Connection: Connect the water inlet hose to a 3/4" threaded tap. Ensure the hose is not kinked or crushed.
- Electrical: Connect to a 220-240V, 50Hz earthed socket. Do not use extension leads.
Control Panel
The control panel allows you to select programs and adjust settings.
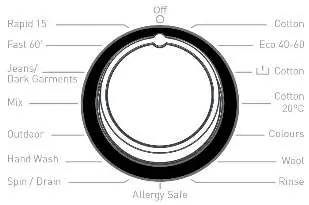
- Program Dial: Turn to select the desired wash cycle (e.g., Cotton, Eco 40-60, Fast 60').
- Electronic Display: Shows remaining time, temperature, and spin speed.
- Buttons: Use these to adjust water temperature, spin speed, and set a delayed start.
Using Your Washing Machine
Follow these steps for a standard wash:
- Sort laundry by type and dirtiness.
- Open the door and spread laundry evenly in the drum.
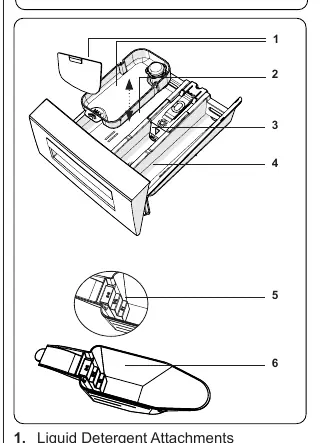
- Add detergent to the appropriate compartment in the drawer (Compartment II for main wash).
- Select the program using the dial.
- Adjust temperature or spin speed if necessary.
- Press the Start/Pause button.
Cleaning and Maintenance
Regular maintenance ensures optimal performance.
- Water Inlet Filters: Clean every 2 months. Unscrew the hose and use pliers to pull out the filter for cleaning.
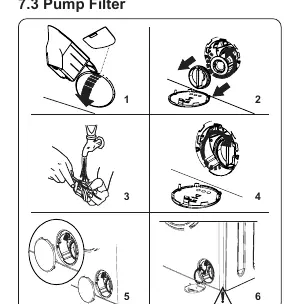
- Pump Filter: Located behind the cover on the front-lower right. Clean every 2 months to remove lint and foreign objects. Place a container under the cover before opening to catch residual water.
- Detergent Drawer: Remove and clean every 2 months to prevent residue buildup.
Troubleshooting
If your machine displays a fault code, refer to the following:
- Er 01: Door not shut properly. Close until it clicks.
- Er 02: Water pressure or level low. Check tap and water supply.
- Er 03: Pump faulty or filter clogged. Clean the pump filter.
- Er 04: Excessive water. The machine will discharge water automatically; unplug and contact service if it persists.
Practical help
Common problems
Machine does not start
Check if plugged in, fuses are intact, the door is closed, and the Start/Pause button has been pressed.
Machine vibrates excessively
Ensure transit bolts are removed, feet are adjusted/leveled, and laundry is not overloaded or unevenly spread.
Machine does not intake water
Check if the water tap is open, the inlet hose is not twisted, and the inlet filter is not clogged.
Excessive foam in detergent drawer
Too much detergent used. Dilute one tablespoon of softener in 1/2 liter of water and pour into the drawer, then press Start/Pause.
Before use
- Remove all 4 transit bolts from the rear.
- Level the machine using the adjustable feet.
- Connect to a 220-240V earthed power supply.
- Ensure water inlet hose is connected and not kinked.
- Perform a first wash using the 90° Cotton program without laundry.
Specs in practice
- Max Capacity
- 5kg of dry laundry.
- Water Pressure
- 0.1 MPa to 1 MPa.
Images and diagrams
- The program dial allows selection of various cycles including Cotton, Eco, and Fast 60'.
- The detergent drawer has three compartments: Pre-wash (I), Main wash (II), and Softener.
- The pump filter is located behind the bottom-right cover.
Model compatibility
- Use only detergents suitable for automatic washing machines.
- Do not use extension leads for electrical connection.
- Hot water supply (if applicable) must not exceed 70°C.

Manual page author
David Miller
Documentation analyst
Organizes user manual content into clear summaries, with attention to model details, product context, and everyday usability.