Garden / Outdoor
Denali Cordless Sander ASR6604B
Quick guide for the Denali Cordless Sander (ASR6604B-00/ASR6604B-00E). Learn how to attach the battery, dust bag, and sanding discs, adjust speed, and use the tool safely.
Table of contents
Manual images
Click an image to enlargeQuick guide from the manual
This guide provides essential instructions for operating the Denali Cordless Sander. Always ensure the tool is switched off before performing any assembly, maintenance, or adjustments. Use only the specified battery packs and chargers listed in the technical specifications.
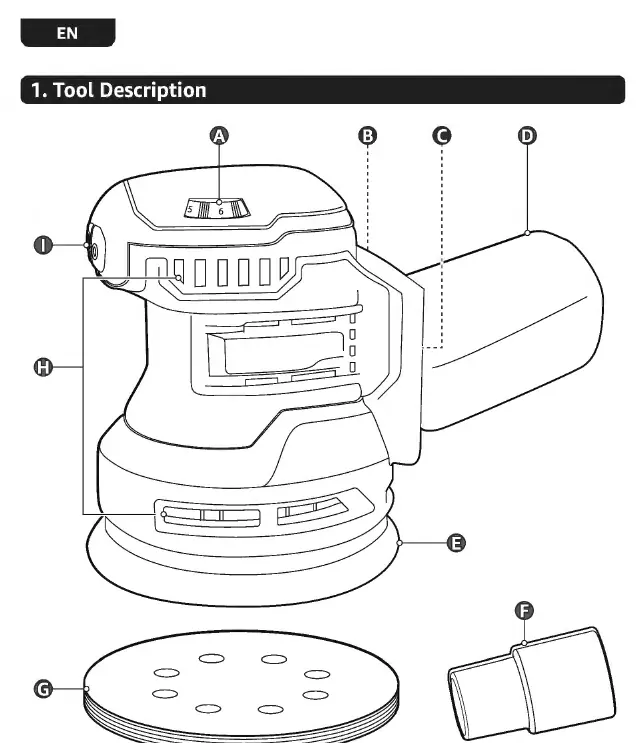
Tool Description
The sander features a variable speed dial (A), dust exhaust (B), battery slot (C), dust bag (D), backing pad (E), vacuum adapter (F), sanding disc (G), ventilation openings (H), and an on/off switch (I).
Preparation
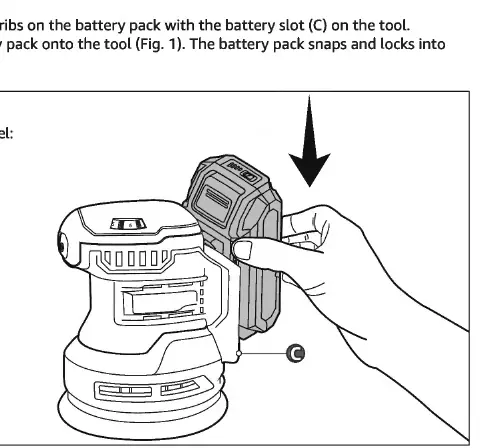
Attaching the battery pack: Align the raised ribs on the battery pack with the battery slot (C) and slide the battery onto the tool until it snaps into place.
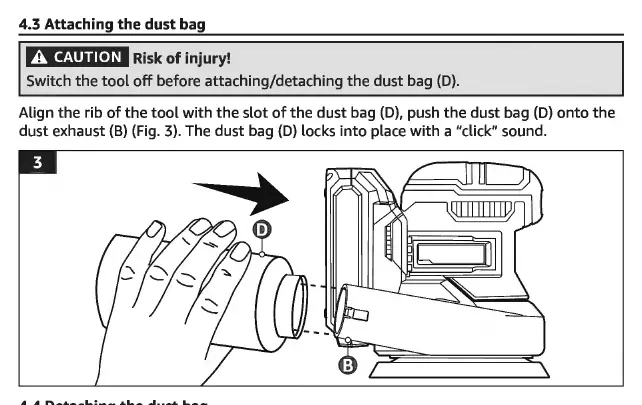
Attaching the dust bag: Align the rib of the tool with the slot of the dust bag (D) and push it onto the dust exhaust (B) until it clicks into place.
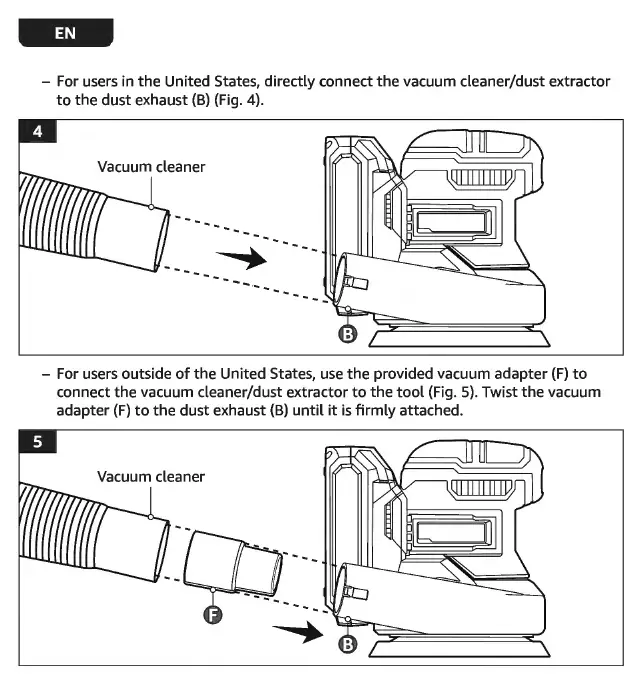
Connecting a vacuum: For US users, connect the vacuum directly to the dust exhaust (B). For other regions, use the provided vacuum adapter (F) to connect the vacuum to the dust exhaust (B).
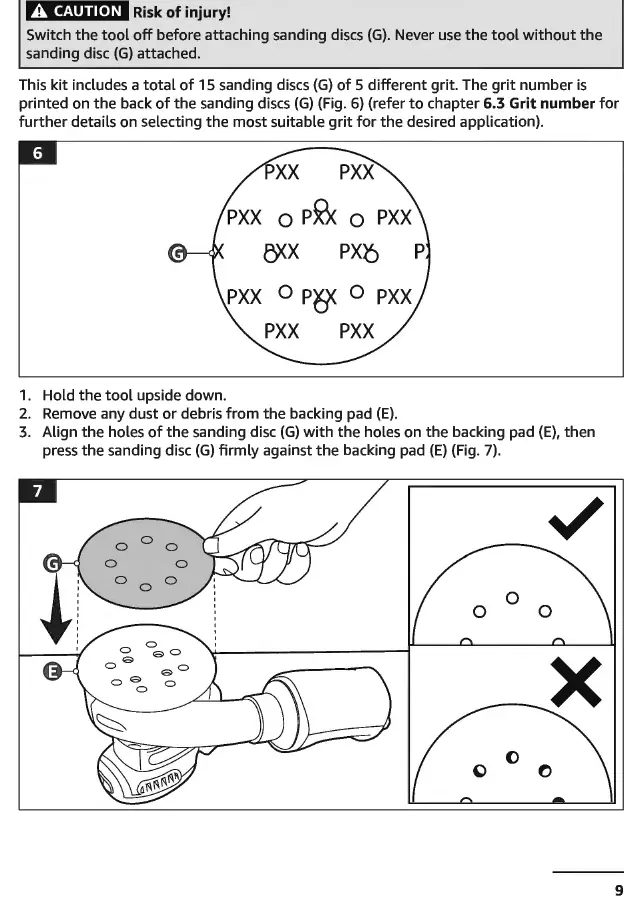
Attaching sanding discs: Ensure the backing pad (E) is clean. Align the holes of the sanding disc (G) with the holes on the backing pad (E) and press firmly.
Operation
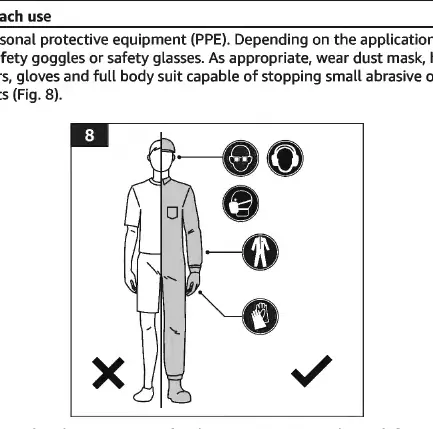
Personal Protective Equipment: Always wear appropriate PPE, including face shield, safety goggles, dust mask, hearing protection, and gloves.
Adjusting speed: Use the variable speed dial (A) to adjust the sanding speed. Position 1 is the slowest, and 6 is the fastest. Use speeds 1-3 for finish sanding and 4-6 for regular sanding.
Switching on/off: Set the on/off switch (I) to position I to turn the tool on, and to position O to turn it off.
Sanding Tips
- Start with a lower grit number and increase as needed for smoothness.
- Do not skip more than one grit size when moving to higher grits.
- Move the sander in a steady circular motion, overlapping strokes by up to 75%.
- Do not apply excessive pressure; let the tool do the work to prevent overheating and uneven results.
- Secure workpieces with clamps to prevent sliding.
Cleaning and Maintenance
Switch off and remove the battery before cleaning. Wipe the tool with a soft, slightly damp cloth. Do not use corrosive detergents or immerse the tool in water. Empty the dust bag when it becomes 1/3 full. This tool contains no user-repairable parts; contact a professional repair center for service.
Practical help
Common problems
The tool does not switch on
Check if the battery is charged, correctly attached, and is the correct model (ABY5197B-00, ABY5197B-00E, ABY5196B-00, ABY5196B-00E).
Unsatisfactory sanding result
The sanding disc may be worn or unsuitable for the workpiece. Replace with a new or correct disc.
Tool speed decreased
The dust bag may be full, or the motor may be overheated. Empty the bag, clean ventilation openings, or reduce pressure on the tool.
Excessive sparking
This may indicate worn carbon brushes. Stop using the tool and dispose of it appropriately.
Before use
- Wear appropriate PPE (goggles, mask, gloves).
- Check the tool and accessories for damage.
- Ensure the sanding disc and dust bag/vacuum are securely attached.
- Check battery charge level.
- Ensure ventilation openings are not obstructed.
Images and diagrams
- A: Variable speed dial
- B: Dust exhaust
- C: Battery slot
- E: Backing pad
- F: Vacuum adapter
Model compatibility
- Use only provided battery packs: ABY5197B-00, ABY5197B-00E, ABY5196B-00, ABY5196B-00E.
- Use only provided chargers: ASC5358B-00, ASC5358B-00E, ASC5358B-00U.

Manual page author
Michael Turner
Technical manual editor
Reviews PDF manuals for structure, safety notes, and practical product details so readers can find the right information quickly.