Health / Medical Mattresses
User Manual for Domus 3D Alternating Pressure Redistribution System
Quick guide and user manual for the Domus 3D alternating pressure redistribution system. Includes setup, operation, cleaning, and troubleshooting instructions.
Table of contents
Manual images
Click an image to enlargeQuick guide from the manual
The Domus 3D is an alternating pressure redistribution system designed to treat and prevent pressure ulcers. The system consists of a pump unit and an air mattress. Before use, ensure the system is set up on a firm surface, connected properly, and the pressure is adjusted to the patient's comfort level. The system features an automatic Maxfirm inflation process during initial setup and an alternating mode for pressure relief.
Product Description
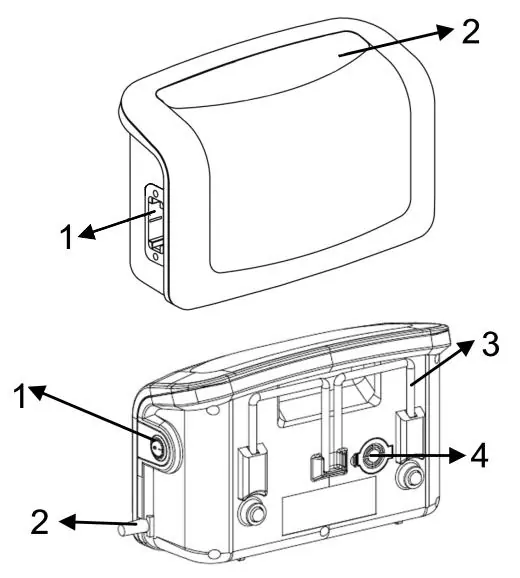
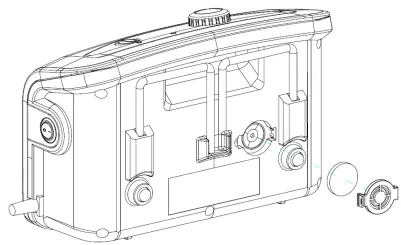
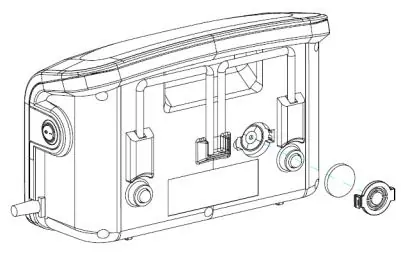
The system includes a pump unit and a mattress. The pump unit features a quick connector slot, display panel, power switch, power cord, bed frame hangers, and an air filter. The mattress includes CPR valves for emergency deflation.
Installation

- Place the mattress on the bed frame. If using an overlay system (less than 8"), ensure a foam or current mattress is underneath.
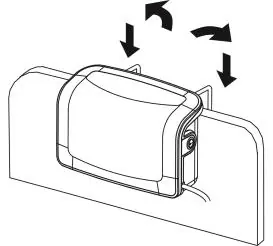
- Hang the pump unit on the bed rail (foot-end) or place it on a flat surface.
- Connect the air hose connectors from the mattress to the pump unit until a click sound is heard. Ensure hoses are not kinked.
- Plug the power cord into an electrical outlet.
- Turn the main power switch to the ON position.
Operation
General Operation: Switch on the main power. The system will execute a Maxfirm inflation process for approximately 30 minutes. Once completed, it enters alternating mode.
Pressure Adjustment: Use the pressure adjust buttons to increase or decrease air pressure. To find the correct setting, have the patient lie on the mattress. Insert a hand between the patient's buttock area and the static cell. Adjust pressure until there is at least 1/2 inch space between the patient and the palm. Always maintain at least 1 inch of space between the patient's buttock area and the static cell to prevent bottoming out.
Therapy Modes: The system offers an Alternate mode (sequentially inflates/deflates cells every 10 minutes) and a Continuous Low Pressure (CLP) mode (redistributes body mass at a constant low pressure).
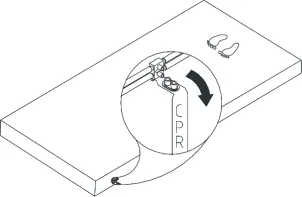
Emergency CPR: In an emergency, pull the CPR tag located at the head of the mattress on the patient's right side to quickly deflate the mattress.
Cleaning and Maintenance
Cleaning: Wipe the pump unit with a damp cloth and mild detergent. Do not immerse the pump in liquid. Wipe the mattress with warm water and mild detergent. The cover may be cleaned with sodium hypochlorite diluted in water. Air dry all parts thoroughly.
Maintenance: Check the power cord and plug for wear. Inspect the mattress cover for signs of damage. Check air hoses for kinks or breaks. Replace the air filter regularly if the environment is dirty.
Troubleshooting
- Power is not ON: Check if the plug is connected to the mains.
- Low pressure indicator is ON: Check connections between the quick connector and pump unit, ensure all tubing is secure, verify the CPR valve is sealed, and check for air leaks in cells.
- Patient is bottoming out: Adjust the comfort range 1 to 2 levels higher and wait a few minutes.
- Mattress form is loose: Check if all snap buttons or straps are securely fastened.
Technical Specifications
Power Supply: AC 220-240V 50 Hz, 0.08A. Fuse Rating: T1AL, 250V. Weight: 2.3 kg (pump). Max Support Weight: 200 kg (5" overlay) / 250 kg (8" replacement). Operating Environment: 10°C to 40°C, 10% to 90% humidity.
Safety Information
Do not use this product while bathing. Do not place or store where it can fall into water. Do not use with patients who have a spinal cord injury. Keep the cord away from heated surfaces. Do not block air openings. Do not modify the equipment without authorization.
Practical help
Common problems
Power is not ON
Check if the power plug is properly connected to the electrical outlet.
Low pressure indicator is ON
Check connections between the quick connector and pump, ensure all tubing is secure, verify the CPR valve is sealed, and check for air leaks.
Patient is bottoming out
The pressure setting may be inadequate. Adjust the comfort range 1 to 2 levels higher and wait a few minutes.
Mattress form is loose
Check if all snap buttons or straps are securely fastened and the mattress is fixed to the bed frame.
Before use
- Unpack the box and check for any shipping damage.
- Place the mattress on the bed frame.
- Hang the pump unit on the bed rail or place on a flat surface.
- Connect air hose connectors to the pump unit until a click is heard.
- Plug the power cord into an electrical outlet.
- Turn the main power switch to the ON position.
Specs in practice
- Max Support Weight
- Maximum patient weight capacity: 200kg for 5" overlay, 250kg for 8" replacement.
- Operating Temperature
- The system is designed to operate between 10°C and 40°C.
Images and diagrams
- Pump front: Shows the quick connector slot and display panel.
- Pump rear: Shows the power switch, power cord, bed frame hangers, and air filter.
Model compatibility
- Not for use with patients who have a spinal cord injury.
- Equipment is not suitable for use in the presence of flammable anesthetic mixtures.

Manual page author
Michael Turner
Technical manual editor
Reviews PDF manuals for structure, safety notes, and practical product details so readers can find the right information quickly.