Home / Security
Installation Guide for Dorman 904-7365 Accelerator Pedal Sensor
Quick installation guide for the Dorman 904-7365 Accelerator Pedal Sensor. Includes step-by-step instructions, torque specifications, and safety precautions for proper replacement.
Table of contents
Quick Installation Guide
This document provides installation instructions for the Dorman 904-7365 Accelerator Pedal Sensor. The kit includes a new 6-pin sensor and a compatible wiring harness. Before beginning, ensure you have the correct part for your vehicle's year, make, model, and configuration. Always wear proper safety equipment and consult your vehicle's service manual.
Important: Before replacing the sensor, check the most current instruction bulletin from Detroit Diesel to ensure your diagnosis of a sensor fault is correct. Replacing the sensor will reset the system and temporarily clear other faults; uncorrected problems will reoccur.
Installation Procedure
- Remove Pedal: Remove the pedal from the vehicle if necessary. Depending on the installation, it may not be possible to replace the sensor without removing the pedal. Note: Carefully observe and mark the routing of the wiring harness, as correct routing is critical to product performance.
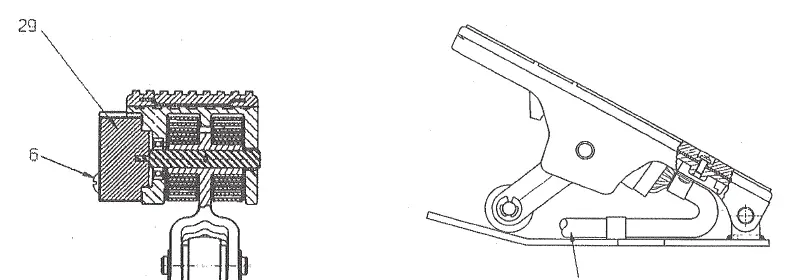
- Remove Old Sensor: Remove the sensor screws (item 6). Pry up the clip on the wiring harness connector to disconnect it from the sensor. Discard the old screws and sensor (item 29). Clean the surface where the sensor mounts to the pedal. Inspect the bearing and bearing housing for wear. If the sensor shaft or bearing is damaged, replace the entire upper pedal assembly.
- Inspect Harness: Inspect the connector for damage to the green rubber seal. If damage is evident, replace the wiring harness. To replace, remove screws and cable clamps, observing the routing. Discard the old harness (item 13), clamps, and screws.
- Install New Sensor: Position the new sensor on the pedal, aligning the holes in the sensor with the holes in the casting. Secure with the screws provided in the kit. Torque to 15–25 in·lbs. Do not over-tighten, as this may damage the screw holes. Connect the new wiring harness to the sensor.
- Secure Harness: Secure the wiring harness to the base plate using the provided cable clamps and screws. Leave a large loop in the harness assembly to eliminate excessive bending of the wires. Torque to 20–35 in·lbs.
- Reinstall Pedal: Reinstall the pedal in the vehicle if it was removed. Secure the wiring harness as originally routed and attach the connector(s) to the vehicle wiring harness.
Safety and Maintenance
Automobiles can be hazardous to work on. Always take necessary safety precautions to avoid property damage or personal injury. Ensure all work is performed in accordance with applicable motor vehicle standards and that no vehicle safety features are disabled.
Practical help
Common problems
Sensor fault diagnosis
Check the latest Detroit Diesel instruction bulletin before replacing to ensure the diagnosis is correct.
Wiring harness damage
Inspect the green rubber seal on the connector; if damaged, replace the entire wiring harness.
Excessive wire bending
Leave a large loop in the harness assembly during installation to prevent excessive bending of the wires.
Before use
- Verify part fitment for your specific vehicle year, make, and model.
- Wear proper safety equipment.
- Have a service manual for your vehicle available.
- Mark the original wire routing before removal.
Specs in practice
- Sensor screw torque
- 15–25 in·lbs
- Harness clamp torque
- 20–35 in·lbs
Images and diagrams
- The diagram illustrates the pedal assembly, identifying the sensor (29) and the sensor screws (6) to be removed.
- The diagram shows the wiring harness (13) routing path.
Model compatibility
- Kit includes a new 6-pin sensor and a compatible wiring harness.
- Fits existing pedal assembly.

Manual page author
Emily Carter
User documentation editor
Prepares concise manual descriptions and highlights the most useful setup, operation, and maintenance information for readers.