Furniture / Tables Desks
Drive Nitro Sprint Rolling Walker Instruction Manual
Comprehensive user guide for the Drive Nitro Sprint rollator, covering assembly, height adjustment, brake operation, storage bag usage, and safety guidelines.
Table of contents
Manual images
Jump to the sectionProduct Overview
The Drive Nitro Sprint is a premium rollator designed to provide stability and support for individuals requiring a walking aid. It features a lightweight frame, adjustable handles, and a built-in seat for resting. The rollator is equipped with a unique slow-down brake system and a curb assist feature to help navigate uneven terrain and small steps safely.

Unfolding and Setup
To prepare the rollator for use, position it on all four wheels on a flat surface. Pull the hand grips outward until the frame unlocks and opens fully. Press down on the seat rails near the vertical frame to ensure the unit is completely open; an audible click confirms that the latches are secure and the seat is locked in position.
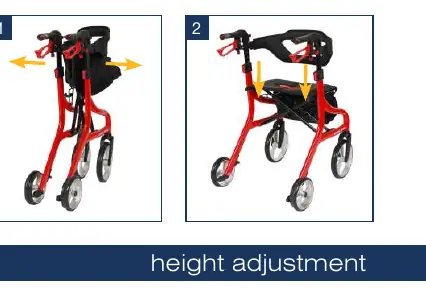
Height Adjustment
The handle height can be customized to suit the user. Press the height adjustment button while pulling the hand grip upward. Release the button once the desired height is reached. Ensure both handles are set to the same height using the numbering system on the frame to maintain stability.
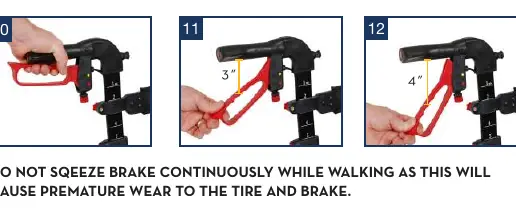
Braking and Locking
The rollator features a dual-function braking system. Pulling the brake levers upward while in motion applies the brakes. For parking, push the brake lever down two positions until it clicks. To release the parking brake, lift the lever upward. The rollator also includes a slow-down brake function, which can be engaged by pushing the lever down one position. This provides constant resistance, which is adjustable via the thumbwheel located on the brake mechanism.
Storage and Transport
The rollator can be folded for easy transport. Pull the seat upward using the seat handle, then push the hand grips together until the unit locks in the folded position. A removable storage bag is included, which can be attached to the frame using the provided clips or carried separately using the shoulder strap.
Maintenance and Safety
Regular maintenance is essential for safe operation. Periodically inspect all screws, fasteners, and components to ensure they are secure and free from wear. Clean the rollator with a damp cloth and mild detergent; avoid abrasive cleaners. Always ensure the rollator is fully opened and locked before use. Do not exceed the weight capacity of 350 lbs (or 500 lbs for the HD model) and never use the rollator as a transport chair or wheelchair.
Manufacturer information
Drive Medical
Practical help
Common problems
Rollator does not fold or lock properly
Ensure the seat is pulled fully upward and the hand grips are pushed together until an audible click is heard.
Brakes feel too loose or too tight
Adjust the slow-down brake resistance by loosening the locking wheel and turning the adjustment thumbwheel.
Difficulty navigating curbs
Use the curb assist located on the inside of the rear wheel by applying gentle foot pressure while holding the hand grips.
Before use
- Ensure all four wheels are firmly on the ground.
- Verify the rollator is fully opened and the seat is locked.
- Check that both hand grips are set to the same height.
- Test the brake levers to ensure they lock and release correctly.
- Confirm the storage bag is not overloaded (max 11 lbs).
- Inspect all screws and fasteners for tightness.
- Ensure the user weight does not exceed the specified capacity.
Specs in practice
- Weight Capacity
- Standard model supports 350 lbs (159 kg); HD model supports 500 lbs (227 kg).
- Slow-Down Brake
- Provides adjustable resistance to the wheels for controlled movement.
Images and diagrams
- Figures 1-2: Unfolding the rollator frame.
- Figures 3-4: Adjusting handle height using the button and numbering system.
- Figures 10-12: Operating standard and parking brakes.
- Figures 14-16: Adjusting the slow-down brake resistance.
- Figures 23-24: Using the curb assist feature.
Model compatibility
- Accessories are mounted using the adapter on the inside of the handles.
- Only use accessories designed for the Nitro Sprint model.

Manual page author
Emily Carter
User documentation editor
Prepares concise manual descriptions and highlights the most useful setup, operation, and maintenance information for readers.