Home Appliances / Space Heaters
User Manual for EUROLAMP TAC-09CPB/SL1 Portable Air Conditioner
Quick guide for the EUROLAMP TAC-09CPB/SL1 portable air conditioner. Includes installation steps, operating modes, WiFi setup, maintenance, and troubleshooting.
Table of contents
Manual images
Click an image to enlargeQuick guide from the manual
This manual provides instructions for the EUROLAMP TAC-09CPB/SL1 portable air conditioner. Before first use, ensure the unit is placed on a flat, stable surface with at least 45cm of clearance around it. The unit must be connected to a properly grounded power outlet. For cooling, install the exhaust hose and window slider kit as described in the installation section. The unit features WiFi connectivity for remote control via the Eurolamp Smart app.
Safety precautions
Important: This unit uses R290 refrigerant. Do not pierce or burn the unit. Installation and repairs must be performed by qualified personnel. Keep the unit away from fire sources, oil, direct sunlight, and water. Do not cover the unit during operation. Ensure the unit is kept upright during transport and storage.
Installation
To install the exhaust hose:
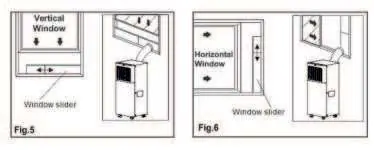
- Extend both sides of the hose and screw on the hose inlet and outlet.
- Install the hose inlet into the back of the unit.
- Affix the hose outlet into the window slider kit and seal it.
- The window slider kit is designed for standard vertical and horizontal windows. If the window opening is smaller than the kit, cut the end without the hole to fit.
Operating modes
The control panel allows you to manage the following functions:
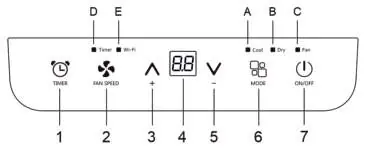
- Cool Mode: Ideal for cooling and dehumidifying. Set the desired temperature (18°C-32°C) and fan speed (High/Low).
- Fan Mode: Circulates air without cooling. The exhaust hose does not need to be attached.
- Dry Mode: Reduces room humidity. Fan speed is selected automatically.
- Sleep Function: Gradually reduces operation for comfort at night.
WiFi connection
To connect the unit to WiFi:
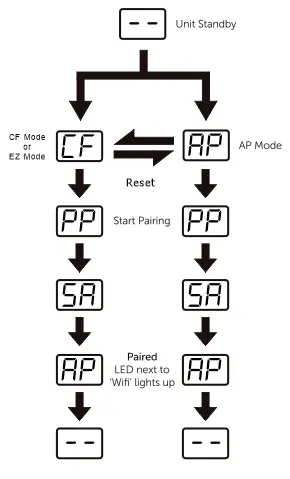
- Download and install the "Eurolamp Smart" app.
- Register an account and log in.
- Reset the WiFi module on the unit (refer to the manual for specific button combinations like holding "Mode" or "ON/OFF").
- Follow the app instructions to add the device using either CF or AP mode.
Maintenance and cleaning
Regular maintenance ensures efficiency:
- Air Filters: Clean the filters every week. Use a vacuum cleaner or rinse with warm water (max 40°C). Ensure they are completely dry before re-installing.
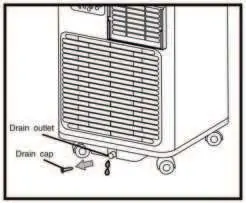
- Water Drainage: If the unit displays "FL" (Full Tank), drain the water. Use the lower drain plug for manual draining or connect a drain hose for continuous drainage.
- Cleaning the Cabinet: Use a slightly damp cloth. Do not use harsh chemicals, wax, or solvents.
Troubleshooting
If the unit does not turn on, check the power supply and the internal safety device. If it does not cool, ensure windows and doors are closed and there are no heat sources in the room. If "PF" or "FL" appears on the display, refer to the self-diagnosis section in the manual.
Manufacturer information
EUROLAMP S.A.
Practical help
Common problems
Unit does not turn on
Check if it is plugged in, check the power supply, or wait 30 minutes if the internal safety device has tripped.
Unit does not cool the room
Close windows, doors, and curtains. Remove heat sources. Ensure the exhaust hose is properly connected.
Unpleasant smell
Clean the air filter as described in the maintenance section.
Unit displays 'FL' (Full Tank)
Drain the internal water tank using the drain plug or hose.
Before use
- Ensure the unit is placed on a flat, stable surface.
- Check that the power supply matches the rating plate.
- Ensure the unit is properly grounded.
- Check that the exhaust hose is correctly installed for cooling mode.
- Ensure there are no obstructions around the air inlet or outlet.
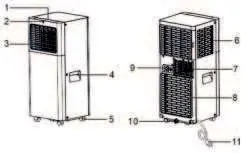
Images and diagrams
- Control panel: Used to manage modes, fan speed, timer, and power.
- Window slider kit: Used to vent hot air outside through a window.
- Drainage points: Located at the back of the unit for removing excess water.
Model compatibility
- WiFi function requires a 2.4GHz network.
- The unit is compliant with the RE Directive (2014/53/EU).

Manual page author
Michael Turner
Technical manual editor
Reviews PDF manuals for structure, safety notes, and practical product details so readers can find the right information quickly.