Home Appliances / Small Kitchen Appliances
User Manual for Farberware 12-Cup Programmable Coffee & Tea Maker CM3000S
Quick guide for the Farberware 12-Cup Programmable Coffee & Tea Maker (CM3000S). Includes setup, brewing instructions for coffee and tea, cleaning, and maintenance.
Table of contents
Manual images
Click an image to enlargeQuick guide from the manual
This manual provides instructions for the Farberware 12-Cup Programmable Coffee & Tea Maker (CM3000S). Before first use, wash all removable parts and run a brewing cycle with water only (no coffee grounds) to clean the system. Always ensure the carafe lid is properly attached to prevent overflow.
Product Overview
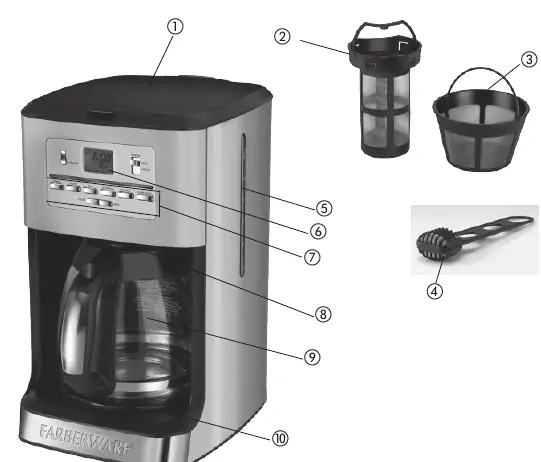
The appliance features a digital display, control panel, removable filter basket, and a Duralife glass carafe. It includes a built-in water filter holder and a Sneak-A-Cup feature for coffee brewing.
Setting the Clock
The clock must be set to use the Delayed Brewing feature. Plug the unit in, and the display will flash 12:00. Use the HOUR and MIN buttons to set the current time. Note that the PM indicator illuminates when the time is in the afternoon.
Brewing Coffee
- Open the cover and fill the reservoir with cold water (do not exceed 12-cup MAX).
- Insert the removable filter basket and place a permanent filter or 8-12 cup basket-style paper filter inside.
- Add coffee grounds and close the cover.
- Ensure the carafe lid is attached and place the carafe on the Keep Hot plate.
- Select brew strength (Regular or Strong) and press the ON/OFF button to start.
Sneak-A-Cup Feature: Allows you to pause brewing for up to 30 seconds to pour a cup. This feature is for coffee only and cannot be used when brewing tea.
Brewing Tea
- Open the cover and fill the reservoir with water.
- Important: Remove the permanent coffee filter and the filter basket from the unit to avoid coffee flavor in the tea.
- Place the stainless steel permanent tea filter into the basket area.
- Add loose tea leaves, close the cover, and place the carafe on the plate.
- Press the TEA button, then press the ON/OFF button to begin.
Water Filter Maintenance
Replace the carbon filter every 60 brewing cycles or every 2 months. To replace: press the latch on the filter holder, dispose of the old filter, insert a new one, and snap the holder back into the recess at the bottom of the water reservoir.
Cleaning and Auto Clean
Clean the exterior with a soft damp cloth. The filter basket, permanent filters, and carafe are dishwasher safe (top rack). To perform an Auto Clean cycle:
- Remove the water filter holder.
- Combine 6 cups of white vinegar and 4 cups of cold water in the carafe and pour into the reservoir.
- Place a paper filter in the basket and run the cycle by pressing the AUTO CLEAN button.
- The cycle takes 45-60 minutes. Run a cycle with fresh water afterward before brewing coffee again.
Practical help
Common problems
Coffee or water overflows
Ensure the carafe lid is properly attached and the filter basket is locked in place. Do not overfill the water reservoir.
Sneak-A-Cup feature not working
This feature is for coffee only. It cannot be used when brewing tea because the filter basket holder is removed.
Clock flashing 12:00
The clock needs to be set to the current time to enable the Delayed Brewing feature.
Before use
- Wash all removable parts (carafe, filters, basket).
- Run a full brewing cycle with water only (no coffee grounds) to clean the system.
- Ensure the carafe lid is securely attached.
- Check that the filter basket is locked in the front position.
Specs in practice
- 1-4 Cup Mode
- Slows down the brewing process to extract better flavor when brewing small amounts of coffee.
Images and diagrams
- The parts diagram identifies the cover, permanent tea/coffee filters, water filter, water window, digital display, control panel, Sneak-A-Cup feature, carafe, and Keep Hot plate.
Model compatibility
- Designed for 120V electrical outlets only.
- Use only with the provided carafe; never use the carafe on a range top.

Manual page author
Michael Turner
Technical manual editor
Reviews PDF manuals for structure, safety notes, and practical product details so readers can find the right information quickly.