Electronics / Camera Monitors
User Manual for Feelworld 1000NIT Broadcast Monitor
Quick guide for the Feelworld 1000NIT broadcast monitor. Learn about power options, OSD menu navigation, LUT import, signal formats, and troubleshooting.
Table of contents
Manual images
Click an image to enlargeQuick guide from the manual
The Feelworld 1000NIT is a high-bright broadcast monitor designed for professional video production. Before using the unit, ensure you use the provided power adapter or a qualified battery. Avoid exposing the monitor to direct sunlight, heat, or humidity. Do not use chemical solutions for cleaning; use a soft, clean cloth. Do not attempt to disassemble or repair the unit yourself.
Product Description
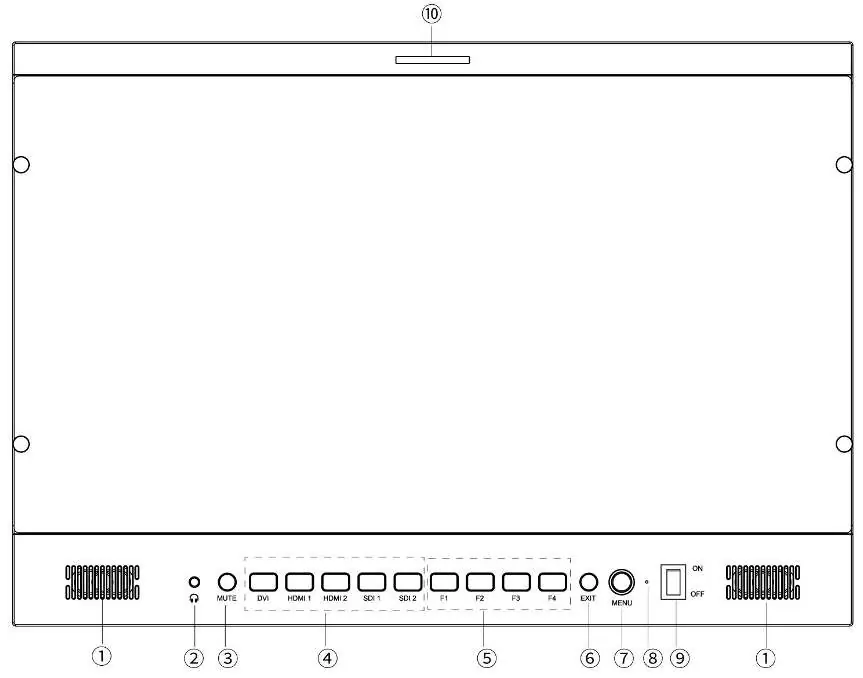
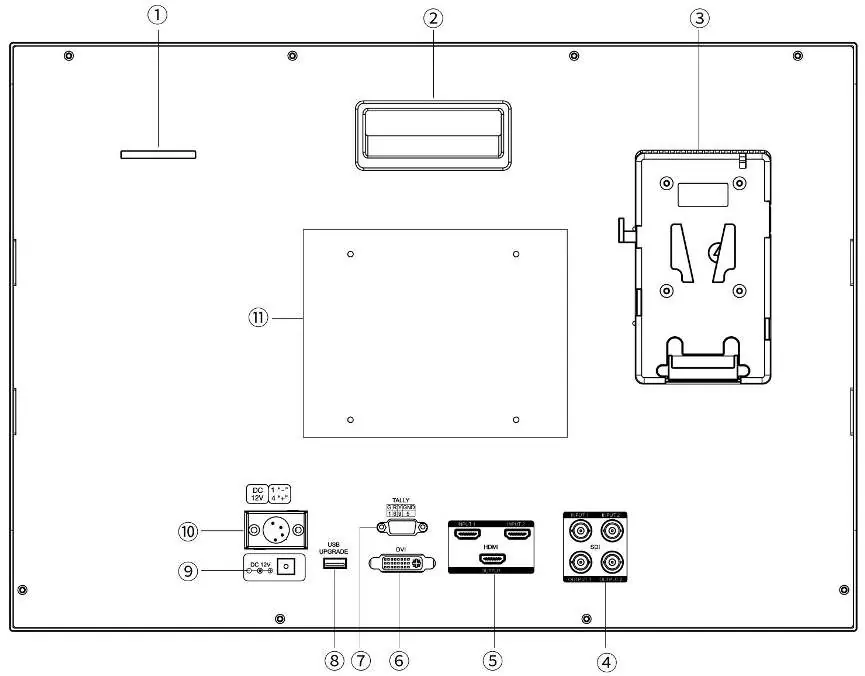
The monitor features a high-bright 1000nit panel, dual speakers, and built-in tally lights. The front panel includes buttons for Mute, Signal Input selection, Custom Function keys (F1-F4), and Power control. The rear panel provides multiple connectivity options, including 3G-SDI, HDMI, DVI, and Tally signal inputs, along with a V-mount battery plate and VESA mounting holes.
Power Supply Options
The monitor supports three power supply methods:
- Direct DC plug-in: Use the provided DC power adapter. Ensure correct polarity.
- 4-pin XLR: Allows sharing power with a camera or using a compatible power adapter.
- Battery: Uses the rear battery plate (Sony V-Mount by default). Remove the battery if the monitor will not be used for a long time.
Tally Indicator Connection
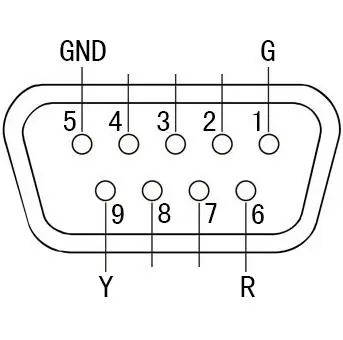
The monitor features front and rear Tally lights to enhance team cooperation. The Tally signal input port uses a specific pin configuration to trigger indicator colors: Green (1-5), Red (6-5), and Yellow (9-5).
Menu Operation
Use the MENU knob to navigate the On-Screen Display (OSD):
- Press the MENU knob to enter the main menu.
- Rotate the knob to select a first-level menu; the icon will turn gray.
- Press the knob to confirm and enter the secondary menu.
- Rotate to select functions or parameters, and press to confirm.
- Press the EXIT button to leave the menu.
Menu Functions
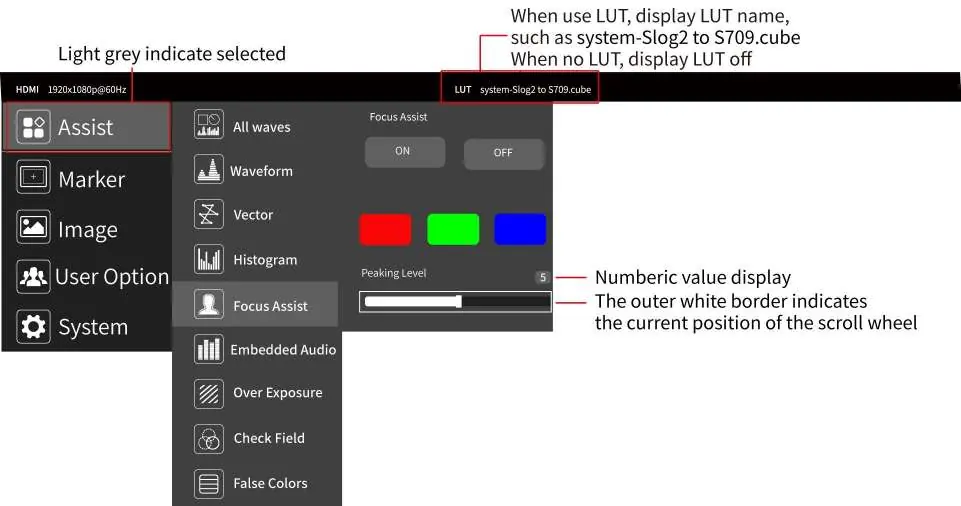
The OSD menu provides advanced monitoring tools:
- Assist: Includes Waveform, Vector scope, Histogram, Focus Assist, Embedded Audio, Over Exposure, Check Field, False Color, and Time Code (SDI only).
- Marker: Offers Grids, Safe Frames, Center Marker, and Ratio Marker.
- Image: Controls Scan Mode, Aspect Ratio, Anamorphic, Image Flip, Zoom Mode, Image Freeze, and Pixel-to-Pixel (P2P).
- User Option: Manages 3D-LUTs, HDR settings, Display Adjustments (Backlight, Brightness, Contrast, Saturation, Tint), Color Temperature, and Shortcut Key assignments (F1-F4).
- System: Configures Language, OSD settings, Mute, Volume, and Firmware updates.
Importing Custom LUTs
You can import custom 3D-LUTs to preview film looks:
- Format a USB flash drive to FAT32.
- Ensure LUT files are in .cube format and do not exceed 7.9Mb.
- Copy files to the USB drive (maximum 32 files).
- Insert the drive into the monitor's USB port.
- Navigate to User Option > LUT > Import > Confirm.
Troubleshooting
If you encounter issues, check the following:
- No image: Verify cable quality, input interface, and power switch status.
- No sound: Confirm audio cable connection and check volume settings.
- Abnormal color/image: Reset to factory settings or check signal source.
- Power issues: Ensure the power adapter or battery is securely connected.
Practical help
Common problems
Monitor will not power on
Check if the power is connected properly and the power switch is in the 'on' position.
No image display
Check the quality of the video cable and ensure it is connected to the correct input interface.
No sound
Confirm the audio cable is connected to the correct port and check that the volume is not set to zero.
Abnormal image or color
Check the signal source, reset the Check Field function, or reset the monitor to factory settings.
Power supply instability
Ensure the power adapter or battery is firmly connected to the battery plate.
Before use
- Use the provided power adapter or a qualified battery.
- Ensure the video cable is securely connected to the correct input.
- Verify the signal source is active and outputting a supported format.
- Remove the battery if the monitor will not be used for a long time.
- Format the USB flash drive to FAT32 before attempting firmware or LUT updates.
Images and diagrams
- Front Panel: Shows the layout of the Mute, Signal Input, F1-F4 function keys, and Power switch.
- Rear Panel: Illustrates the location of SDI, HDMI, DVI, Tally, and Power input ports.
- Tally Connection: Displays the pinout diagram for connecting external Tally indicators.
Model compatibility
- Supports 4K@60 HDMI Input and Output.
- LUT files must be in .cube format and under 7.9Mb.
- USB flash drives for updates must be formatted as FAT32.

Manual page author
Michael Turner
Technical manual editor
Reviews PDF manuals for structure, safety notes, and practical product details so readers can find the right information quickly.