Lighting / Work Lights
Installation Guide for Feit Electric 74210 11-inch LED Flush Mount Ceiling Fixture
A complete installation and setup guide for the Feit Electric 74210 11-inch LED flush mount ceiling fixture. Includes wiring instructions, color temperature settings, and safety precautions.
Table of contents
Manual images
Click an image to enlargeQuick Guide and Safety Information
This fixture is designed for use on 120V 60Hz circuits and is suitable for damp locations. The operating temperature range is 0°F to 120°F. The fixture is dimmable to 10% with most standard dimmers.
Safety Warnings:
- Turn off the power supply at the fuse or circuit breaker box before installation.
- Ground the fixture to avoid electric shock.
- If you are unfamiliar with electrical wiring, consult a certified electrician.
- Wear rubber-soled shoes and use a sturdy ladder.
Pre-Installation Requirements
Before starting, ensure you have the following tools and parts:
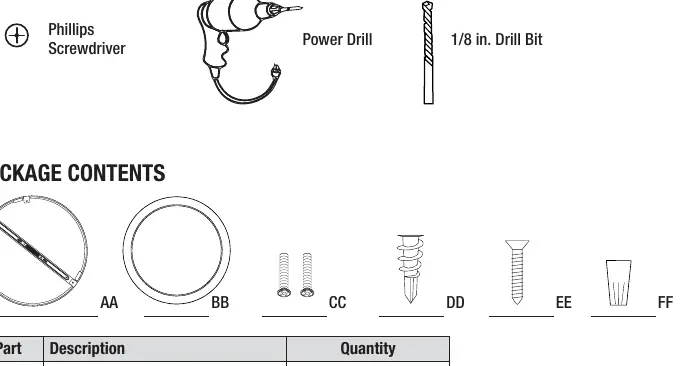
- Tools Required: Phillips screwdriver, power drill, 1/8 in. drill bit.
- Hardware Included: Mounting bracket (AA), Lamp unit (BB), Junction box screws (CC), Plastic anchors (DD), Anchor screws (EE), Wire connectors (FF).
Installation Steps
- Turn Off Power: Ensure the power is off at the switch and fusebox or circuit breaker.
- Remove Fixture: Twist and unlock the mounting bracket (AA) from the lamp unit (BB).
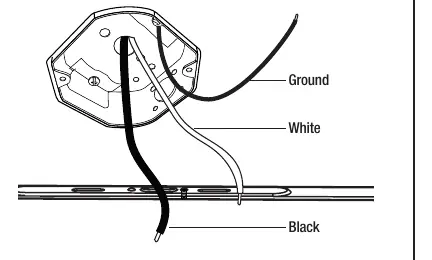
- Identify Wires: Locate the Black (Line), White (Neutral), and Ground wires from the ceiling.
- Attach Bracket: Secure the mounting bracket (AA) to the junction box using screws (CC). If using anchors, mark hole positions, drill 1/8 in. holes, insert plastic anchors (DD), and secure with anchor screws (EE).
- Connect Support Wire: Hook the support wire installed in the fixture to the mounting bracket (AA) to hold the fixture while wiring.
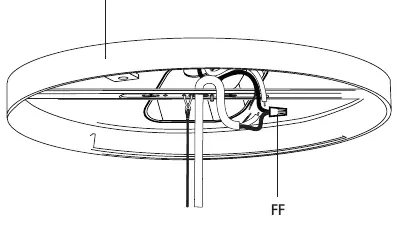
- Connect Wires: Feed the lamp unit wires through the center hole of the mounting bracket. Use the provided wire connectors (FF) to connect the Black, White, and Ground wires from the ceiling to the corresponding fixture wires.
- Attach Fixture: Match the alignment arrows on the mounting bracket (AA) and the lamp unit (BB). Raise the lamp unit, twist, and lock it into the "Lock direction" position.
Changing Color Settings
The fixture features selectable color temperatures. You can adjust this using the slide switch on the back of the fixture:
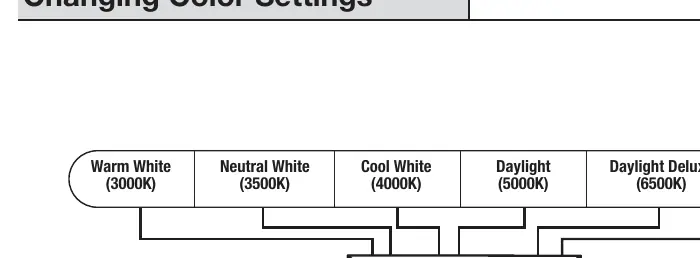
- Settings: 3000K (Warm White), 3500K (Neutral White), 4000K (Cool White), 5000K (Daylight), 6500K (Daylight Deluxe).
- SWITCH Mode: If set to "SWITCH", you can cycle through the 5 color temperatures by toggling your wall light switch ON and OFF within 0.5-3 seconds.
- Memory: If the fixture is left OFF for over 10 seconds, it will remember the last color temperature selected.
- Reset: If multiple fixtures are not displaying the same color, toggle the wall switch ON and OFF seven times (leave ON for five seconds before toggling OFF) to reset.
Manufacturer information
Feit Electric Company, Inc.
Practical help
Common problems
Flickering in low-level dimming
Increase the light level.
Multiple fixtures not displaying the same color
Reset the fixtures by toggling the wall switch ON and OFF seven times.
Before use
- Turn off power at the circuit breaker.
- Verify the circuit is 120V 60Hz.
- Ensure you have a Phillips screwdriver and power drill.
- Confirm the installation location is suitable for damp conditions.
- Consult a certified electrician if you are unsure about wiring.
Specs in practice
- Dimmable to 10%
- Compatible with most dimmers, including Leviton 6681-IW, Lutron S-600P, and Lutron DVCL-153.
Images and diagrams
- Wiring Diagram: Shows connection of Black (Line), White (Neutral), and Ground wires using provided connectors.
- Alignment Arrows: Used to align and lock the lamp unit into the mounting bracket.
Model compatibility
- Compatible with most dimmers including Leviton 6681-IW, Lutron S-600P, and Lutron DVCL-153.

Manual page author
Emily Carter
User documentation editor
Prepares concise manual descriptions and highlights the most useful setup, operation, and maintenance information for readers.