Lighting / Work Lights
Installation Guide for Feit Electric SHOP/4/HO/850/CAN LED Shop Light
A comprehensive installation and maintenance guide for the Feit Electric SHOP/4/HO/850/CAN LED Shop Light. Includes step-by-step instructions for chain and flushmount installation, linking multiple units, and safety precautions.
Table of contents
Manual images
Click an image to enlargeImportant Information
This guide provides installation instructions for the Feit Electric SHOP/4/HO/850/CAN LED Shop Light. This fixture is designed for indoor use and is suitable for damp locations. It is intended to be installed directly beneath a ceiling-mounted receptacle. Do not install this fixture on radiant-heating ceilings.
Safety Warnings
- Turn off the main power at the circuit breaker before beginning installation to prevent electric shock.
- This fixture must be grounded.
- Do not install on radiant-heating ceilings.
- Hooks are to engage the chain only and not the electric cord.
Parts Included
Ensure all parts are present before starting installation:
- Screw hooks (x2)
- V-hooks (x2)
- Hanging chains (x2)
- Wall anchors (x3)
- Mounting screws (x3)
- Pull chain extension (x1)
- Cable tie (x1)
Installation Options

Chain and V-Hook Installation
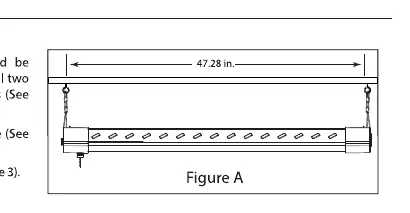
- Install the provided screw hooks directly into the ceiling. Ensure spacing between screws is 47.28 inches. For concrete or drywall surfaces, use the provided wall anchors after drilling 1/4 inch holes.
- Attach the chain to the V-hooks, then insert the hooks into the mounting holes located on the top of the fixture. Do this for both ends of the lamp.
- Hang the lamp by attaching the chain to the pre-mounted screw hooks on the ceiling.
- Plug the power cord into an outlet.
- Use the pull chain extension to turn the fixture ON/OFF.
- Use the provided cable tie to secure excess cord.
Flushmount Installation
- Install the provided screws directly into the mounting surface. Ensure spacing between screws is 45.71 inches. Use wall anchors if installing into concrete or drywall.
- Insert the fixture into the mounting surface by aligning the Key Holes on the top of the fixture with the mounting screws. Adjust the tightness of the screws if necessary.
- If an anchor is required, mark the hole as close as possible to the fixture, remove the lamp, drill the hole, install the anchor, re-install the fixture, and secure it with the screw.
- Plug in the power cord and use the pull chain to operate.
Linking Multiple Shoplights
You can link up to 3 shoplights together. The maximum distance between interconnected units is 60 inches (1.5m).
Maintenance
- Ensure the power is off before performing any maintenance.
- Clean the lamp regularly.
- Do not use chemical solvents for cleaning to avoid damaging the product.
Manufacturer information
Feit Electric Company, Inc.
Practical help
Common problems
Fixture does not turn on
Ensure the pull chain switch is engaged and the wall switch (if applicable) is turned on.
Fixture is loose after flushmount installation
Adjust the tightness of the mounting screws on the narrow side of the Key Holes.
Before use
- Turn off main power at the circuit breaker.
- Verify the ceiling is not a radiant-heating ceiling.
- Ensure the ceiling can support the fixture weight.
- Check that all parts (hooks, chains, anchors, screws) are included.
- Confirm the installation location is a damp-rated area if applicable.
Specs in practice
- Linking Capacity
- Up to 3 shoplights can be linked together.
- Max Interconnect Distance
- 60 inches (1.5m) between units.
Images and diagrams
- Figures 1-4 illustrate the chain and V-hook installation process.
- Figures 5-7 illustrate the flushmount installation process using keyholes.
Model compatibility
- Suitable for damp locations.
- Not compatible with radiant-heating ceilings.

Manual page author
Emily Carter
User documentation editor
Prepares concise manual descriptions and highlights the most useful setup, operation, and maintenance information for readers.