Sports / Sports Equipment
Assembly Instructions for Franklin All-Sport Net 19060X
Complete assembly guide for the Franklin All-Sport Net 19060X. Includes step-by-step instructions for setting up the frame, attaching the net, and installing the strike zone target.
Quick answers from the manual
Quick answer
- The Franklin All-Sport Net 19060X is assembled by connecting the long fiberglass poles, inserting them into the net sleeves, attaching the strike zone target, and securing the structure with ground stakes. p. 1, 2
Key actions
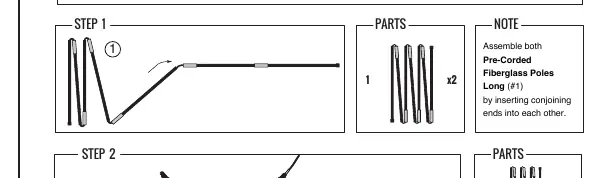
- Assemble the long fiberglass poles (#1) by inserting conjoining ends. p. 2
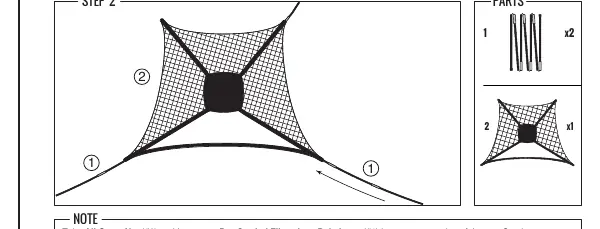
- Insert poles into the net sleeves until the opposite end emerges. p. 2
- Secure the net using ground stakes (#6) for extra stability. p. 1
First start
- Find a clean, level area and have two adults work together for assembly. p. 2
Technical specifications
| Parameter | Value | Meaning | Pages |
|---|---|---|---|
| Dimensions | 120in x 84in x 60in | Size of the assembled net | p. 1 |
Where to find it in the PDF
- Assembly Instructions p. 1, 2
Table of contents
Manual images
Click an image to enlargeQuick Guide
The Franklin All-Sport Net 19060X is designed for sports practice. Assembly requires a clean, level surface and is best performed by two adults. The process involves assembling the fiberglass poles, threading them through the net, attaching the strike zone target, and securing the net to the ground.
Parts List
- Pre-Corded Fiberglass Poles Long (#1): x2
- All Sport Net (#2): x1
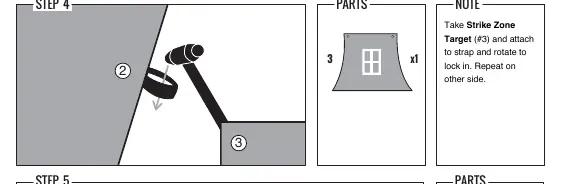
- Strike-Zone Target (#3): x1
- Pre-Corded Fiberglass Poles Short (#4): x1
- Black Travel Bag (#5): x1
- Ground Stakes (#6): x4
Assembly Instructions
Step 1: Assemble Long Poles
Assemble both Pre-Corded Fiberglass Poles Long (#1) by inserting the conjoining ends into each other.
Step 2: Insert Poles into Net
Take the All-Sport Net (#2) and insert one Pre-Corded Fiberglass Pole Long (#1) into the corner opening of the net. Continue to insert the pole into the sleeve until the opposite end emerges out of the opposite corner. Repeat this process with the other Pre-Corded Fiberglass Pole Long (#1) into the opposite diagonal end.
Step 3: Secure Poles
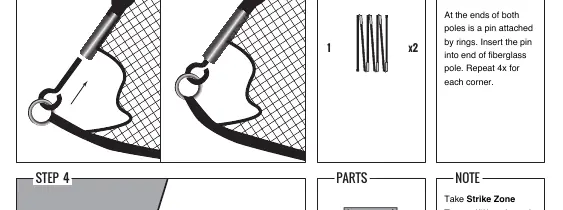
At the ends of both poles, there is a pin attached by rings. Insert the pin into the end of the fiberglass pole. Repeat this for each of the four corners.
Step 4: Attach Strike Zone Target
Take the Strike Zone Target (#3) and attach it to the strap, then rotate to lock it in place. Repeat this on the other side.
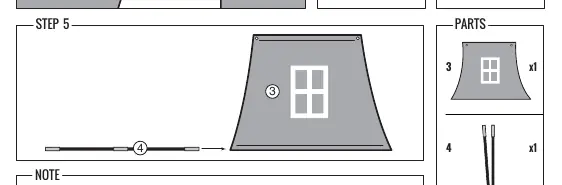
Step 5: Assemble Short Pole
Assemble the Pre-Corded Fiberglass Pole Short (#4) and insert it into the bottom of the Strike Zone Target (#3). Use the self-stick closure on the bottom left to keep the pole in place.
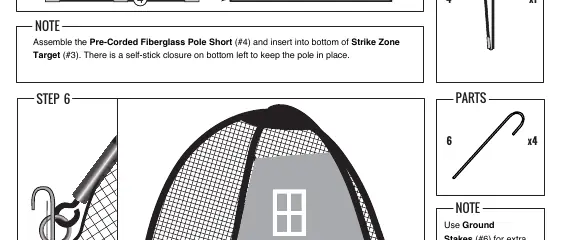
Step 6: Secure with Stakes
Use the Ground Stakes (#6) to secure the net to the ground for extra stability when needed.
Customer Support
If you have missing or damaged parts, do not return the product to the store. Contact Franklin Sports customer service at [email protected] or visit franklinsports.com/instructions for assistance. Please include the product part number and description.
Official resources from the manual
Practical help
Common problems
Missing or damaged parts
Contact customer service at [email protected] with the part number and description.
Difficulty during assembly
It is recommended that two adults work together to assemble the net.
Before use
- Find a clean, level place for assembly.
- Remove all components from the package.
- Confirm all parts are included using the parts list.
- Have two adults available for assembly.
Images and diagrams
- Steps 1-2: Frame assembly and net insertion.
- Steps 3-6: Securing the frame, attaching the target, and staking the net.

Manual page author
David Miller
Documentation analyst
Organizes user manual content into clear summaries, with attention to model details, product context, and everyday usability.