Furniture / Home Furnishing
Installation Guide for Fredrick Ramond 19-LT Pendant
Quick installation and wiring guide for the Fredrick Ramond 19-LT pendant light, including mounting instructions, safety warnings, and grounding procedures.
Table of contents
Manual images
Jump to the sectionQuick guide from the manual
This document provides essential installation and wiring instructions for the Fredrick Ramond 19-LT pendant light. Before starting, ensure the electrical power is completely turned off at the fuse box or circuit breaker. Do not restore power until the fixture is fully installed and wired. The fixture must be mounted using a 1/4IP threaded pipe (not supplied) anchored to a structure capable of supporting four times the fixture's weight.
Mounting and Installation
- Find a clear workspace and unpack the fixture and glass.
- Install a 1/4-18 NPS threaded pipe into the ceiling structure, ensuring 1 inch extends into the junction box.
- Thread the pipe coupler (B) onto the pipe and secure it with screws (C).
- Attach the loop (K) to the threaded tube (E) using the hex nut (J).
- Thread the tube (E) into the coupler (B) and adjust the loop height so that half of the exterior threads on the loop are exposed when the canopy (L) is in place.
- Secure the pipe (E) by tightening the hex nut (D) against the coupler (B).
- Use the Quick link to hook the assembled fixture onto the loop (K).
- Feed wires through the canopy loop and make electrical connections.
- Attach the safety cable to a joist or structure independent of the junction box.
- Slide the canopy (L) and screw collar ring (M) up to the ceiling and secure the canopy.
- Attach the desired number of stems and mount the glass by twisting it over the socket.
Wiring and Grounding
Follow these steps to ensure safe electrical connections:
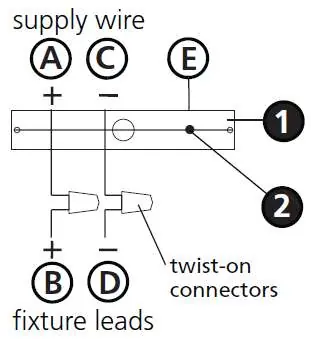
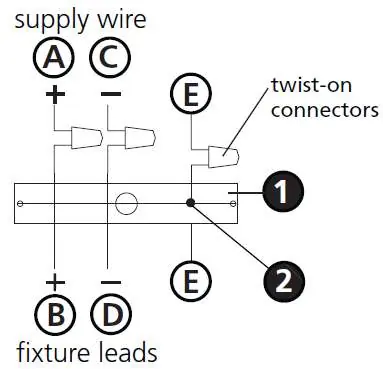
- Connect the positive supply wire (typically black or smooth) to the positive fixture lead (B) using a twist-on connector.
- Connect the negative supply wire (typically white or ribbed) to the negative fixture lead (D).
- For outdoor fixtures, apply silicone sealant to the open end of connectors to create a watertight seal.
- For grounding, fasten the fixture ground wire (E) (typically copper or green) to the mounting strap (M) using the ground screw (S) for flush mounts, or connect it directly to the building's ground wire for chain-hung fixtures.
Manufacturer information
Fredrick Ramond
Practical help
Common problems
Water entering the outlet box (outdoor installation)
Use silicone sealant on connectors and caulk gaps between the mounting plate and the wall.
Fixture not secure
Ensure the 1/4IP pipe is anchored to a structure capable of supporting four times the fixture's weight.
Before use
- Turn off electrical power at the source.
- Verify the mounting structure can support 4x the fixture weight.
- Ensure you have a 1/4IP threaded pipe (not supplied).
- Check that all wiring connections are secure and properly grounded.
Specs in practice
- 1/4IP threaded pipe
- The required mounting hardware (not supplied) to support the fixture.
- Positive supply wire
- Typically black or the smooth, unmarked side of the cord.
- Negative supply wire
- Typically white or the ribbed, marked side of the cord.
Images and diagrams
- Drawing 1 shows the mounting pipe and junction box assembly.
- Drawing 2 illustrates the installation example with ceiling joists and support blocks.
- Drawing 3 details the shade and stem installation process.
Model compatibility
- Suitable for indoor and outdoor use (if sealed correctly).
- Requires a 3-wire electrical system for proper grounding.

Manual page author
David Miller
Documentation analyst
Organizes user manual content into clear summaries, with attention to model details, product context, and everyday usability.