Electronics / Monitors
FS N Series Data Center Switches Quick Start Guide
Comprehensive quick start guide for FS N Series 10G/25G/40G/100G managed L2/L3 data center switches, covering installation, configuration, and troubleshooting.
Table of contents
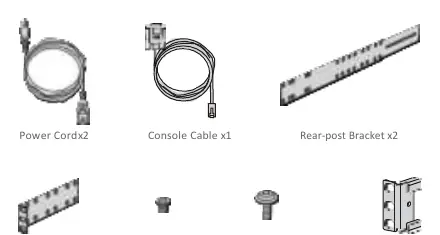
Manual images
Jump to the sectionIntroduction
The FS N Series 10G/25G/40G/100G managed L2/L3 data center switches are designed for high-performance networking environments. This guide provides essential information for the deployment and initial setup of these devices. The switches feature hot-swappable power supplies and fan tray modules to ensure high availability and ease of maintenance.
Installation Requirements
Before beginning the installation, ensure you have a Phillips screwdriver and a standard 19-inch rack with at least 1U of available space. Use Category 5e or higher RJ-45 Ethernet cables for network connections. The installation environment must be well-ventilated, stable, and free from dust, moisture, or extreme temperatures exceeding 45°C. Ensure that the rack and working platforms are properly earthed to prevent electrical hazards.
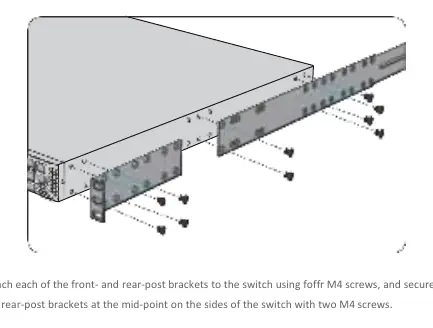
Mounting the Switch
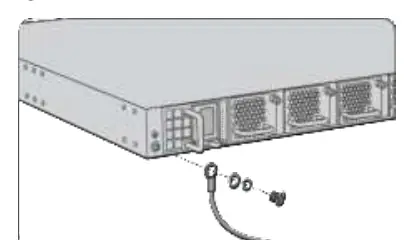
Attach the front and rear-post brackets to the switch using the provided M4 screws. Secure the rear-post brackets at the mid-point on the sides of the switch. Once the brackets are attached, use the screws and cage nuts supplied with your rack to mount the switch securely. Adjust the rear-post bracket ears as needed and lock them in place using the included ear-locking screws. Always connect the grounding cable to a proper earth ground, such as the rack, before connecting power.
Connecting the Switch
Connect the AC power cord to the power port on the back of the switch and then to an AC power source. Do not install power cables while the power is on. For network connectivity, plug compatible transceivers into the SFP+, SFP28, QSFP+, or QSFP28 ports as required, and connect your fiber optic cables. Use the RJ45 console port for serial management and the MGMT port for Ethernet-based management. A USB port is also available for management tasks.
Configuration
For switches running Cumulus Linux, you must install a license key. This can be done by pasting the key directly, transferring a file via SCP, or referencing an HTTP URL. To configure the switch, connect a PC to the console port using a console cable. Use terminal software like PuTTY with the following settings: 115200 baud rate, 8 data bits, no parity, 1 stop bit, and no flow control. The default login credentials are username: cumulus and password: CumulusLinux!.
Troubleshooting
If the switch fails to power on, verify that the power cable is connected correctly and that the power source matches the requirements. If the configuration terminal displays no information, check the power supply and the console cable connection. If error codes appear, verify the terminal software parameters.
Manufacturer information
FS.com
Practical help
Common problems
Power indicator is unlit
Check if the power cable is connected correctly and matches the required power supply.
Configuration terminal shows nothing
Verify the power supply is normal and the console cable is properly connected.
Configuration terminal shows error codes
Confirm that the terminal software parameters (baud rate, parity, etc.) are set correctly.
Before use
- Phillips screwdriver
- Standard 19-inch rack with 1U space
- Category 5e or higher RJ-45 cables
- Well-ventilated site environment
- Stable and level mounting surface
- Properly earthed rack and platform
Images and diagrams
- Front panel ports layout for various N Series models
- Back panel showing hot-swappable fans and power supplies
- Bracket attachment procedure for rack mounting
- Grounding cable connection point on the back panel
- Console cable connection to PC serial port
Model compatibility
- Requires Category 5e or higher RJ-45 cables for network connections.
- Cumulus Linux license installation is required for switch port activation.
- Compatible with standard 19-inch racks.
- Supports hot-swappable power supplies and fan trays.

Manual page author
David Miller
Documentation analyst
Organizes user manual content into clear summaries, with attention to model details, product context, and everyday usability.