Lighting / LED Lamps
Installation Instructions for GE Advantium 120V Built-In SpeedCook Oven
Comprehensive installation guide for GE Advantium 120V Built-In SpeedCook Ovens (PSB1200, PSB1201, ZSC1201, ZSC1202). Includes electrical requirements, cabinet cutout dimensions, accessory drawer assembly, and step-by-step mounting...
Table of contents
Manual images
Click an image to enlargeQuick Guide for Installation
This document provides installation instructions for the GE Advantium 120V Built-In SpeedCook Oven. Proper installation is the responsibility of the installer. The process requires basic mechanical and electrical skills and takes approximately 1 hour. Always observe local governing codes and ordinances.
Safety Information
Important Safety Warnings:
- Electrical Shock: Remove the house fuse or oven circuit breaker before beginning installation.
- Weight Support: The mounting surface must support the cabinet load, the 80-pound oven, and any additional loads (up to 160 pounds total).
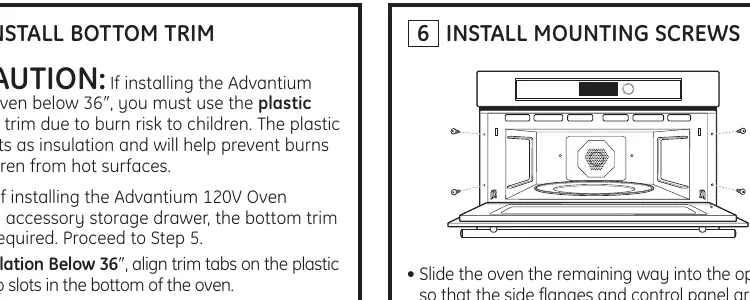
- Burn Risk: If installing the oven below 36 inches from the floor, you must use the plastic bottom trim and keep the plastic door trim attached to prevent burns to children.
- Ventilation: Use the oven only for its intended purpose; never use it to heat a room.
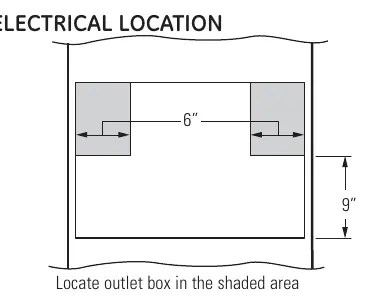
Electrical Requirements
The oven requires a 120-volt, 60 Hz, 15-amp circuit and draws 1.8 kilowatts. It must be connected to a supply circuit of the proper voltage and frequency. The power cord is 48 inches long and requires a grounded three-prong receptacle. Do not use an extension cord.
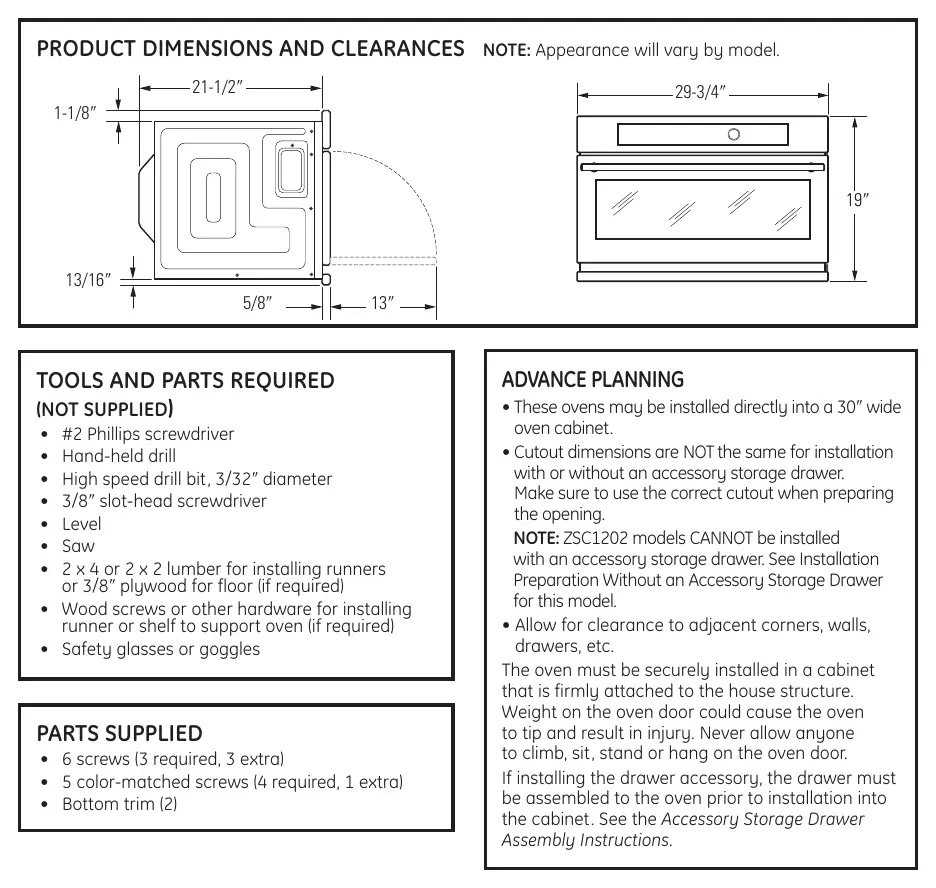
Preparing the Opening
The oven can be installed in a 30-inch wide cabinet. Cutout dimensions vary depending on whether an accessory storage drawer is used. Ensure the support floor is solid (minimum 3/8-inch plywood) and supported by 2x4 or 2x2 runners on all sides. The support must be level and flush with the bottom edge of the cutout.
Installation Steps
- Remove Packaging: Remove all packing material and tape. Locate the parts package. Do not lift the unit by the handle or conduit.
- Door Trim Removal: If installing above 36 inches, you may remove the plastic trim from the bottom of the door for aesthetic purposes.
- Slide into Cutout: With two people, lift the oven into the opening. Plug in the power cord before sliding it fully into the cabinet. Ensure the cord is not trapped.
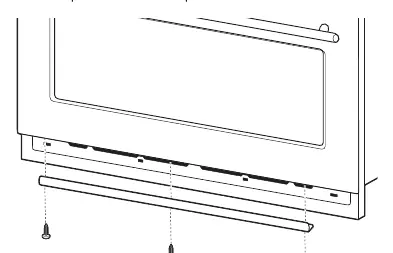
- Install Bottom Trim: Align the trim tabs to the slots in the bottom of the oven and secure with the provided screws.
- Install Mounting Screws: Slide the oven until the side flanges are against the cabinet frame. Drill pilot holes through the side flanges and secure with the provided color-matched screws.
- Finalize: Turn on the power at the source. The interior light should activate when the door is opened.
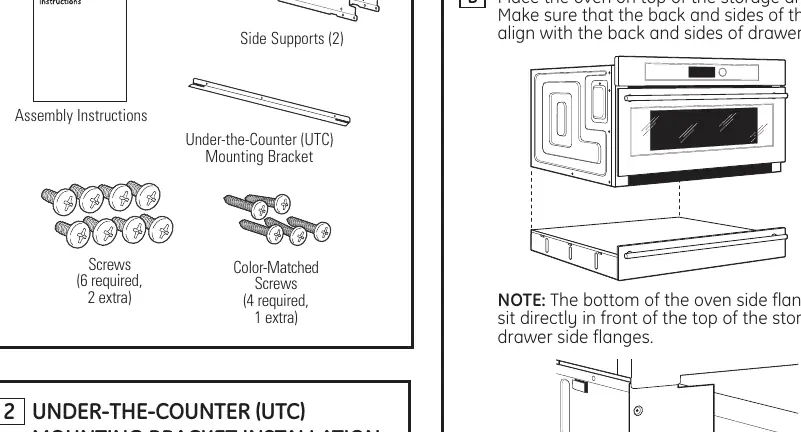
Accessory Storage Drawer Assembly
If installing with an accessory storage drawer (models JX2200, JX2201, ZX2201), assemble the drawer to the oven before installing the unit into the cabinet. Place the drawer on a surface with the front hanging over the edge, place the oven on top, and secure the side supports into the tabs on the drawer.
Practical help
Common problems
Oven tips over during use
Ensure the oven is securely installed in a cabinet that is firmly attached to the house structure.
Burn risk to children
If installing below 36 inches, you must use the plastic bottom trim and do not remove the plastic door trim.
Electrical issues
Do not use an extension cord. Ensure the wall receptacle is properly grounded and has the correct polarity.
Before use
- Verify the cabinet can support a total weight of 160 lbs.
- Ensure a 120V, 60Hz, 15-amp grounded circuit is available.
- Check cutout dimensions based on whether an accessory drawer is used.
- Have a #2 Phillips screwdriver, drill, and level ready.
- Ensure the support floor is solid (3/8-inch plywood) and level.
Images and diagrams
- Cutout dimensions vary significantly based on whether an accessory storage drawer is used.
- Electrical outlet must be located within 6 inches of either side and at least 9 inches above the cutout floor.
Model compatibility
- ZSC1202 cannot be installed with an accessory storage drawer.
- ZSC1201 requires specific installation height for accessory drawer.
- Only approved for installation under specific cooktop models.

Manual page author
Michael Turner
Technical manual editor
Reviews PDF manuals for structure, safety notes, and practical product details so readers can find the right information quickly.