Home Appliances / Ovens
Installation Guide for GE Appliances Type B LED HID Hazardous Rated Lamp
Comprehensive installation guide for GE Appliances Type B LED HID Hazardous Rated Lamps. Includes wiring diagrams, ballast bypass procedures, and compatibility details for various luminaire fittings.
Table of contents
Manual images
Click an image to enlargeQuick guide from the manual
This document provides installation instructions for retrofitting HID luminaires with GE Type B LED lamps in hazardous locations. Important: This installation must be performed by a qualified electrician. The retrofit process involves bypassing the existing ballast, connecting the lamp directly to the AC input, and installing the provided retrofit label on the luminaire.
Safety and Warnings
- Qualified Electrician Required: Installation requires familiarity with safety procedures and electrical systems.
- Hazardous Locations: Ensure the luminaire and retrofit kit are installed only in the hazardous (classified) locations specified on the retrofit kit marking label.
- Electrical Safety: Disconnect electrical power at the supply source before beginning.
- Burn Risk: Allow the luminaire and lamp to cool completely before proceeding.
- Wiring: Do not make or alter open holes in the wiring enclosure. Avoid exposing wiring to sharp edges of sheet metal.
Kit Contents
- LED lamp
- Label for modified luminaire
- Installation instructions
- Wire connectors (2)
- E26 to E39 socket adapter (included with 120-277V models only)
General Retrofit Procedure

- Disconnect power to the luminaire.
- Open the ballast housing and loosen the cover.
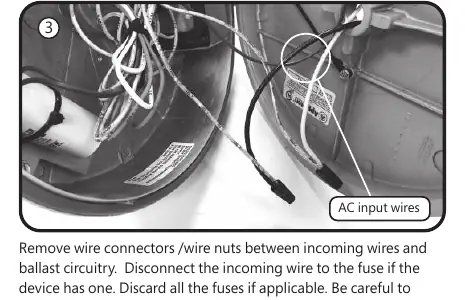
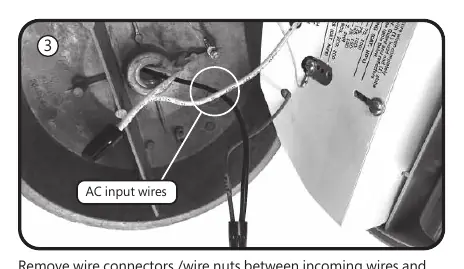
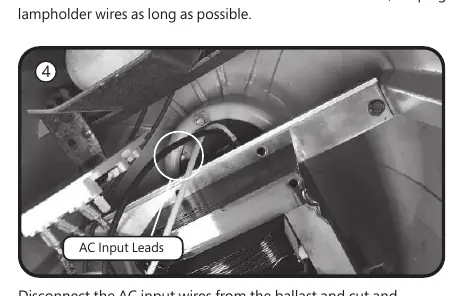
- Disconnect the ballast circuitry. Cut the existing lamp holder terminal wires, leaving enough length for new connections.
- Strip 3/8 inch from the wires.
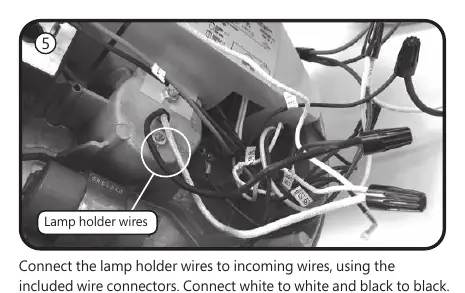
- Connect the AC input wires to the lamp holder wires using the provided wire connectors (match white to white, black to black/color).
- Reinstall the ballast housing cover, ensuring no wires are pinched.
- Remove the old HID lamp and inspect the socket for wear or arcing.
- Install the new LED lamp, using the E26/E39 adapter if necessary.
- Apply the new ratings label over the existing luminaire label.
- Restore power.
Specific Luminaire Retrofitting
The manual provides specific instructions for the following luminaire fittings:
- GE Lighting Filtr-Gard
- Crouse-Hinds Champ VMV Series
- Appleton Mercmaster III
- Appleton Mercmaster II
- GE Lighting Powr-Gard H9 Series
- Hubbell Killark VM Series
- Holophane Petrolux P3M
- Thomas & Betts Hazlux 3 Series
Refer to the specific section in the manual for your luminaire type to identify the correct ballast housing and mounting components.
Maintenance
If the old lamp socket shows signs of wear or arcing, contact the original luminaire manufacturer for replacement parts before installing the new LED lamp.
Practical help
Common problems
Ballast not bypassed
Ensure all ballast wiring is disconnected and the lamp is wired directly to the AC input as per the wiring instructions.
Lamp does not fit the socket
Check if an E26 to E39 adapter is required or needs to be removed based on the luminaire socket type (E26 vs E39).
Wiring damage during installation
Do not expose wiring to sharp edges of sheet metal; ensure wires are properly routed and secured inside the housing.
Before use
- Disconnect electrical power at the supply source.
- Verify the luminaire is compatible with the retrofit kit.
- Ensure the luminaire is in a hazardous location as specified on the label.
- Ensure installation is performed by a qualified electrician.
- Gather required tools: slotted screwdriver, adjustable wrench, wire cutter, wire stripper.
Specs in practice
- 120-277V vs 277-480V
- Ensure the lamp voltage rating matches your supply voltage.
- E26/E39 Base
- E26 is a standard medium base; E39 is a mogul base. Use the provided adapter if the luminaire socket differs from the lamp base.
Images and diagrams
- Wiring diagrams show the removal of ballast connections and direct wiring of the lamp holder to the AC input.
- Adapter usage tables indicate whether to remove or use the supplied E26 to E39 adapter based on the specific ballast housing.
Model compatibility
- Must be installed in hazardous locations specified on the retrofit kit marking label.
- The installation guide does not supersede local or national electrical regulations.

Manual page author
Emily Carter
User documentation editor
Prepares concise manual descriptions and highlights the most useful setup, operation, and maintenance information for readers.