Hvac / Air Conditioners
User Manual for GREE Floor Ceiling Type Air Conditioner
Comprehensive user guide for GREE Floor Ceiling Type Air Conditioner. Includes installation instructions, remote control operation, safety precautions, and troubleshooting.
Table of contents
Manual images
Jump to the sectionQuick Guide
This manual provides essential instructions for the installation, operation, and maintenance of the GREE Floor Ceiling Type Air Conditioner. Key safety requirements include the use of R32 refrigerant, which is flammable and requires professional handling. Always ensure the unit is installed in a well-ventilated area and that all electrical connections comply with local regulations.
Safety Precautions
- Flammable Refrigerant: The unit uses R32 refrigerant. Installation, maintenance, and repair must be performed by certified professionals.
- Installation Environment: Do not install the unit in laundry rooms or areas with potential ignition sources. Ensure the room size meets the minimum area requirements specified on the nameplate.
- Electrical Safety: Ensure the power supply matches the specifications on the nameplate. The unit must be properly grounded. Do not use extension cords.
- Children and Safety: Keep children away from the unit and ensure they do not play with it.
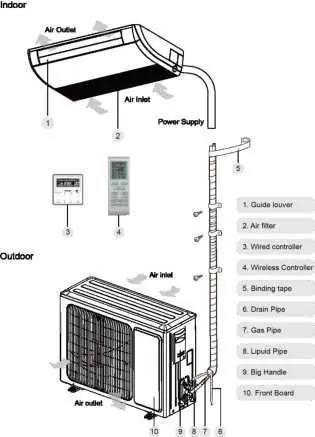
Unit Overview
The system consists of an indoor unit and an outdoor unit. Key components include the air inlet/outlet, guide louvers, air filter, and control interfaces (wired or wireless controller).
Remote Controller Operation
The remote controller allows for various settings and modes:
- Operation Modes: Auto, Cool, Dry, Fan, and Heat.
- Fan Speed: Adjustable from Auto, Low, Medium, to High, plus Turbo and Quiet modes.
- Special Functions:
- X-FAN: Dries the indoor unit evaporator after the unit is turned off to prevent mold.
- I FEEL: The remote controller senses the ambient temperature and adjusts the unit's operation accordingly.
- Sleep Mode: Adjusts temperature curves for comfort during sleep.
- 8°C Heating: Maintains the room temperature at 8°C during heating mode.
- Energy-Saving: Optimizes power consumption.
- Child Lock: Prevents unauthorized changes to settings.
Installation
Installation must be carried out by qualified professionals. Key steps include:
- Location Selection: Choose a location strong enough to support the unit's weight, away from heat sources, steam, or flammable gas.
- Pipe Connection: Use a flaring tool for connection pipes. Ensure pipes are insulated and bent correctly (radius of 150mm or over) to avoid collapse.
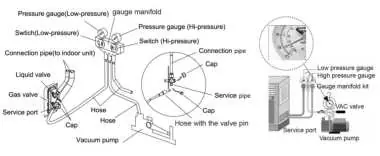
- Vacuuming: Use a vacuum pump to evacuate the system before charging. Verify no leaks exist.
- Drain Pipe: Install with a downward slope (at least 1/100 gradient) to ensure smooth drainage.
- Electrical Wiring: Connect wires according to the provided diagrams, ensuring all connections are firm and the unit is grounded.
Vacuum and Gas Leakage Inspection
After connecting the pipes, perform a vacuum test using a manifold valve assembly and vacuum pump. Ensure the system holds pressure. Check all joints for gas leaks using a detector.
Troubleshooting
If the unit malfunctions, check the following before calling for service:
- Unit won't start: Check power supply and circuit breaker.
- Poor cooling/heating: Check for dirty air filters, open doors/windows, or blocked air intake/outlet.
- Error Codes: The unit displays error codes (e.g., E1, E2, F1) to indicate specific faults like sensor issues or protection triggers. Refer to the error code table in the manual for details.
Manufacturer information
Gree Electric Appliances, Inc.
Practical help
Common problems
Unit does not start
Check if the power supply is connected and if the circuit breaker has tripped.
Poor cooling or heating effect
Clean the air filter, ensure doors and windows are closed, and check for blocked air intake or outlet.
Unit stops after a while
Check for obstacles in front of the condenser or if the outdoor ambient temperature is too high (above 46°C).
Before use
- Ensure the power supply matches the specifications on the unit nameplate.
- Verify that the unit is properly grounded.
- Check that the air inlet and outlet are not blocked.
- Ensure the installation location is strong enough to support the unit.
- Confirm that all installation work is complete before powering on.
Specs in practice
- Power Supply
- 208/230V~ 60Hz
- Pipe Bending Radius
- 150mm or over to prevent pipe breakage
Images and diagrams
- Fig. 1: Overview of indoor and outdoor unit components.
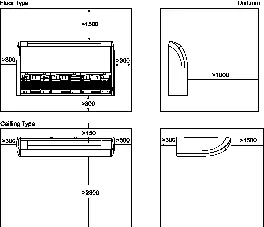
- Fig. 2: Required service space around the unit for installation.
- Fig. 17: Setup for vacuuming the system using a manifold valve assembly.
Model compatibility
- Only use specified refrigerant (R32).
- Installation must be performed by appointed/qualified units.
- Not intended for use in laundry rooms.

Manual page author
David Miller
Documentation analyst
Organizes user manual content into clear summaries, with attention to model details, product context, and everyday usability.