Hvac / Air Conditioners
Owner's Manual for GREE 30,000-36,000 BTU Floor Ceiling Air Conditioner
Quick guide for the GREE 30,000-36,000 BTU Floor Ceiling Air Conditioner. Includes installation steps, remote controller functions, safety warnings, and troubleshooting.
Table of contents
Manual images
Jump to the sectionQuick guide from the manual
This document provides essential information for the installation, operation, and maintenance of the GREE Floor Ceiling Type Air Conditioner (30,000-36,000 BTU). Key procedures include proper installation of the indoor unit, connection of refrigerant piping, vacuuming the system, and electrical wiring. Users should pay close attention to safety warnings regarding the use of R32 flammable refrigerant.
Safety Precautions
The unit uses R32 refrigerant, which is flammable. Installation, maintenance, and repair must be performed by qualified professionals. Ensure the installation room meets the minimum area requirements specified on the nameplate. Do not use means to accelerate the defrosting process or to clean, other than those recommended by the manufacturer. Keep ventilation openings clear and avoid ignition sources in the maintenance area.
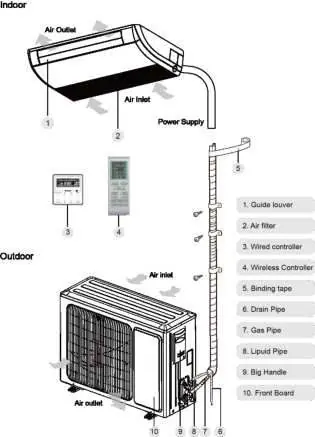
Unit Overview
The system consists of an indoor unit and an outdoor unit. Main components include the guide louver, air filter, and various connection pipes (gas and liquid). The unit can be controlled via a wired controller (optional) or a wireless remote controller.
Remote Controller Functions
The remote controller allows for various settings:
- Operation Modes: Auto, Cool, Dry, Fan, and Heat.
- Fan Speed: Adjustable from low to high, including Turbo and Quiet modes.
- Special Functions: X-FAN (dries the evaporator after shutdown), I FEEL (adjusts temperature based on remote sensor), Sleep mode, and 8°C heating function.
- Swing: Control of up/down and left/right air blowing angles.
- Child Lock: Prevents unauthorized changes to settings.
Installation
Installation must be carried out by authorized personnel in accordance with national wiring standards. Key steps include:
- Location Selection: Choose a location strong enough to support the unit's weight, away from heat sources, steam, or flammable gas.
- Pipe Connection: Use a pipe cutter to cut pipes, remove burrs, and flare the ends. Ensure pipes are not bent more than 90 degrees or repeatedly bent.
- Vacuuming: Use a vacuum pump to remove air from the system before opening the valves. Verify pressure gauge readings to ensure no leaks.
- Drain Pipe: Install with a downward slope of at least 1/100 to ensure smooth drainage.
- Electrical Wiring: Ensure the unit is properly grounded and connected to a dedicated branch circuit with a circuit breaker.
Troubleshooting
If the unit malfunctions, check the error codes displayed on the indoor unit or wired controller:
- E1: Compressor high pressure protection.
- E2: Indoor anti-freeze protection.
- E3: Compressor low pressure protection/refrigerant lack.
- E4: Compressor high discharge temperature protection.
- E5: AC over-current protection.
- E6: Communication error.
- EA: Refrigerant leakage alarm.
- EE: Loading EEPROM malfunction.
If the unit fails to start, check the power supply and leakage switch. For poor cooling or heating, check for dirty filters, open doors/windows, or refrigerant leaks.
Maintenance
Regular maintenance is required. Always disconnect the power supply before cleaning. Do not wash the unit with water. If the refrigerant sensor is damaged or reaches its service life, contact the after-sales service team for replacement.
Manufacturer information
Gree Electric Appliances, Inc.
Practical help
Common problems
Unit does not start
Check if the power supply is connected and ensure the leakage switch has not tripped.
Poor cooling or heating effect
Clean the air filter, ensure doors and windows are closed, check for refrigerant leaks, and verify the set temperature.
Unit stops after running for a while
Check for obstacles in front of the condenser and ensure the outdoor ambient temperature is not above 46°C.
Before use
- Verify power specifications match the nameplate.
- Ensure the unit is properly grounded.
- Check that the installation location is strong enough to support the unit.
- Confirm the air inlet and outlet are not obstructed.
- Ensure the refrigerant piping is correctly installed and leak-tested.
Specs in practice
- R32 Refrigerant
- A flammable, high-efficiency refrigerant used in this system.
Images and diagrams
- Unit components diagram showing indoor and outdoor units.
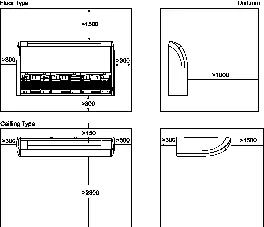
- Installation dimensions for floor and ceiling mounting.
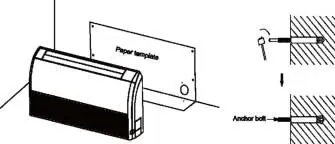
- Anchor bolt installation procedure.
- Vacuum pump connection setup for system evacuation.
Model compatibility
- Compatible with R32 refrigerant systems.
- Requires specific indoor unit models: GTH(30)DBXH-D6DNA1G/I and GTH(36)DCXH-D6DNA1A/I.

Manual page author
Emily Carter
User documentation editor
Prepares concise manual descriptions and highlights the most useful setup, operation, and maintenance information for readers.