Automotive / Car Audio
User Manual for Grundig VCC 4150 L / VCC 6250 ECO Vacuum Cleaner
Quick guide for the Grundig VCC 4150 L and VCC 6250 ECO vacuum cleaners. Includes setup, operation, cleaning, maintenance, and technical specifications.
Table of contents
Manual images
Click an image to enlargeQuick guide from the manual
This vacuum cleaner is designed for domestic use. Before starting, ensure the dust bag and filters are correctly installed. The appliance features adjustable suction power and various attachments for different surfaces.
Description of the appliance
The vacuum cleaner consists of the following main components:
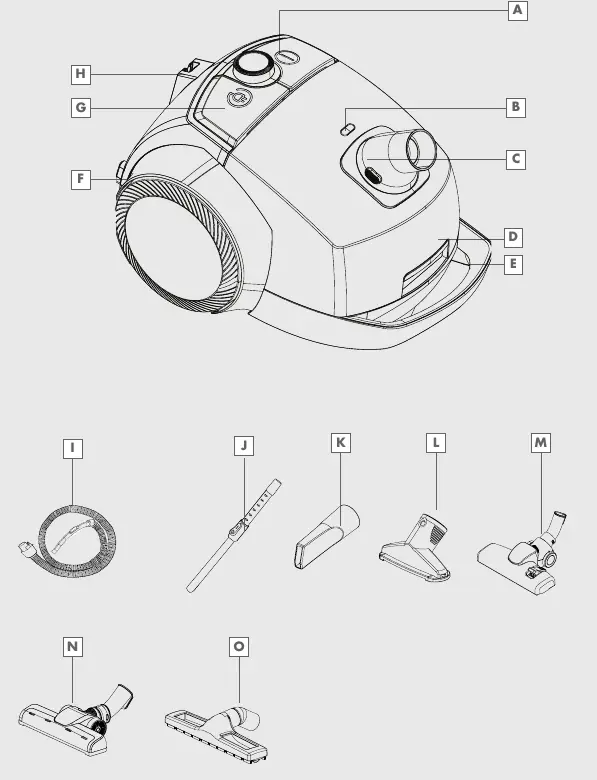
- A: ON/OFF button
- B: Dust bin indicator
- C: Hose inlet
- D: Dust container opening latch
- E: Carriage handle
- F: Power cord
- G: Power cable winding button
- H: Parquet/carpet brush parking groove
- I: Hose
- J: Telescopic tube
- K: Crevice tool
- L: Upholstery brush
- M: Main brush
- N: Turbo brush (VCC 6250 ECO only)
- O: Parquet brush (VCC 6250 ECO only)
Assembly and operation
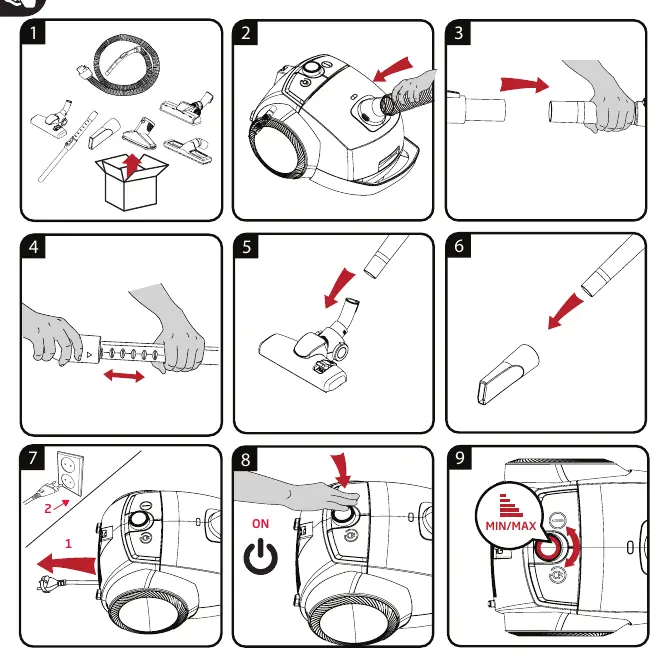
- Connect the hose to the hose inlet.
- Attach the telescopic tube to the hose handle.
- Attach the desired brush (Main, Turbo, or Parquet) to the telescopic tube.
- Pull out the power cord and plug it into a wall socket.
- Press the ON/OFF button to start the vacuum.
- Adjust the suction power using the MIN/MAX dial.
- After use, switch off the appliance, unplug it, and press the cable winding button to retract the cord.
Cleaning and maintenance
Regular maintenance ensures optimal performance.
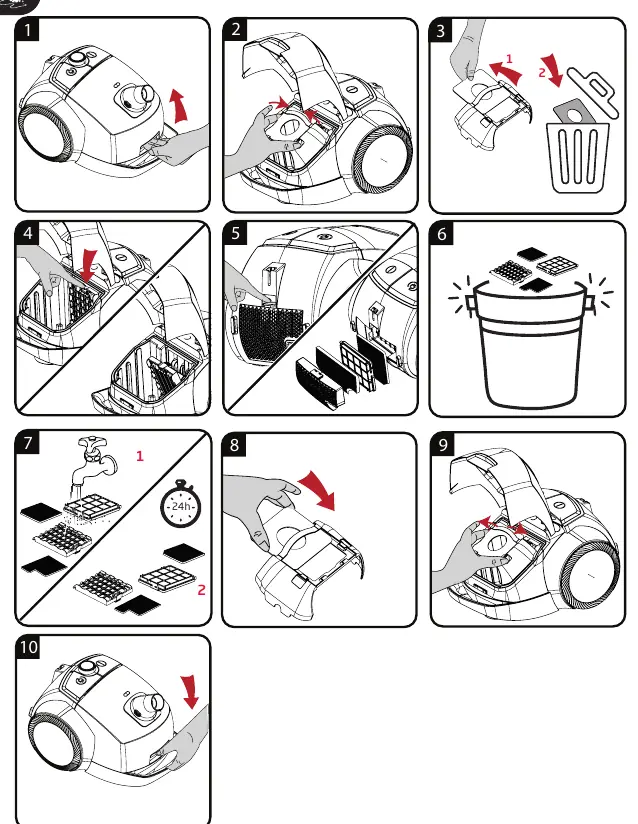
- Dust bag: Replace the dust bag when the dust bin indicator turns red.
- Filters: The appliance uses a HEPA 13 filter. To clean, remove the filter, wash it if applicable (check specific filter type), and ensure it is completely dry before re-installing. Do not use heat sources like hair dryers to dry filters.
- General cleaning: Wipe the exterior with a dry cloth. Never use gasoline, solvents, abrasive cleaners, or hard brushes.
Safety instructions
- Do not use on wet surfaces or to vacuum wet objects.
- Do not vacuum cigarette stubs, ash, or matches.
- Keep the suction intake free of blockages.
- Do not operate without a dust bag or filter.
- Keep the appliance away from children.
- If the power cord is damaged, it must be replaced by a qualified service center.
Technical data
- Supply voltage: 220-240 V~, 50-60 Hz
- Power: 800 W
- Operating radius: 9 m
- Dust capacity: 4 L
- Filter: HEPA 13
Practical help
Common problems
Appliance does not start
Check if the power cord is properly plugged into the wall socket.
Dust bin indicator is red
The dust bag is full and needs to be replaced.
Reduced suction power
Check the hose, tube, and brush for blockages. Ensure the dust bag is not full and filters are clean.
Before use
- Ensure the dust bag is correctly installed.
- Check that all filters are clean and dry.
- Verify the hose is securely connected to the inlet.
- Inspect the power cord for any visible damage.
Specs in practice
- Operating radius
- 9 meters, allowing cleaning of large areas without changing sockets.
- Dust capacity
- 4 Liters, reducing the frequency of bag changes.
Images and diagrams
- A: ON/OFF button for power control.
- B: Indicator shows when the dust bag needs replacement.
- G: Button to automatically retract the power cord.
- J: Telescopic tube allows height adjustment.
Model compatibility
- Use only original GRUNDIG accessories.
- Recommended dust bags: Swirl® Y 05® MicroPor® Plus AntiBac.

Manual page author
David Miller
Documentation analyst
Organizes user manual content into clear summaries, with attention to model details, product context, and everyday usability.