Documents / Warranty Safety
10FT Trampoline with Safety Net
Comprehensive assembly, safety, and maintenance guide for the GSD 10FT Trampoline with Safety Net, ensuring safe and long-lasting use.
Table of contents
Manual images
Jump to the sectionProduct Overview
The GSD 10FT Trampoline with Safety Net is designed for domestic, outdoor use. It features a robust frame, a durable jumping mat, and a safety enclosure to prevent falls. The trampoline is intended for one user at a time, with a maximum weight capacity of 100kg. It is essential to follow all assembly instructions carefully to ensure the safety and stability of the equipment.
Safety Guidelines
Safety is paramount when using the trampoline. Always ensure the safety net is closed before jumping. Users should jump without shoes, empty their pockets, and remove any sharp objects. Never eat while jumping and avoid somersaults, as these pose a high risk of injury. The trampoline should be placed on a level surface, at least 2 meters away from any structures, fences, or electrical wires. It is not suitable for children under 3 years old due to small parts and choking hazards. If you feel unwell or dizzy, stop exercising immediately.
Assembly Instructions
Assembly must be performed by an adult. Begin by connecting the top rails to the T-sections to form the frame. Secure the leg extensions to the U-shaped legs using the provided screws. Once the frame is assembled, unfold the jumping mat in the center and attach the springs in the specified order to ensure even tension. Do not insert springs at random. Finally, install the enclosure poles and attach the safety net securely to the jumping mat and frame. Ensure the frame pad is correctly positioned over the springs and top rails to prevent injury.

Maintenance and Care
Regular maintenance is required to keep the trampoline in safe working condition. At the start of each season and at regular intervals, check that all bolts are tight and re-screw if necessary. Inspect the springs, jumping mat, and safety net for any signs of wear or damage. If any parts are worn or defective, they must be replaced immediately. During periods of strong wind, it is recommended to secure the trampoline or dismantle it to prevent damage. In winter, store the net, mat, and protective elements indoors to protect them from extreme weather conditions.
Moving and Transportation
To move the trampoline, a minimum of two people is required to lift the structure gently. For long-distance transport, the trampoline must be fully dismantled by following the assembly steps in reverse order. Removing springs is a delicate operation and should be performed using the provided tool.
Practical help
Common problems
Trampoline moves or shifts during use
Ensure all bottom connecting straps of the frame pad are securely tied to the top rails.
Springs are difficult to attach
Use the provided T-hook tool to pull the spring until it attaches to the corresponding opening on the top rail.
Parts show wear and tear
Stop using the trampoline immediately and replace any defective or worn parts according to manufacturer instructions.
Strong wind conditions
Secure the trampoline with an anchoring system or dismantle the mat and net to reduce wind factor.
Before use
- Check that all bolts are correctly screwed and tightened.
- Ensure the jumping mat is in good condition and free of holes.
- Verify that the safety net is properly attached and closed.
- Confirm the frame pad is covering all springs and top rails.
- Ensure the area around the trampoline is clear of obstructions.
- Check that all enclosure poles are securely snapped into place.
- Verify that the user weight is within the 100kg limit.
Specs in practice
- Max User Weight
- 100kg - The maximum weight the trampoline is designed to support safely.
- Frame Height
- 70cm - The height of the jumping surface from the ground.
Images and diagrams
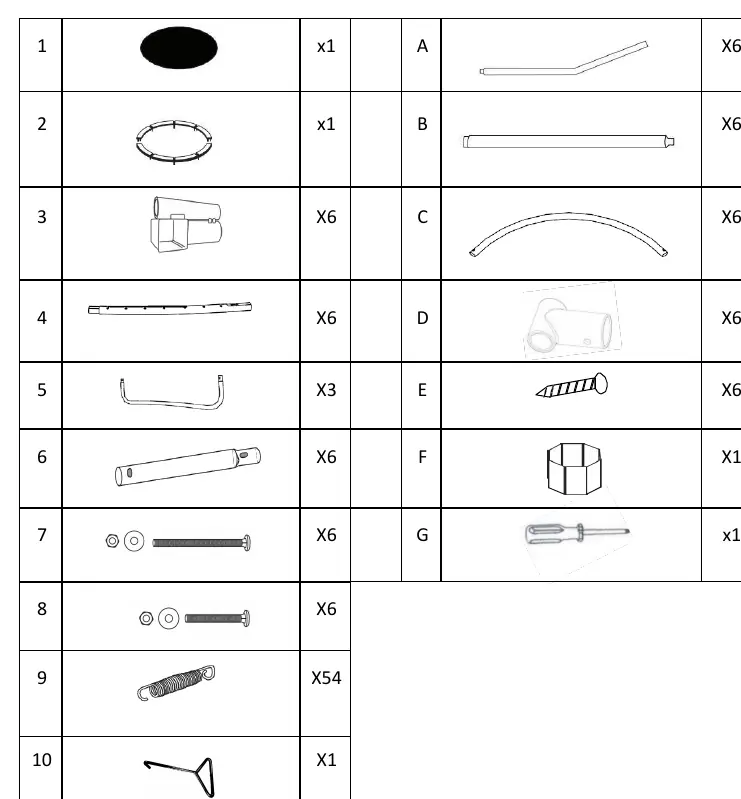
- Parts List: Identifies all components (1-11, A-G) required for assembly.
- Spring Attachment: Shows the correct method of hooking the spring to the V-ring and pulling it into the top rail.
- Spring Order: Illustrates the specific sequence for attaching springs to ensure balanced tension.
- Enclosure Pole Assembly: Demonstrates the snap-and-click mechanism for connecting straight and curved poles.
- Net Attachment: Shows how to fasten the net hooks to the V-rings on the jumping mat.
Model compatibility
- The safety net should be replaced every year.
- Only use original manufacturer parts for replacements.
- Do not install over concrete, asphalt, or other hard surfaces.
- Trampoline is not intended to be buried into the ground.

Manual page author
Emily Carter
User documentation editor
Prepares concise manual descriptions and highlights the most useful setup, operation, and maintenance information for readers.