iMac G4 17-inch 800 MHz EMC 1936 PRAM Battery Replacement
Step-by-step guide on how to replace the PRAM battery in an iMac G4 17-inch 800 MHz (EMC 1936).
Table of contents
Introduction
This guide provides instructions for replacing the PRAM battery in an iMac G4 17-inch 800 MHz (EMC 1936). Replacing the PRAM battery is necessary when the computer fails to retain system settings like time and date.
Tools and Parts
To perform this replacement, you will need the following tools and parts:
- Phillips #0 Screwdriver
- T15 Torx Screwdriver
- iFixit Opening Tools
- 1/2 AA Lithium 3.6V battery
Safety and Preparation
Before starting, ensure the computer is powered off and all cables, including the power cable, are disconnected. Place the computer face-down on a soft cloth to protect the screen and support the neck and base.
Opening the iMac
To access the internal components, follow these steps:
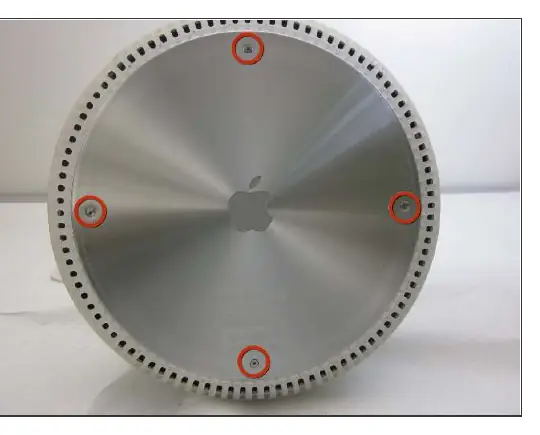
- Loosen the four Phillips #0 screws on the bottom plate.
- Carefully remove the base access panel.
- Remove the four 25mm T-15 screws securing the bottom plate housing.
- Open the housing plate carefully. Be gentle with the wires connected to the logic board to avoid damage. Note that there is a fixed plug connector between the logic board and the upper unit that will provide resistance; pull gently but firmly to separate.
Replacing the PRAM Battery
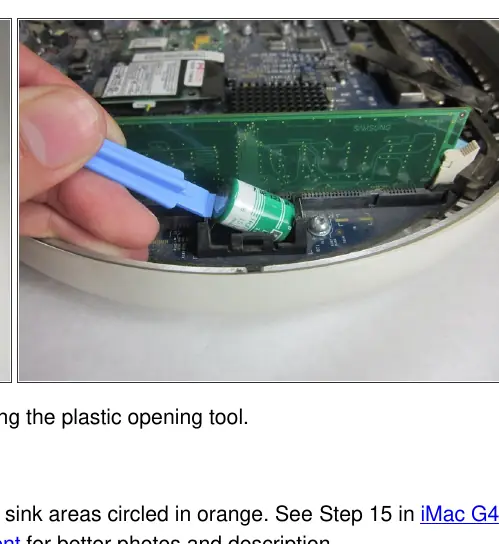
Once the housing is open, locate the PRAM battery on the logic board. Use a plastic opening tool to gently pry the battery out of its holder. Insert the new 1/2 AA Lithium 3.6V battery into the holder. If necessary, clean and re-apply thermal paste to the heat sink areas indicated on the board.
Reassembly
To reassemble your device, follow the steps above in reverse order. Ensure all cables are properly seated and screws are tightened securely before powering on the unit.

Manual page author
David Miller
Documentation analyst
Organizes user manual content into clear summaries, with attention to model details, product context, and everyday usability.