Documents / Warranty Safety
Kaise 12V/24V Jump Starter KG-201 User Manual
Quick guide for the Kaise 12V/24V Jump Starter KG-201, covering jump-starting procedures, USB output usage, charging instructions, safety warnings, and troubleshooting.
Table of contents
Quick guide from the manual
The Kaise KG-201 is a portable 12V/24V jump starter. This document provides essential safety instructions, operational procedures for jump-starting vehicles, USB power output usage, and maintenance guidelines. Always read the full safety warnings before use.
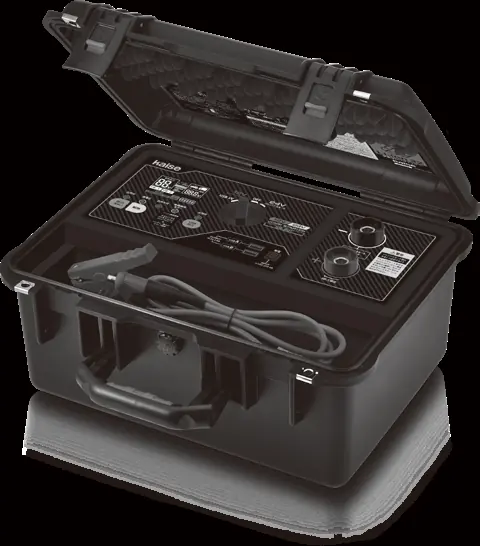
Device Overview
The unit features a control panel with a function switch (12V/24V/USB/OFF), LED indicators for status, a digital LCD display, and jump-start output terminals. It is housed in a rugged, portable case.
Jump-Starting Procedure
- Place the unit on a flat, stable surface.
- Connect the red cable to the positive (+) terminal and the black cable to the negative (-) terminal on the unit, tightening them securely.
- Set the function switch to the appropriate 12V or 24V position.
- Clean the vehicle battery terminals and jump-start clips using the provided wire brush if necessary.
- Connect the red clip to the vehicle's positive (+) battery terminal, then the black clip to the negative (-) terminal.
- Ensure the green LED indicates the unit is ready.
- Press and hold the output key for at least 1.5 seconds to initiate output. A 99-second countdown will begin; start the engine within this time.
- After starting, immediately set the function switch to OFF and disconnect the cables in reverse order (black clip first, then red clip).
USB 5V Output
The device can power or charge USB devices:
- Set the function switch to USB 5V.
- Connect your USB device to port A or B.
- Press the USB output key to start power delivery.
- After use, set the switch to OFF and disconnect the device.
Charging the Unit
The unit can be charged via the included AC charger or a compatible solar panel (14V-25V output). Ensure the function switch is set to OFF during charging. The battery level indicator will flash during charging and show 5 bars when complete.
Maintenance and Safety
- Storage: Store in a cool, dry place. Charge every 3 months if not in use.
- Waterproofing: The unit is IP67 rated only when the lid is fully closed and locked.
- Warnings: Do not use if the battery is severely degraded or deeply discharged. Do not crank for more than 3 seconds. Do not use in explosive environments.
Troubleshooting
If the unit fails to power on, check the battery charge level or ensure the function switch is not in a conflict state. If jump-starting fails, verify the vehicle battery condition, ensure the correct voltage is selected, and confirm the clips are clean and properly connected.
Manufacturer information
Kaise Corporation
Practical help
Common problems
Unit will not power on
Check if the battery is low or in over-discharge protection mode. Charge the unit. Ensure the function switch is not set to a function while cables are connected to a vehicle.
Jump-start fails
Ensure the function switch is set correctly (12V/24V). Check for heavy electrical loads (headlights/AC) on the vehicle and turn them off. Verify battery terminals are clean.
USB output not working
Ensure the function switch is set to USB 5V and the USB output key has been pressed.
Before use
- Ensure the unit is charged (check battery level indicator).
- Verify the vehicle battery voltage matches the selected 12V or 24V setting.
- Clean vehicle battery terminals and jump-start clips.
- Ensure the function switch is set to OFF before connecting cables.
- Check that the unit is placed on a flat, stable surface.
Specs in practice
- Jump-start current
- 600A continuous, 1200A peak.
- Battery capacity
- 64000mAh (3.2V) / 204.8Wh.
- Operating temperature
- -10°C to 45°C for jump-starting.
Images and diagrams
- The control panel includes a function switch to select between 12V, 24V, USB, and OFF modes.
- LED indicators show status: Green (Ready/Output), Yellow (Low Voltage), Red (Output Disabled/Error).
- The LCD displays output voltage, countdown timer, and battery level.
Model compatibility
- Compatible with 12V engines (gas/diesel) up to 6000cc.
- Compatible with 24V diesel engines up to 17000cc.
- USB output provides 5V/2.4A.

Manual page author
Emily Carter
User documentation editor
Prepares concise manual descriptions and highlights the most useful setup, operation, and maintenance information for readers.