Electronics / Collaboration Devices
User Manual for LAIA CUTE 12X/30X PTZ Camera
Quick guide for the LAIA CUTE 12X/30X PTZ Camera. Includes installation, network configuration, streaming setup, remote control pairing, and troubleshooting steps.
Table of contents
Manual images
Click an image to enlargeQuick Guide
This guide provides essential information for setting up and operating the LAIA CUTE 12X/30X PTZ Camera. Ensure the camera is placed on a stable surface and that all connections are secure before powering on. The camera supports multiple control protocols and streaming options, including RTSP and RTMP.
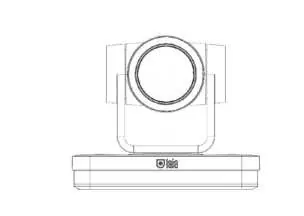
Product Overview
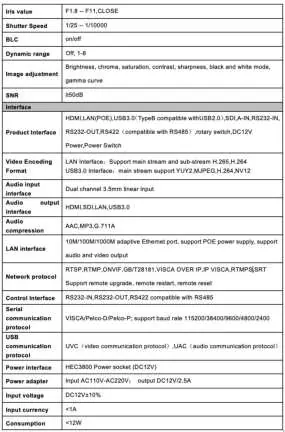
The LAIA CUTE 12X/30X is a Full HD PTZ camera featuring a 1/2.8 inch CMOS sensor, 12X/30X optical zoom, and autofocus technology. It includes multiple output interfaces such as HDMI, USB 3.0, and LAN (with POE support).
Installation and Connections
Wall and Ceiling Mounting: Brackets should only be mounted on template or concrete walls. Plasterboard is not recommended for safety reasons.
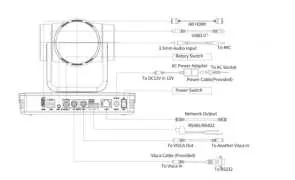
Connections: The camera features various interfaces including:
- HDMI Output: For direct video display.
- USB 3.0: For data and video streaming.
- LAN Port: Supports network connectivity and POE.
- RS232/RS485: For serial communication and external control.
- Audio Input: 3.5mm line-in.
Remote Control Operation
Pairing: To pair the remote, press the "set" and "*" keys simultaneously for 3 seconds until the LED flashes. The camera will receive the signal and power on. If pairing fails, the red LED will flash for 20 seconds.
Clearing Code: Press "set" and "*" for 3 seconds. The camera will power off and on to confirm.
Address Setting: Use the remote to select the camera address (1-4) using key combinations like [ * ] + [ # ] + [ F1 ].
Network Configuration
The camera's default IP address is 192.168.5.163. To access the web interface:
- Connect the camera to your network.
- Ensure your computer is on the same network segment.
- Use an IE-based browser (IE, 360 browser) to log in.
- Default credentials are username: "admin", password: "admin".
Streaming Setup
The camera supports RTSP and RTMP streaming. Configure these settings under Configurations -> Video Configure -> Stream Publish. You will need to input the host address, port, and stream name (e.g., live/av0) provided by your streaming platform (YouTube/Facebook).
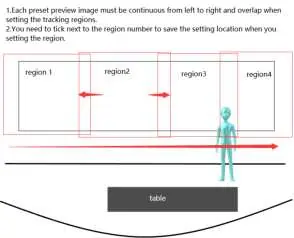
Camera Tracking
The camera supports regional tracking. Enable this in the management interface under "Monocular Tracking". You can define up to 4 regions. Ensure preset preview images are continuous and overlap when setting tracking regions.
Maintenance and Troubleshooting
Maintenance: Clean the lens with a soft, dry cloth and mild detergent if necessary. Do not use corrosive cleaners.
Troubleshooting:
- No Video Output: Check power supply, DIP switch settings, and video cables.
- Remote Not Working: Verify the remote address is set to 1, check batteries, and ensure the OSD menu is closed.
- Web Login Failed: Ensure the network cable is connected (check for flashing yellow light) and that your computer is on the correct IP segment.
Practical help
Common problems
No video output
Check if the power supply is connected and the voltage is normal. Verify the DIP switch is in the correct operating mode and check video cables.
Remote control not working
Ensure the remote address is set to 1. Check battery levels. Ensure the OSD menu is closed, as remote control is limited while the menu is open.
Web page login failed
Verify the network cable is connected (yellow light should flash). Ensure your computer is on the same IP segment as the camera (default 192.168.5.163).
Video dithering during zoom
Ensure the camera installation position is solid and there is no vibration or shaking around the camera.
Before use
- Ensure the camera is placed on a stable, horizontal surface.
- Verify the power supply is 12V/2A.
- Check that the DIP switch is set to the correct operating mode.
- Ensure the network cable is connected for IP-based features.
- Install the required plug-in for IE browser access.
Specs in practice
- 12X/30X Optical Zoom
- The lens magnification capability for capturing distant objects.
- 1920x1080 @ 60fps
- The maximum resolution and frame rate for high-quality video output.
Images and diagrams
- Interfaces: Shows the location of HDMI, USB 3.0, LAN, and power ports.
- Wall/Ceiling Mounting: Illustrates the bracket installation steps.
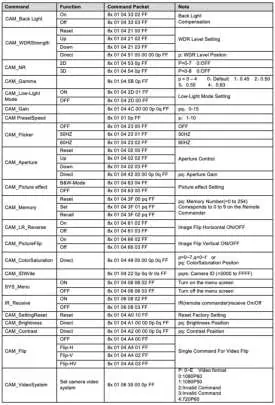
- Rotary Dial: Explains the video format selection settings.
Model compatibility
- Web access requires IE-based browsers (IE, 360 browsers).
- Ceiling/Wall brackets should be mounted on concrete or template walls; plasterboard is not recommended.

Manual page author
Michael Turner
Technical manual editor
Reviews PDF manuals for structure, safety notes, and practical product details so readers can find the right information quickly.