Electronics / Cameras
User Manual for Laia Cute 10x 22 Conference Camera
Quick guide for the Laia Cute 10x 22 conference camera. Includes connection instructions, remote control menu settings, troubleshooting, and technical specifications.
Table of contents
Manual images
Click an image to enlargeQuick Guide from the Manual
This document provides essential instructions for setting up and operating the Laia Cute 10x 22 conference camera. Users should ensure the power supply is DC +12V and that the camera is installed on a stable surface to avoid image jitter. The camera supports USB 2.0 connectivity and RS232 control.
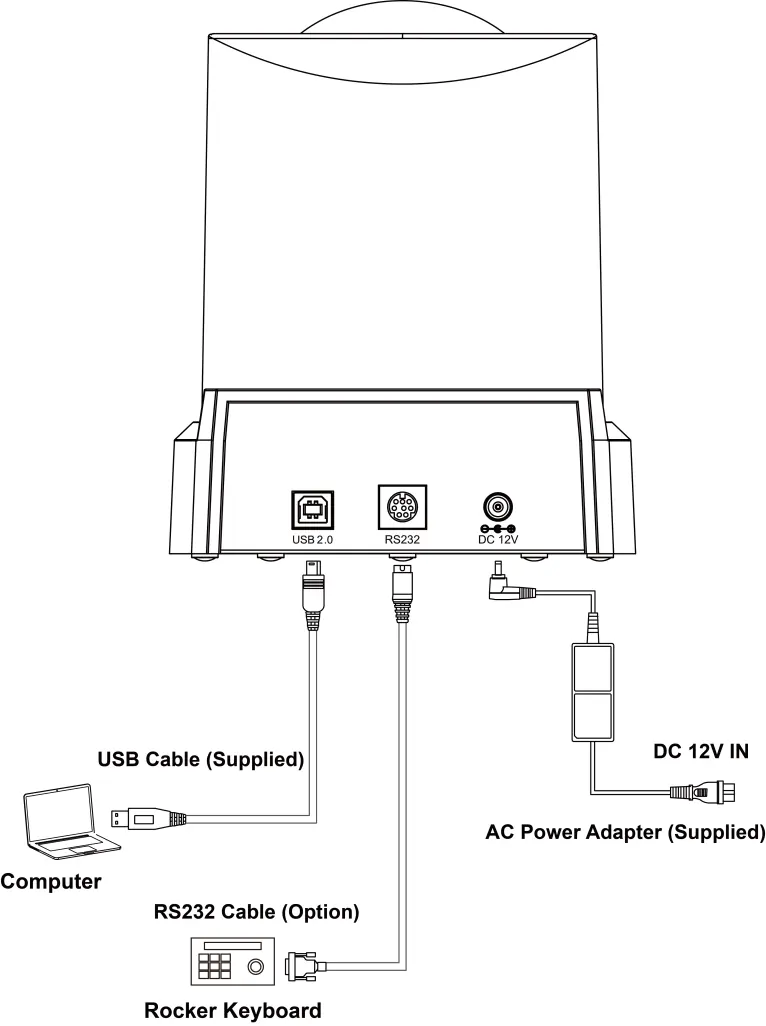
Appearance and Connections
The camera features a USB 2.0 interface for video output, an RS232 port for serial control, and a DC 12V power input. Connect the USB cable to your computer for video conferencing. If using serial control, connect the RS232 cable to the appropriate controller.
Packing List
Ensure the following items are included in the package:
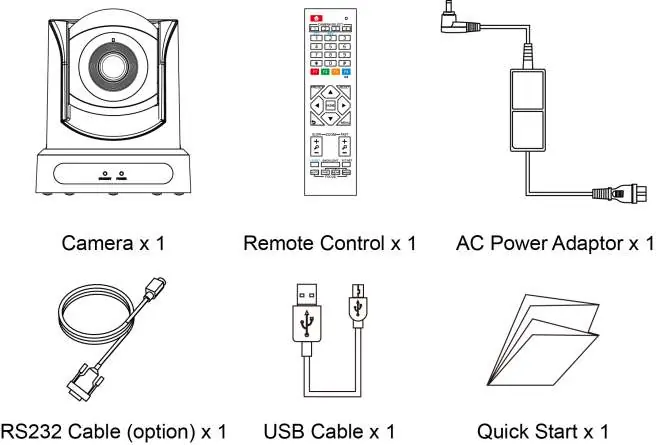
- Camera
- Remote Control
- AC Power Adaptor
- RS232 Cable (Optional)
- USB Cable
- Quick Start Guide
Remote Control Operation
The remote control allows for full management of the camera settings. Key functions include:
- Standby Key: Enters standby mode.
- Number Keys: Used for preset settings or transfer.
- Preset Key: Sets presets in combination with number keys.
- HOME Key: Confirms menu selections or returns the PTZ to the middle position.
- Zoom Button: Adjusts lens angle (wide/narrow).
- Menu Key: Enters or exits the OSD menu.
- PTZ Control Keys: Moves the camera according to arrow directions.
Menu Settings
Access the OSD menu by pressing the [MENU] button. Use the arrow keys to navigate and the [HOME] button to enter sub-menus. Available configuration categories include:
- Exposure: Adjust modes (Auto, Manual, SAE, AAE, Bright), exposure compensation, gain limits, and backlight settings.
- Color: Configure white balance (WB Mode), red/blue gain, saturation, and hue.
- Image: Adjust luminance, contrast, sharpness, flip settings (Flip-H/V), and image freeze.
- Noise Reduction: Configure 2D and 3D noise reduction levels.
- Setup: Change language, DVI mode, and video format.
- Communication Setup: Configure protocol (VISCA, PELCO-D/P), address, and baud rate.
- Restore Default: Reset all parameters to factory settings.
RS232 Interface
The RS232 interface pinout is as follows:
- 1: DTR
- 2: DSR
- 3: TXD
- 4: GND
- 5: RXD
- 6: GND
- 7: IR OUT
- 8: NC
Troubleshooting
If you encounter issues, check the following:
- No Image: Verify power supply connection, ensure the power indicator is on, and check video cable connections.
- Image Jitter: Ensure the camera is installed on a stable surface and is not near vibrating machinery.
- Remote Control Failure: Replace batteries, check camera working mode, and verify address matching.
- Serial Port Control Failure: Check protocol, address settings, and cable connections.
Safety Precautions
- Installation must comply with local electrical safety standards.
- Use only the specified DC +12V power supply.
- Do not rotate the camera head by hand to avoid mechanical damage.
- Do not disassemble the unit; unauthorized repair voids the warranty.
- Avoid hot-plugging the power supply.
Practical help
Common problems
Monitor shows no image
Check that the camera power supply is connected, the voltage is normal, and the power indicator light is on. Verify the video cable connection to the TV or platform.
Image jitter at maximum zoom
Ensure the camera is installed on a stable surface and is not located near vibrating machinery or objects.
Remote control not working
Replace the batteries, check if the camera working mode is correct, and ensure the remote control address matches the camera.
Serial port control not working
Verify that the camera protocol and address are set correctly and check that the control line is connected properly.
Before use
- Verify power supply is DC +12V, 2A.
- Ensure the camera is placed on a stable surface.
- Connect the USB cable to the computer.
- If using serial control, connect the RS232 cable.
- Check that the power indicator light is on.
Specs in practice
- 1080P Full HD
- High-quality HD CMOS sensor supporting resolutions up to 1920x1080.
Images and diagrams
- The connection diagram illustrates the camera connected to a computer via USB and to a keyboard controller via an RS232 cable.
Model compatibility
- Requires Laia Cam Control app for advanced features like ePTZ and preset management.
- Supports VISCA, PELCO-D, and PELCO-P protocols.

Manual page author
Michael Turner
Technical manual editor
Reviews PDF manuals for structure, safety notes, and practical product details so readers can find the right information quickly.