Lighting / Fixtures
User Manual for Lucci Decor Aspen 10LT Pendant Light
Quick guide for the Lucci Decor Aspen 10LT pendant light. Includes installation instructions for both pendant and close-to-ceiling mounting, wiring diagrams, safety tips, and technical specifications.
Table of contents
Manual images
Click an image to enlargeImportant Information
This luminaire must be assembled and installed by a licensed electrician. Due to the significant weight of the product (43 kg), two people are required to lift it during the installation process. Ensure the mounting point can support at least twice the weight of the luminaire. This is a Class I product and must be earthed during installation.
Installation Requirements
- Ensure power to the circuit is switched OFF before starting any electrical work.
- The luminaire is for indoor use only.
- Do not install in direct line of an air vent or system.
- If installing in a moist area, ensure proper ventilation and use an exhaust fan if necessary.
- Check all components before assembly; if parts are missing or damaged, return the complete product to the place of purchase.
Installation Methods
This luminaire supports two installation types: Pendant or Close to Ceiling. Refer to the specific instructions below.

Pendant Installation
- Use the mounting bracket as a template to mark screw positions on the ceiling.
- Install the rod onto the luminaire and secure it with the provided grub screw and allen key.
- Adjust the suspension length using the chain-link connectors.
- Attach the safety lanyard to the mounting bracket.
- Install the mounting bracket to the ceiling using appropriate screws and anchors.
- Connect the luminaire wires to the mains supply at the terminal block.
- Hang the luminaire on the bracket and secure the canopy.
Close to Ceiling Installation
- Remove the mounting bracket from the canopy.
- Use the bracket as a template to mark screw positions.
- Install the rod onto the luminaire and secure with the grub screw.
- Insert the canopy onto the rod and secure the earth point, ensuring the star washer, earth ring, lock washer, and nut are in the correct sequence.
- Attach the safety lanyard to the mounting bracket.
- Install the mounting bracket to the ceiling.
- Connect the wiring and secure the canopy to the bracket.
Wiring
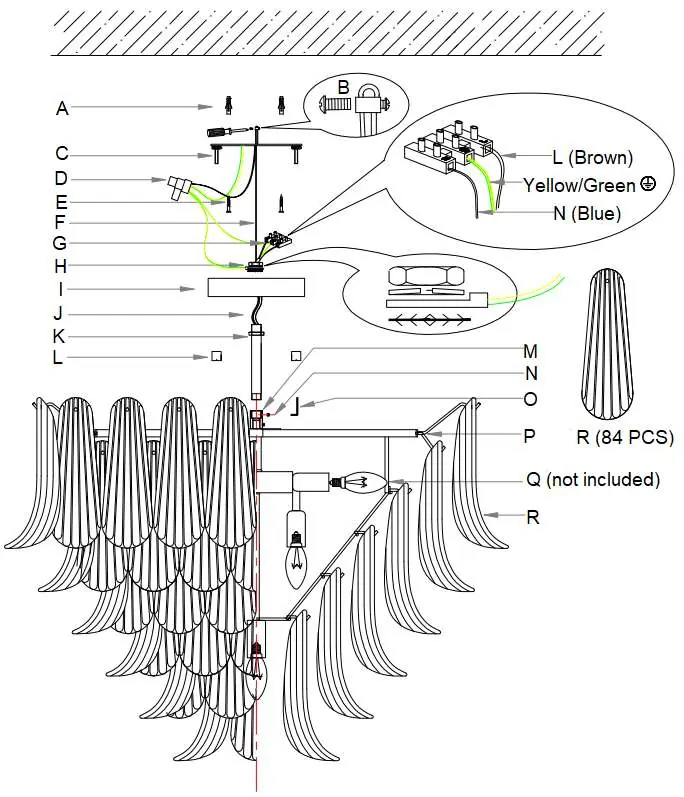
Ensure all wires are secure and no bare wires are exposed. Connect the mains supply to the terminal block as follows:
- Earth: Yellow/Green
- Neutral: Blue or Black
- Live: Brown or Red
Ensure the earth wires from the canopy and safety lanyard are connected to the cable connector for full earth continuity.
Safety and Maintenance
- Always ensure the power is OFF and the luminaire has cooled down before maintenance, cleaning, or changing globes.
- Clean with a soft, damp cloth. Do not soak or immerse in water.
- Avoid contact with corrosive chemicals, solvents, or abrasive cleaners.
- Do not exceed the maximum wattage rating.
Practical help
Common problems
Missing or damaged parts
Do not install the product. Return the complete unit to the place of purchase for inspection or replacement.
Weight concerns
The luminaire weighs 43 kg. Ensure the mounting point can support twice this weight and use two people for the installation process.
Moisture damage
Damage or corrosion caused by moisture is not a product fault. Ensure the area is well-ventilated and use an exhaust fan if necessary.
Before use
- Ensure power is switched OFF at the circuit.
- Verify the mounting point can support twice the weight of the luminaire.
- Check that all components are present and undamaged.
- Ensure you have a licensed electrician for installation.
- Confirm the installation type (Pendant or Close to Ceiling) before starting.
Specs in practice
- Rated Voltage
- 220-240V~ 50Hz
- Rated Wattage
- 280W Max. (10 x Max. 28W)
Images and diagrams
- The diagrams illustrate the assembly sequence for both pendant and close-to-ceiling configurations, highlighting the wiring connections and the safety lanyard attachment.
Model compatibility
- Indoor use only.
- Class I product (must be earthed).

Manual page author
Emily Carter
User documentation editor
Prepares concise manual descriptions and highlights the most useful setup, operation, and maintenance information for readers.