Mayfair 1730SL Toilet Seat Installation Guide
Step-by-step installation guide for the Mayfair 1730SL toilet seat. Learn how to properly mount, adjust, and secure your seat for a perfect fit.
Quick answers from the manual
Quick answer
- The Mayfair 1730SL toilet seat is installed by inserting bolts into the hinge, placing the seat on the bowl, adjusting for fit, and tightening the fasteners from below. p. 1
Key actions
- Adjust seat front to back for proper fit p. 1
First start
- Open hinge caps, insert bolts, place on bowl, adjust, tighten fasteners, and close caps. p. 1
Where to find it in the PDF
- Installation Instructions p. 1
Table of contents
Manual images
Click an image to enlargeQuick guide from the manual
This document provides instructions for installing the Mayfair 1730SL toilet seat. The process involves attaching the hinge bolts to the seat, placing the seat on the toilet bowl, adjusting for fit, and tightening the fasteners from below.
Tools needed
You will need a screwdriver to complete the installation.
Hardware kit includes
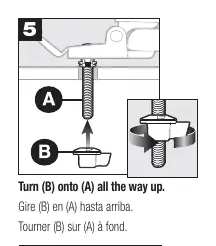
- 2x Bolt (A)
- 2x Fastener (B)
Installation steps
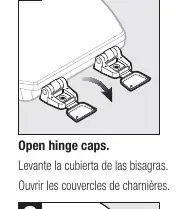
- Open hinge caps: Lift the covers on the hinge mechanism.
- Insert (A): Insert the bolts (A) into the hinge assembly.
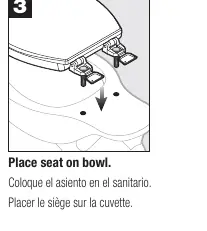
- Place seat on bowl: Position the seat onto the toilet bowl.
- Adjust seat: Move the seat from front to back to ensure a proper fit.
- Turn (B) onto (A): Screw the fasteners (B) onto the bolts (A) all the way up.
- Tighten: Use a screwdriver to tighten the fasteners securely.
- Close hinge caps: Snap the hinge covers shut.
Support
For assistance, contact Mansfield Plumbing at 888.722.6488 or visit MansfieldPlumbing.com.
Official resources from the manual
Practical help
Before use
- Ensure you have a screwdriver available
- Verify the hardware kit contains 2 bolts (A) and 2 fasteners (B)
Images and diagrams
- Steps 1-7 illustrate the mounting process
- Step 4 demonstrates the front-to-back adjustment capability

Manual page author
David Miller
Documentation analyst
Organizes user manual content into clear summaries, with attention to model details, product context, and everyday usability.