Plumbing / Toilet Frames
Installation Guide for Plumbworld PROSYS 1150mm Pneumatic WC Frame
Step-by-step installation and maintenance guide for the Plumbworld PROSYS 1150mm Pneumatic WC Frame. Includes mounting instructions, pipe fitting, flush volume adjustments (4.5L/6L), and troubleshooting for low water pressure.
Table of contents
Manual images
Click an image to enlargeQuick guide from the manual
This document provides installation and maintenance instructions for the PROSYS 1150mm Pneumatic WC Frame. Key procedures include frame assembly, wall mounting, pipe fitting, and flush volume adjustment. Ensure the water supply is shut off before beginning any installation or maintenance work.
Installation and Assembly
The installation process involves preparing the frame, mounting it to the wall, and connecting the pneumatic flush mechanism. Follow these critical steps:
- Frame Preparation: Assemble the frame components as shown in the initial diagrams. Ensure all dimensions match the requirements for your specific wall installation.
- Pipe Fitting: Measure the required pipe lengths (L1 and L2) carefully before cutting. Use the provided lubricant to ensure smooth connections and prevent leaks.
- Wall Mounting: Secure the frame to the wall structure. Ensure the frame is level and at the correct height (min 530mm - max 645mm).
- Mechanism Connection: Connect the pneumatic tubes to the flush mechanism. Listen for a "click" to confirm secure attachment.
Flush Volume Adjustment
The system allows for adjusting the flush volume to optimize water usage. You can switch between 4.5L and 6L settings:
- Access the flush mechanism inside the cistern.
- Locate the adjustment ring on the flush valve.
- Rotate the ring to select the desired volume (4.5L or 6L) as indicated by the markings.
Maintenance and Troubleshooting
Regular maintenance ensures the longevity of the pneumatic system. If you experience issues, check the following:

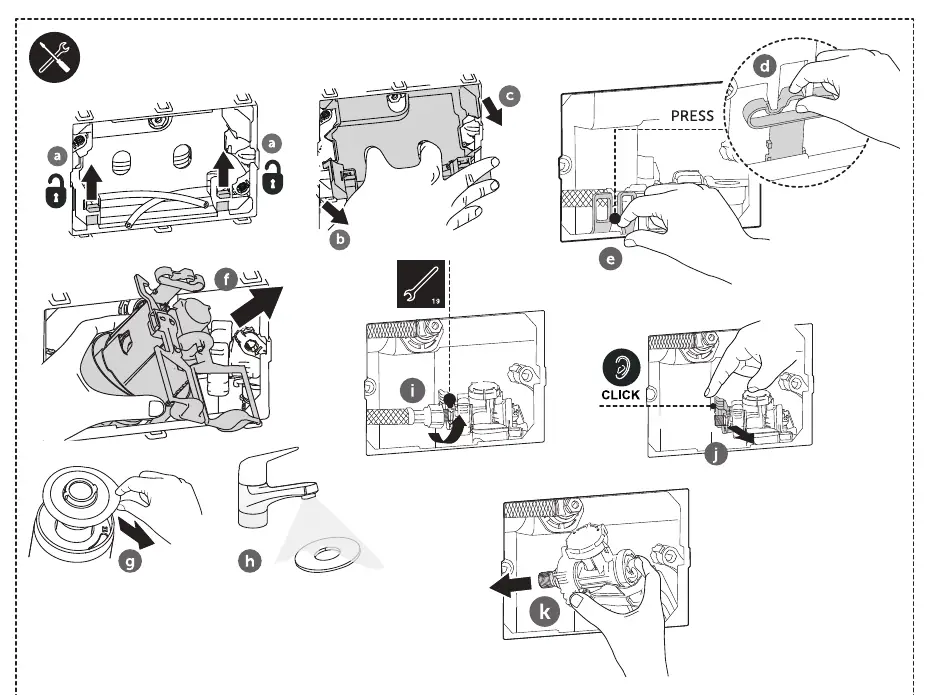
- Low Water Pressure: If the pressure is below 1 bar, the inlet valve filter may be clogged. Follow the maintenance procedure on page 6 to remove, clean, or replace the filter.
- Cleaning: Keep the internal components free of debris. Use only recommended lubricants during reassembly.
Technical Support
For further assistance, contact Ideal Standard International NV. Contact details for various regions are provided on the final page of the manual.
Practical help
Common problems
Low water pressure (< 1 bar)
Clean or replace the inlet valve filter. Follow the maintenance steps on page 6 to access and service the valve.
Flush mechanism not activating
Check that the pneumatic tubes are connected correctly and that you hear a 'click' when attaching them to the mechanism.
Before use
- Verify the wall structure can support the frame weight.
- Ensure the water supply is shut off.
- Measure pipe lengths (L1 + L2) accurately before cutting.
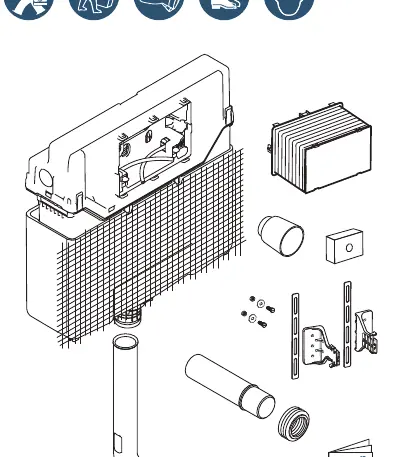
- Check that all components listed in the diagram are present.
- Ensure you have the necessary tools: wrench, screwdriver, tape measure, pencil, and lubricant.
Specs in practice
- Flush Volume
- Adjustable between 4.5L and 6L to suit water-saving requirements.
- Pressure Requirement
- Minimum 1 bar required for optimal operation.
Images and diagrams
- Page 1: Overview of components and initial assembly dimensions.
- Page 4: Detailed steps for pipe cutting and fitting.
- Page 5: Instructions for adjusting the flush volume between 4.5L and 6L.
- Page 6: Troubleshooting procedure for low water pressure.
Model compatibility
- Designed for pneumatic flush systems.
- Compatible with standard wall installations.

Manual page author
Emily Carter
User documentation editor
Prepares concise manual descriptions and highlights the most useful setup, operation, and maintenance information for readers.