Computers / Printers
Quick Start Guide for Plustek OpticFilm 135i Ai
A comprehensive quick start guide for the Plustek OpticFilm 135i Ai film scanner. Includes instructions for hardware setup, driver installation, film holder usage, scanning with QuickScan Plus, and activating the included SilverFast...
Table of contents
Manual images
Click an image to enlargeQuick Start Guide for Plustek OpticFilm 135i Ai
This document provides essential steps to set up and operate your Plustek OpticFilm 135i Ai film scanner. It covers hardware connection, software installation, and basic scanning operations.
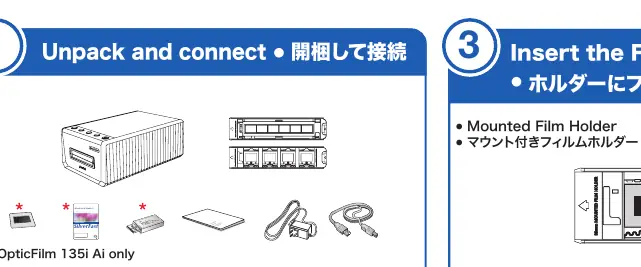
Unpacking and Connection
Ensure all components are present. Connect the scanner to your computer using the provided USB cable and connect the power adapter. Ensure the scanner is powered on before proceeding with driver installation.
Installing the Scanner Driver
Install the scanner driver by navigating to the following paths on the provided media:
- Mac OS X: OPTICFILM > Mac > Plustek OpticFilm 135i > Setup.dmg
- Windows OS: OPTICFILM > Windows > Plustek OpticFilm 135i > Setup.exe
You may also download the latest driver version from the official website at https://www.plustek.com/jpn/OF135i_Ai
Inserting the Film Holder
The scanner supports both mounted film holders and strip film holders. To ensure correct scan results:
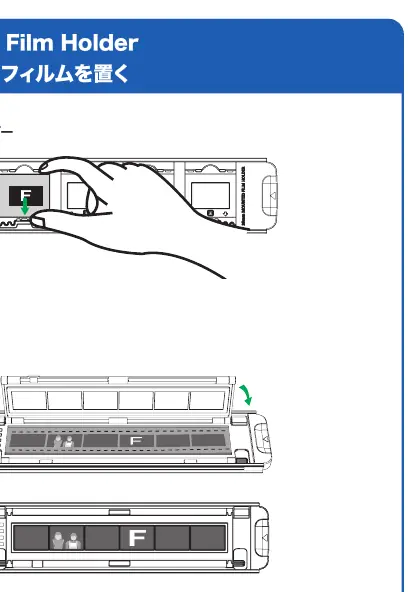
- Insert the film holder smoothly into the scanner; do not force it.
- Always keep the side labeled '35 mm Mounted Film Holder' or '35 mm Strip Film Holder' facing up.
- The 'F' mark on the holder should be oriented correctly as shown in the diagram.
Scanning with QuickScan Plus
You can scan using the physical buttons on the scanner or via the QuickScan Plus application:
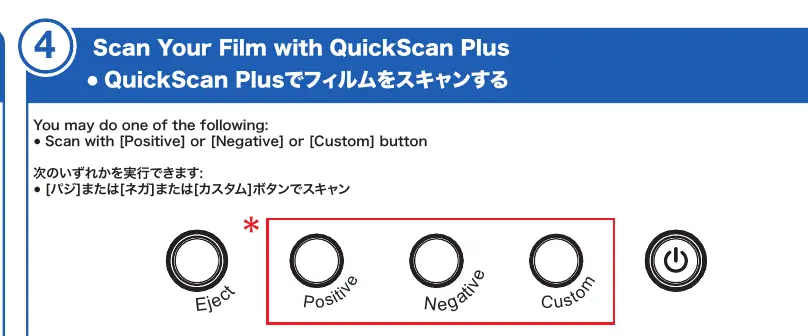
- Physical Buttons: Press the [Positive], [Negative], or [Custom] button on the scanner.
- Application: Use the QuickScan Plus software on your computer. You may select Custom scan mode to adjust cropping areas if necessary.
SilverFast Software Activation and Installation
The scanner includes SilverFast software, which requires activation:
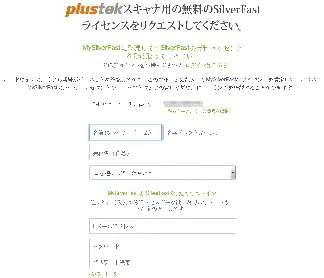
- Visit https://www.silverfast.com/show/activation-plustek/Jp to request a license. You will need your scanner's 15-digit hardware serial number.
- Create and log in with a MySilverFast account.
- You will receive an email confirming the license has been added to your account.
- Install SilverFast from your MySilverFast portal or the provided USB stick.
Troubleshooting and FAQ
- SilverFast will not start: Check if the Image Source is blank. Ensure the USB cable and power cord are connected properly. Verify the scanner is listed under [Imaging Devices] in the Windows Device Manager.
- Software Reset: If needed, click [Service Dialog] in the SilverFast welcome screen and select [Software reset] to restore factory settings.
- iSRD Function: Note that the iSRD (Infrared Smart Removal of Defects) function is not available for traditional black and white negatives or slides due to their silver content. It is compatible with C41 color negatives, E6 color slides, and paper proofs.
Technical Support
For further assistance, you can contact support via email at [email protected] or visit the technical support form at https://plustek.com/jpn/support/technical-support-form.php. Live chat is available during working hours.
Official resources from the manual
Practical help
Common problems
SilverFast software fails to start
Check if the Image Source is blank. Ensure the USB cable and power cord are connected properly. Verify the scanner is listed under [Imaging Devices] in the Windows Device Manager.
iSRD function is not working
iSRD is not compatible with traditional black and white negatives or slides due to silver content. It works with C41 color negatives, E6 color slides, and paper proofs.
Scanner not detected
Ensure the USB cable is securely connected and the scanner is powered on. Check the Device Manager to see if the scanner is recognized.
Before use
- Ensure you have an active internet connection for software activation.
- Locate the 15-digit hardware serial number on your scanner.
- Create a MySilverFast account.
- Ensure the film holder is inserted with the 'F' side up.
- Install the scanner driver before connecting the scanner to the computer.
Specs in practice
- QuickScan Plus
- The primary scanning application for quick, automated scans.
- SilverFast 9
- Professional scanning software included with the scanner, requires online activation.
Images and diagrams
- The film holder must be inserted with the 'F' side facing up for correct scanning.
- The scanner features physical buttons for Eject, Positive, Negative, and Custom scan modes.
Model compatibility
- SilverFast and QuickScan Plus cannot be run at the same time.

Manual page author
David Miller
Documentation analyst
Organizes user manual content into clear summaries, with attention to model details, product context, and everyday usability.