Home Appliances / Small Kitchen Appliances
User Manual for Proctor Silex 12-Cup Coffee Maker
Quick guide for the Proctor Silex 12-Cup Coffee Maker (models 43686, 43687). Includes setup, brewing instructions, cleaning, and safety tips.
Table of contents
Manual images
Click an image to enlargeQuick guide from the manual
This coffee maker is designed for household use. Before first use, clean the unit by following the cleaning instructions. Always ensure the filter basket is fully inserted and the carafe is placed on the warming plate before starting the brew cycle. Do not fill the water reservoir above the maximum mark.
Important Safeguards
- Do not touch hot surfaces; use handles or knobs.
- Unplug the coffee maker when not in use and before cleaning.
- Operate on a flat surface away from the edge of the counter.
- Do not use a cracked carafe or one with a loose/weakened handle.
- The carafe is for use with this coffee maker only; do not use on a stove or in a microwave.
- Do not place the coffee maker in a cabinet while in use.
- The warming plate may remain hot after the unit is turned off.
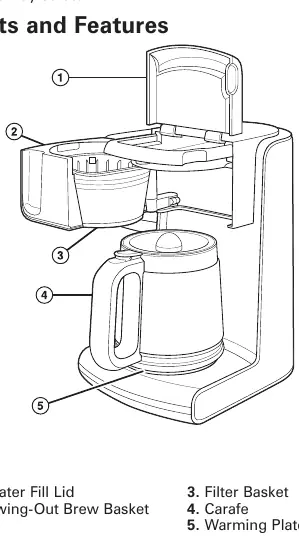
Parts and Features
The coffee maker consists of the following components: Water Fill Lid, Swing-Out Brew Basket, Filter Basket, Carafe, Warming Plate, Brewing Indicator Light, and the ON/OFF (I/O) BREW Button.
How to Make Coffee
- Place an 8–12 cup basket-style paper filter in the Filter Basket. Ensure it is fully inserted into the Brew Basket.
- Add ground coffee to the filter (use one level tablespoon per cup).
- Push the Brew Basket counterclockwise to close until it clicks.
- Fill the Carafe with the desired amount of water, lift the Water Fill Lid, and pour into the reservoir. Do not exceed the maximum mark.
- Close the Water Fill Lid.
- Place the Carafe with the lid attached onto the Warming Plate.
- Press the ON/OFF (I/O) BREW Button to start. The indicator light will illuminate white. Press the OFF button after brewing, or the unit will automatically shut off after 2 hours.
Brewing Chart
Measurements are based on a 5 oz (148 ml) cup of coffee:
- 12 cups: 60 oz (1774 ml) water, 12 tbsp (60 g) coffee
- 10 cups: 50 oz (1478 ml) water, 10 tbsp (50 g) coffee
- 8 cups: 40 oz (1183 ml) water, 8 tbsp (40 g) coffee
- 6 cups: 60 oz (887 ml) water, 6 tbsp (30 g) coffee
- 4 cups: 20 oz (591 ml) water, 4 tbsp (20 g) coffee
Pause 'N Serve
This feature allows you to pour a cup of coffee before the brew cycle is complete. By removing the Carafe, the flow of coffee will temporarily stop. Return the carafe to the base within 20 seconds to prevent overflow.
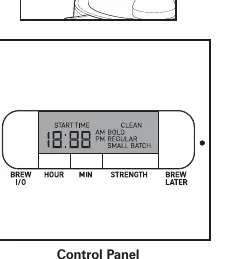
Digital Clock and Brew Later
To set the clock: Plug in the coffee maker, then pulse the HOUR button to set the hour (AM/PM) and the MIN button to set the minutes. To program Brew Later: Set the clock first, fill with water and coffee, hold the BREW LATER button while pulsing HOUR and MIN to set the desired time, then press and release BREW LATER again to activate.
Care and Cleaning
Unplug the unit before cleaning. The Carafe, Filter Basket, and Lid are dishwasher-safe. Wipe the outside with a soft damp cloth. For monthly cleaning: Plug in the coffee maker, add 1 cup of plain white vinegar to the reservoir (no coffee or filter), press BREW to start, stop after 30 seconds, wait 30 minutes, then finish the cycle. Run one more cycle with cold water to rinse.
Limited Warranty
This product is warranted to be free from defects in material and workmanship for three years from the date of purchase. This warranty does not cover glass, filters, or damage resulting from misuse or accidents. For claims, contact Hamilton Beach Brands, Inc. Customer Service.
Practical help
Common problems
Filter basket overflow
Unplug the coffee maker, let it cool, and check that you have not exceeded the coffee manufacturer's recommended serving amount. Ensure the carafe is replaced within 20 seconds.
Carafe breakage
Do not use metal utensils to stir, do not place on a stove or microwave, and avoid hitting the faucet when filling.
Clock or Brew Later not working
Ensure the unit is plugged in. The clock must be set to the correct time of day before programming the Brew Later feature.
Before use
- Clean the coffee maker following the Care and Cleaning instructions.
- Ensure the filter basket is fully inserted into the brew basket.
- Use an 8-12 cup basket-style paper filter.
- Do not fill the water reservoir above the maximum mark.
- Ensure the carafe is placed on the warming plate before starting.
Images and diagrams
- 1. Water Fill Lid
- 2. Swing-Out Brew Basket
- 3. Filter Basket
- 5. Warming Plate
- 6. Brewing Indicator Light
Model compatibility
- Models 43686 and 43687.
- Warranty applies to products purchased and used in the U.S. and Canada.

Manual page author
Michael Turner
Technical manual editor
Reviews PDF manuals for structure, safety notes, and practical product details so readers can find the right information quickly.