Computers / Industrial Panel Pcs
Quick Start Guide for ProDVX 10-inch APPC R23 Series
Quick start guide for the ProDVX 10-inch APPC R23 Series. Includes setup instructions, configuration methods, hardware port layout, and important safety warnings for installation and operation.
Quick answers from the manual
Quick answer
- This guide provides instructions for unpacking, mounting, powering on, and configuring the ProDVX 10-inch APPC – R23 Series device. p. 2
Key actions
- Powering the device p. 2
- Mounting the device p. 2
- Configuring the device p. 2
First start
- Unpack and verify contents p. 2
- Install mount or stand p. 2
- Connect power p. 2
- Connect to network p. 2
- Configure device p. 2
Problems and fixes
Overheating or malfunction
Mount the device on a wall or surface in landscape or portrait mode. Do not operate flat on a horizontal surface.
p. 2Technical specifications
| Parameter | Value | Meaning | Pages |
|---|---|---|---|
| Operating Temperature | 0°C-40°C | Permitted operating temperature range | p. 2 |
| Automatic Sleep | 30 minutes | Default screen sleep interval | p. 2 |
Where to find it in the PDF
- Cover Page p. 1
- Setup and Configuration p. 2
Table of contents
Manual images
Click an image to enlargeQuick start guide from the manual
Follow these steps to set up your ProDVX device:
- Unbox: Take contents out of the box and ensure all components are present.
- Install: Mount the device on a wall or stand. Use a manual screwdriver; do not use power tools to avoid damaging the device.
- Power: Connect to power via PoE+ or a power adapter.
- Connect: Connect to the internet via LAN or Wi-Fi.
- Configure: Set up the device for your production environment.
Package contents
- 10-inch APPC – R23 Series device
- Quick start guide and battery information
- Preinstalled Android OS
Hardware overview
The device features various ports and buttons for operation:
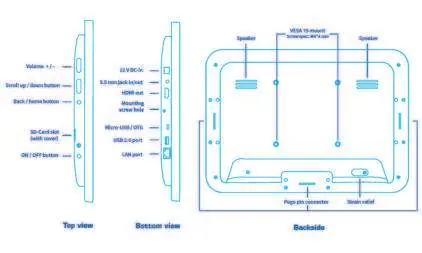
- Top/Side: Volume +/-, Scroll up/down, Back/Home, SD-Card slot, ON/OFF button.
- Bottom/Side: 12V DC-in, 3.5mm jack, HDMI out, Mounting screw hole, Micro-USB/OTG, USB 2.0 port, LAN port.
- Backside: VESA 15-mount points, Speakers, Pogo pin connector, Strain relief.
Installation and mounting
To ensure optimal performance and prevent overheating, mount the device on a wall or surface in landscape or portrait mode. Operating the device flat on a horizontal surface can cause heat entrapment, leading to overheating, malfunction, and potential physical damage.
Configuration methods
Choose one of the following methods to configure the device:
- Skip Wizard: All configuration elements remain in their default state.
- Network Setup: Configure network connection from the start. Note: Ethernet must be disabled to use Wi-Fi.
- Upload Configuration: Upload a pre-defined configuration in JSON format.
- Start Wizard: Follow the on-screen wizard to configure features, such as screen sleep intervals (default is 30 minutes of inactivity).
Additional setup
- Configure IEEE 802.1X for LAN or Wi-Fi connection.
- Install and configure preferred applications.
- Once configuration is complete, the device will automatically reboot to apply changes.
Safety and environment
- Temperature: The suitable operating temperature is 0°C-40°C. Using the device outside this range is not permitted.
- Battery: The product contains a battery. Return to a certified repair center for replacement.
- Disposal: Do not dispose of with household waste. Use return and collection systems for recycling.
- RF Exposure: Maintain a distance of at least 20cm from the product to comply with FCC & CE RF exposure guidelines.
Practical help
Common problems
Overheating or malfunction
Do not operate the device flat on a horizontal surface. Mount it on a wall or stand in landscape or portrait mode.
Damage during installation
Do not use power tools to attach the device to the mount or stand; use a manual screwdriver.
Wi-Fi not working
Ensure that the Ethernet connection is disabled if you intend to use Wi-Fi.
Before use
- Verify all package contents are present.
- Ensure you have a manual screwdriver for installation.
- Choose a suitable mounting orientation (landscape or portrait).
- Prepare a power source (PoE+ or power adapter).
- Check that the operating environment is between 0°C and 40°C.
Specs in practice
- Operating Temperature
- 0°C-40°C; operation outside this range is not permitted.
Images and diagrams
- The backside diagram shows the location of VESA mount points, speakers, and the pogo pin connector.
- The side view diagrams detail the location of physical buttons (Volume, Scroll, Back/Home, Power) and ports (HDMI, USB, LAN, DC-in).
Model compatibility
- Optional accessories include: Barcode scanner, NFC module, Camera, RGB LED bar, and Power adapter (EU, UK, US).
- Contact your sales representative for accessory applicability.

Manual page author
Michael Turner
Technical manual editor
Reviews PDF manuals for structure, safety notes, and practical product details so readers can find the right information quickly.