Raspberry Pi Pico 2-Channel RS232 Module User Manual
Quick guide for the Raspberry Pi Pico 2-Channel RS232 Module. Includes pinout definitions, component overview, and connection instructions for your Raspberry Pi Pico.
Quick answers from the manual
Quick answer
- The Raspberry Pi Pico 2-Channel RS232 Module provides RS232 communication capabilities to the Raspberry Pi Pico via an onboard SP3232 transceiver. p. 1
Key actions
- Connect the module directly to the Raspberry Pi Pico using the onboard female pin header. p. 1
Technical specifications
| Parameter | Value | Meaning | Pages |
|---|---|---|---|
| UART Channel 0 | GP0 (TX), GP1 (RX) | Pins for Channel 0 communication | p. 2 |
| UART Channel 1 | GP4 (TX), GP5 (RX) | Pins for Channel 1 communication | p. 2 |
Where to find it in the PDF
- Overview and Components p. 1
- Pinout Definition p. 2
Table of contents
Manual images
Click an image to enlargeQuick guide from the manual
The Raspberry Pi Pico 2-Channel RS232 Module is an expansion board designed to add RS232 communication capabilities to the Raspberry Pi Pico. It features an onboard SP3232 transceiver and provides two RS232 channels. This guide covers the component layout, pinout definitions, and connection instructions.
What's on Board
- SP3232 RS232 transceiver: Handles signal conversion for RS232 communication.
- Raspberry Pi Pico header: Female pin header for direct attachment to the Pico.
- RS232 bus interface: Supports 2-channel RS232 communication (DB9 male connector available via adapter cable).
- TVS and ESD diodes: Provide protection for the interface.
- UART status indicators: LEDs for RXD0/TXD0 (Channel 0) and RXD1/TXD1 (Channel 1).
Pinout Definition
The module maps specific GPIO pins on the Raspberry Pi Pico to the UART channels:
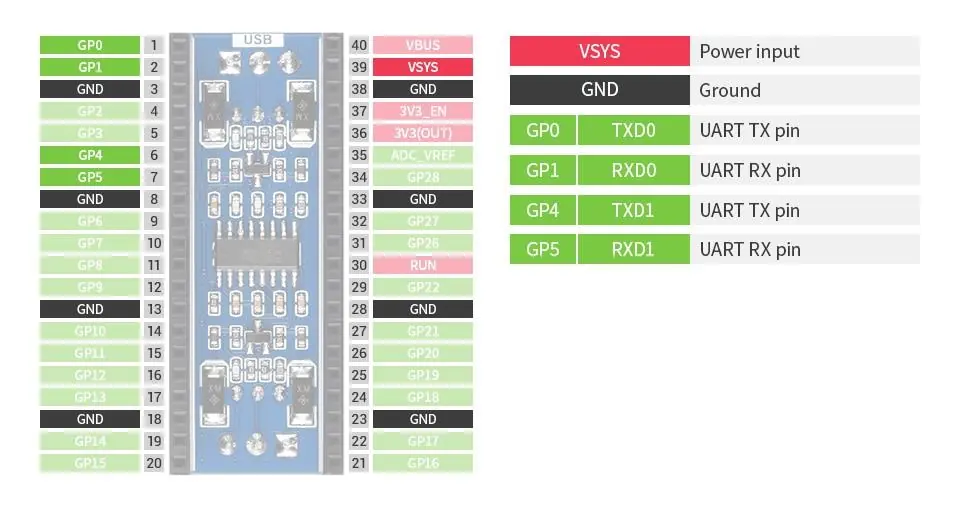
- Channel 0: GP0 (TX), GP1 (RX)
- Channel 1: GP4 (TX), GP5 (RX)
- Power: VSYS (Power input), GND (Ground)
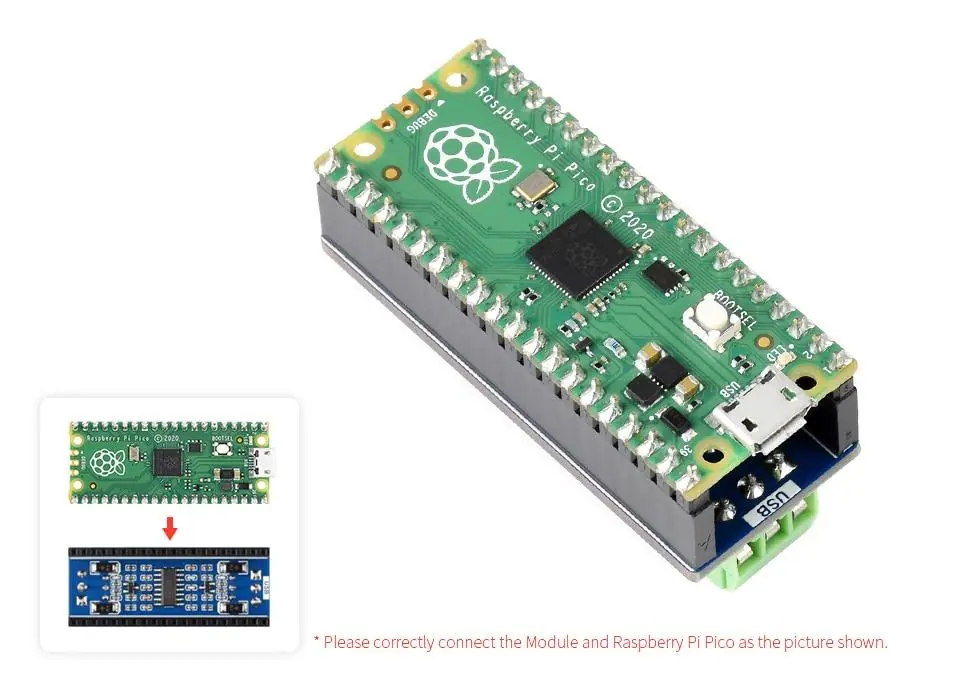
Connection
The module is designed for direct attachment to the Raspberry Pi Pico. Ensure the module is correctly aligned with the Pico headers as shown in the product diagrams. Note that the Raspberry Pi Pico is not included with the module.
Practical help
Common problems
Verify that the module is correctly aligned with the Raspberry Pi Pico headers and that the correct UART pins (GP0/GP1 or GP4/GP5) are configured in your software.
Ensure the VSYS pin is correctly connected to the power source.
Before use
- Ensure Raspberry Pi Pico is powered off before connection
- Verify the module is correctly aligned with the Pico headers
- Check UART pin configuration (GP0/GP1 for Ch0, GP4/GP5 for Ch1)

Manual page author
Michael Turner
Technical manual editor
Reviews PDF manuals for structure, safety notes, and practical product details so readers can find the right information quickly.