HVAC / Air Conditioners
Senville Split-Type Room Air Conditioner User and Installation Manual
Comprehensive user and installation guide for Senville Split-Type Room Air Conditioners. Includes detailed instructions for mounting, wiring, refrigerant piping, system evacuation, safety precautions, maintenance, and troubleshooting.
Table of contents
Manual images
Click an image to enlargeQuick Guide from the Manual
This manual provides essential instructions for the installation and operation of your Senville Split-Type Room Air Conditioner. Key steps include selecting a proper location, mounting the indoor and outdoor units, connecting refrigerant piping, performing electrical wiring, and conducting a test run. Always ensure installation is performed by an authorized dealer or specialist to prevent water leakage, electrical shock, or fire.
Safety Precautions
Incorrect installation can cause serious damage or injury. Always turn off the power before cleaning or maintenance. Do not operate the unit in wet rooms like bathrooms or laundry rooms. Ensure the unit is properly grounded. If an abnormal situation arises, such as a burning smell, immediately disconnect the power.
Indoor Unit Installation
Choose a location with good air circulation and convenient drainage. The unit must be at least one meter away from other electrical devices. Secure the mounting plate to the wall, drill a wall hole for piping at a slight downward angle, and connect the drain hose and refrigerant piping. Ensure the drain hose is at the bottom of the bundle to prevent overflow.
Outdoor Unit Installation
Install the unit in a firm location that can support its weight. Ensure there is adequate space for air circulation. If the unit is exposed to heavy wind, install it at a 90-degree angle to the wind direction. For cold climates, ensure the drain hose is as vertical as possible to prevent freezing.
Refrigerant Piping Connection
Proper flaring is essential for an airtight seal. Use a pipe cutter to cut the pipe, remove all burrs with a reamer, and flare the ends. Connect the low-pressure pipe first, then the high-pressure pipe. Do not use excessive torque when tightening flare nuts to avoid damaging the piping.
Air Evacuation
Use a vacuum pump and manifold gauge to evacuate the refrigerant circuit. Run the vacuum for at least 15 minutes or until the compound meter reads -76cmHg. Check for leaks after evacuation before opening the valves.

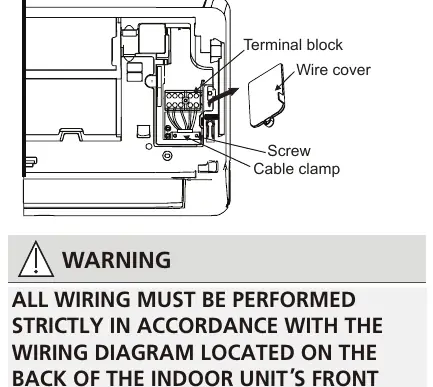
Electrical and Gas Leak Checks
Verify all electrical wiring complies with local codes. Perform a grounding resistance test. Use the soap and water method or a leak detector to check all pipe connection points for gas leaks.

Test Run
Perform a test run for at least 30 minutes. Use the remote control to cycle through COOL and HEAT modes. Verify that the unit is properly grounded, there is no electrical leakage, and the unit responds correctly to commands.
Care and Maintenance
Clean the air filter every two weeks. Turn off the unit and disconnect the power before cleaning. Do not use chemicals or water hotter than 40°C (104°F) to clean the unit. If the unit will not be used for a long period, clean the filters and remove batteries from the remote control.
Troubleshooting
If the unit does not turn on, check for the 3-minute protection delay. If cooling performance is poor, check the air filter, ensure doors and windows are closed, and verify that air inlets/outlets are not blocked. If error codes appear, wait 10 minutes; if the problem persists, contact an authorized service center.
Practical help
Common problems
Unit does not turn on when pressing ON/OFF button
The unit has a 3-minute protection feature. Wait three minutes after turning off the unit before restarting.
Poor cooling performance
Check if the air filter is dirty, ensure doors and windows are closed, and verify that air inlets/outlets are not blocked.
Unit starts and stops frequently
Check for refrigerant leaks or incorrect voltage levels.
Indoor unit emits white mist
This is normal in humid regions due to the temperature difference between room air and conditioned air.
Before use
- Ensure all electrical wiring complies with local and national codes.
- Verify that the unit is properly grounded.
- Confirm that refrigerant piping is properly connected and leak-tested.
- Check that the drain hose is installed correctly without kinks.
- Ensure the mounting plate is securely attached to the wall.
Specs in practice
- Operating Temperature (Cooling)
- 17°C-32°C (62°F-90°F) for room temperature.
- Operating Temperature (Heating)
- 0°C-30°C (32°F-86°F) for room temperature.
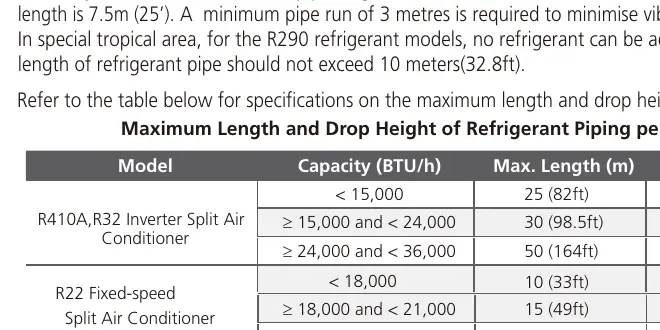
- Minimum Bend Radius
- 10cm for connective refrigerant piping.
- Grounding Resistance
- Must be less than 0.1Ω.
Images and diagrams
- Installation Summary: Shows the sequence of steps from selecting the location to mounting the indoor unit.
- Mounting Plate: Illustrates the correct orientation and dimensions for different models.
- Wiring: Details the terminal block and cable clamp connections.
- Manifold Gauge: Shows the setup for air evacuation using a vacuum pump.
Model compatibility
- Requires professional installation by an authorized dealer or specialist.
- Not for use in wet rooms like bathrooms or laundry rooms.
- For units with R32 or R290 refrigerant, only blast-proof ceramic fuses can be used.

Manual page author
Emily Carter
User documentation editor
Prepares concise manual descriptions and highlights the most useful setup, operation, and maintenance information for readers.