Electronics / Cameras
Sharper Image 186-Piece Vanadium Tool Set User Guide
Quick guide for the Sharper Image 186-Piece Vanadium Tool Set. Includes a full inventory of the four tool trays, operating instructions for the electric glue gun, and essential safety precautions.
Table of contents
Quick guide from the manual
This document provides an overview of the 186-piece tool set contents and specific operating instructions for the included electric glue gun. Please note that all tools are metric unless otherwise specified. The set is designed for both beginners and experts and comes in a wheeled aluminum carrying case.
Tool set inventory
The tool set is organized into four trays:
- Tray 1: Includes longnose, diagonal, slip joint, and water pump pliers, an adjustable wrench, and 9 combination wrenches (6-17mm).
- Tray 2: Contains 11 screwdrivers, 3 insulation screwdrivers, an electrical tester (100V-500V), a ratchet bit holder, and a pressure tester.
- Tray 3: Features nylon spring clamps, an aluminum level, a knife, a claw hammer, kitchen scissors, an electric hot glue gun, measuring tape, wire stripping pliers, insulation tape, and a fastener kit.
- Tray 4: Includes 24 bits, 9 hex keys, extension bars, 6 precision screwdrivers, 1/4" and 1/2" sockets, ratchet wrenches, spark plug sockets, universal joints, and a flexible pipe.
Operating the electric glue gun
- Attach the wire stand to the tool by snapping the open ends into the holes near the nose. Always use this stand to ensure good ventilation and prevent the tool from lying on its side.
- Plug the power cord into a standard AC outlet.
- Insert a glue stick into the rear opening.
- Allow the tool to heat for 3-5 minutes.
- Squeeze the trigger to apply glue.
- Unplug the tool when finished or if not in use for more than two hours.
- Do not remove the glue stick from the tool, as this may cause damage.
- Allow the tool to cool for at least 15 minutes before storing.
Safety and maintenance
Warning: The glue gun nozzle reaches 350°F (193°C) and can cause severe burns. Do not touch the nozzle or melted glue.
- Always wear safety glasses.
- Do not operate near flammable liquids or in damp/wet areas.
- Do not glue items that will be exposed to temperatures over 140°F.
- Keep the tool clean, dry, and free of oil or grease.
- Store the tool and glue sticks in a high, locked, and dry location out of reach of children.
- There are no user-serviceable parts; do not attempt to repair the tool.
Customer service
Sharper Image items include a 1-year limited replacement warranty. For support, call 1 (877) 210-3449, Monday through Friday, 9:00 a.m. to 6:00 p.m. ET.
Manufacturer information
Sharper Image
Practical help
Common problems
Glue gun nozzle is extremely hot
The nozzle reaches 350°F (193°C). Never touch the nozzle or melted glue to avoid severe burns.
Glue stick is stuck in the tool
Do not attempt to remove the glue stick. Leave it in the tool; it will melt again the next time the tool is plugged in.
Glue joint failing
Do not use petroleum-based wood stains on glue joints, as this breaks down the bonding power. Also, do not use the glue for heavy objects or structural fasteners.
Before use
- Ensure the wire stand is attached to the glue gun for proper ventilation.
- Check that the power cord is not damaged.
- Verify the work area is free of flammable liquids or gases.
- Wear safety glasses before starting work.
- Ensure the glue stick is inserted into the rear opening.
Specs in practice
- Glue Gun Power
- 10W / 110V-240V 50/60Hz
- Electrical Tester
- Rated for 100V-500V range.
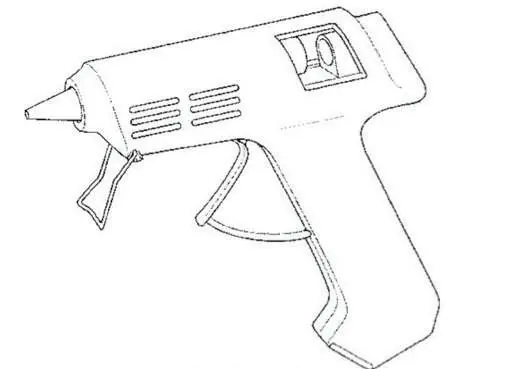
Images and diagrams
- The glue gun diagram highlights the wire stand, trigger, hot glue tip, and glue stick opening.
- The wire stand must be used to keep the tool upright and prevent it from resting on its side.
Model compatibility
- The glue is not intended for heavy objects or structural repairs.
- The glue is not resistant to flammable liquids and should not be used to repair fuel tanks.

Manual page author
Michael Turner
Technical manual editor
Reviews PDF manuals for structure, safety notes, and practical product details so readers can find the right information quickly.