Home / Gas Detectors
User Manual for Solight 1D31A Carbon Monoxide Detector
Comprehensive user guide for the Solight 1D31A Carbon Monoxide Detector. Includes installation instructions, placement guidelines, LED indicator meanings, maintenance procedures, and troubleshooting steps.
Quick answers from the manual
Quick answer
- The Solight 1D31A is a carbon monoxide detector. It requires 3x AA batteries, has a 90-second warm-up period, and features an 85dB alarm. It should be tested monthly. p. 1, 2, 3
Key actions
- Test the device monthly using the TEST button. p. 3
- Replace batteries immediately when the low battery warning sounds. p. 2
First start
- Insert 3x AA batteries, wait 90 seconds for warm-up, then press TEST. p. 1, 2
Problems and fixes
Green light off
Insert correct batteries.
p. 4
Constant alarm after warm-up
Move to clean air; potential VOC interference.
p. 4Maintenance and reset
- Hold TEST button for >10 seconds to clear peak memory. p. 2
Technical specifications
| Parameter | Value | Meaning | Pages |
|---|---|---|---|
| Sensor | Electrochemical | Detection technology | p. 1 |
| Power | 3x AA | Battery requirement | p. 1 |
Where to find it in the PDF
- Technical Parameters and Installation p. 1
- Operation and Indicators p. 2
- Maintenance and Alarm Procedures p. 3
- Troubleshooting and Compliance p. 4
Table of contents
Quick guide from the manual
The Solight 1D31A is a carbon monoxide detector designed for indoor use. Upon inserting batteries, the device requires a 90-second warm-up period before it becomes active. It is essential to test the device monthly using the TEST button. If the alarm sounds, immediately move to fresh air and follow safety protocols.
Product Description
The device features a display and three LED indicators to communicate status:
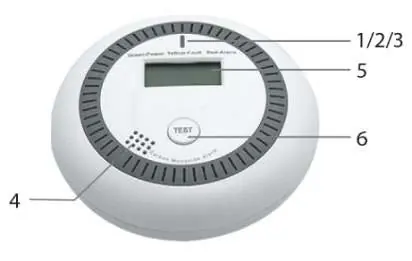
- Green indicator: Power/Operation status.
- Yellow indicator: Fault/Maintenance status.
- Red indicator: Alarm status.
- Test button: Used to verify device function and check peak concentration.
Placement
Proper placement is critical for safety:
- Install in bedrooms, living areas, or similar residential spaces.
- In multi-story buildings, install at least one detector on every floor.
- If a fuel-burning appliance is present, the detector must be in that room.
- Mount on the wall, higher than windows or doors, but at least 150 mm below the ceiling.
- Keep 1 to 3 meters away from potential gas sources.
- Avoid placing near stoves, beds, or in areas with high dust, grease, or humidity.
Installation
- Ensure no electrical wires or pipes are in the wall at the chosen location.
- Measure and drill two holes using the mounting base as a template.
- Secure the mounting base with screws.
- Insert three AA batteries, ensuring correct polarity. The device will beep.
- Close the battery cover and press the TEST button to verify operation.
- Attach the detector to the mounting base.
Operation
After inserting batteries, the device enters a 90-second warm-up phase with a countdown on the display. Once complete, it enters monitoring mode. The green LED flashes every 40 seconds to indicate normal operation. If CO concentration exceeds 20 ppm, the display shows the current concentration.
Maintenance
- Cleaning: Regularly clean the cover with a soft brush or dry flannel cloth to prevent dust buildup. Do not use detergents, bleach, or polishes.
- Testing: Perform a test monthly by pressing the TEST button.
- Battery Replacement: Replace batteries immediately when the low battery warning (single beep and yellow LED flash every 50 seconds) occurs.
What to do in case of alarm
- Immediately move to fresh air or open windows and doors to ventilate.
- Turn off fuel-burning appliances if possible.
- Evacuate the area and alert others.
- Do not re-enter the building until the alarm has stopped.
- Seek medical attention if anyone shows symptoms of CO poisoning.
- Contact emergency services or a qualified technician to identify and fix the source of the leak.
Practical help
Common problems
Green power light is off
Insert or replace batteries.
No reaction when pressing TEST button
The device may still be in the 90-second warm-up phase. If not, the circuit may be faulty; contact the seller.
Alarm sounds constantly after warm-up
High concentration of VOCs (perfume, paint, gasoline, etc.) may be present. Move the device to clean air and test again.
Before use
- Insert 3x AA batteries with correct polarity.
- Wait 90 seconds for the warm-up phase to complete.
- Press the TEST button to verify the device is functional.
- Ensure the device is mounted at least 150 mm below the ceiling.
- Verify the device is not placed near vents, fans, or high-humidity areas.
Specs in practice
- Alarm Volume
- >= 85 dB at a distance of 3 meters.
- Power Supply
- DC 4.5 V (3x 1.5 V AA batteries).
Images and diagrams
- 1: Green indicator (Power)
- 2: Yellow indicator (Fault)
- 3: Red indicator (Alarm)
- 6: Test button
Model compatibility
- For indoor use only.
- Not a substitute for smoke or gas leak detectors.
- Designed to protect against acute CO exposure, not chronic long-term exposure.

Manual page author
Emily Carter
User documentation editor
Prepares concise manual descriptions and highlights the most useful setup, operation, and maintenance information for readers.