Electronics / Security Cameras
User Manual for Solight 1D60 WIFI Camera with Solar Panel
Quick guide for the Solight 1D60 WIFI camera. Learn how to install, set up the Tuya Smart app, optimize solar charging, and troubleshoot connection issues.
Quick answers from the manual
Quick answer
- The Solight 1D60 is a solar-powered WIFI camera. To set it up, charge it for 3 hours, power it on, reset it, and configure it using the Tuya Smart app. p. 2
Key actions
- Reset the camera p. 2
- Charge the device p. 2
First start
- Charge for 3 hours, power on, reset, and use the mobile app. p. 2
Problems and fixes
Indicator light is red
Connection to the Internet has failed.
p. 2Maintenance and reset
- Press the reset button for about 3 seconds until the device makes a sound. p. 2
Technical specifications
| Parameter | Value | Meaning | Pages |
|---|---|---|---|
| Resolution | 1920*1080P | Full HD image quality | p. 6 |
| Battery Capacity | 5000mAh | Internal rechargeable battery | p. 6 |
Where to find it in the PDF
- Description and Parts p. 1
- Features and Setup p. 2
- Installation and App p. 3, 4
- Technical Parameters p. 5, 6
Table of contents
Manual images
Click an image to enlargeQuick guide from the manual
To get started with your Solight 1D60 camera, ensure you charge the device for at least 3 hours using a 5V/1A adapter. Power on the device, reset it by holding the reset button for 3 seconds until it makes a sound, and then use the Tuya Smart app to complete the configuration.
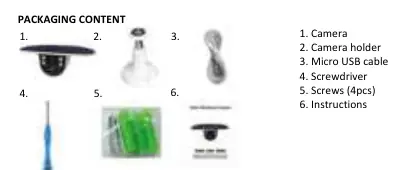
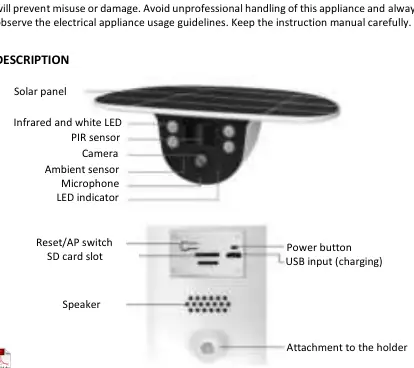
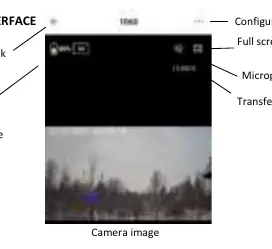
Description
The camera features a solar panel for power, a PIR sensor for motion detection, and an integrated microphone and speaker. Key physical controls include a power button, a reset/AP switch, and a Micro SD card slot for local storage.
Installation
The camera should be mounted using the provided holder and four universal screws. For optimal performance:
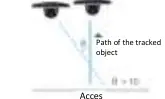
- PIR Sensor: Install so the angle between the sensor and the detected object is greater than 10°. The sensor detects motion up to 6m with a 120° angle.
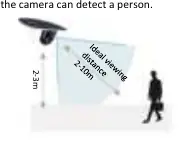
- Camera Location: The ideal viewing distance is 2-10m to effectively detect a person.
Using the Mobile App
Download the Tuya Smart or Smart Life app from Google Play or the App Store. Follow the in-app instructions to register an account and connect the camera via 2.4GHz Wi-Fi. Select 'Camera and Lock' then 'Camera (Wi-Fi)' during the setup process.
Maintenance and Solar Panel
The camera is powered by a solar panel. For maximum efficiency, position the panel facing south with a 30-45° tilt to ensure exposure to sunlight. Avoid placing the camera in shady areas. The battery life is approximately 3-6 months based on 20 activations per day.
Technical Parameters
- Resolution: 1080P Full HD
- Waterproof: IP65
- Battery: 5000mAh (embedded)
- Storage: Micro SD card up to 128GB
- Connectivity: 2.4GHz Wi-Fi
Practical help
Common problems
Camera not connecting to the Internet
Check the indicator light. Blue means connected, red means connection failed. Reset the device by holding the reset button for 3 seconds.
Motion not detected correctly
Ensure the moving object is not approaching the PIR sensor perpendicularly; the angle should be greater than 10°.
Battery draining quickly
Ensure the solar panel is positioned to receive maximum sunlight, ideally facing south with a 30-45° tilt.
Before use
- Charge the device for at least 3 hours (DC 5V/1A).
- Switch on the device using the power button.
- Reset the device using the reset button until it makes a sound.
- Download the Tuya Smart or Smart Life app.
- Ensure a 2.4GHz Wi-Fi network is available.
Specs in practice
- Battery Life
- Approx. 3-6 months assuming 20 clicks per day.
Images and diagrams
- PIR Sensor Location: Install with >10° angle to the object path.
- Camera Location: Ideal viewing distance is 2-10m.
Model compatibility
- Requires 2.4GHz Wi-Fi network.
- Compatible with iOS and Android smartphones.
- Supports Micro SD cards up to 128GB.

Manual page author
David Miller
Documentation analyst
Organizes user manual content into clear summaries, with attention to model details, product context, and everyday usability.