Electronics / Security Cameras
User Manual for Solight 1D76S Outdoor Rotating IP Camera
Quick guide for the Solight 1D76S outdoor rotating IP camera. Includes installation steps, Smart Life app setup, troubleshooting, and SD card configuration.
Quick answers from the manual
Quick answer
- The Solight 1D76S is an outdoor rotating IP camera managed via the Smart Life app. It supports 2.4GHz and 5GHz Wi-Fi and microSD cards up to 128GB for storage. p. 1, 7, 12
Key actions
- Reset the camera p. 6
- Install SD card p. 6, 12
First start
- Download Smart Life app, create an account, and add the device using Bluetooth or QR code pairing. p. 7, 8, 9
Problems and fixes
Camera offline
Check router, power supply, and signal strength (min 2 bars).
p. 11Maintenance and reset
- Press and hold the reset button on the bottom of the camera for several seconds until it beeps. p. 6
Technical specifications
| Parameter | Value | Meaning | Pages |
|---|---|---|---|
| SD Card Capacity | 128 GB | Maximum supported capacity | p. 12 |
| Wi-Fi Frequency | 2.4 GHz / 5 GHz | Supported network bands | p. 7 |
Where to find it in the PDF
- Camera Description p. 3
- Installation p. 4
- App Setup p. 7, 8, 9
- Troubleshooting p. 11, 12
Table of contents
Manual images
Click an image to enlargeQuick guide from the manual
The Solight 1D76S is an outdoor rotating IP camera designed for home security. It connects to your home network via Wi-Fi and is managed through the Smart Life application. The device supports both 2.4GHz and 5GHz Wi-Fi networks and allows for local storage via a microSD card.
Package contents
- Wi-Fi camera 1D76
- Power adapter
- Screws and wall anchors
- User manual
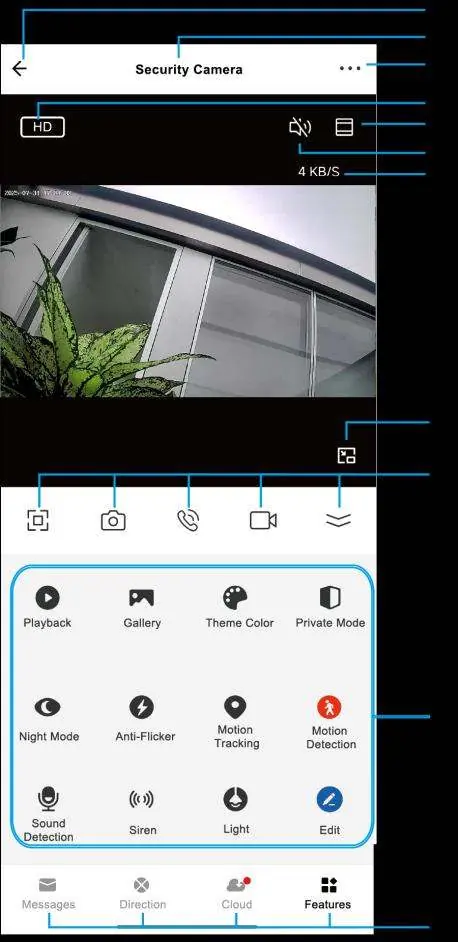
Camera description
The camera features include:
- Wi-Fi antennas for signal reception
- Wall mounting bracket
- Microphone and speaker for two-way audio
- Camera lens with IR/LED night vision
- Light sensor
- Reset button and microSD card slot (located on the bottom)
Installation
To mount the camera:


- Use the 3 included screws and wall anchors to secure the mounting bracket to the desired surface.
- Position the antennas vertically to ensure optimal signal reception.
- Connect the camera to a power source using the provided adapter. The camera will move and calibrate automatically upon power-up.
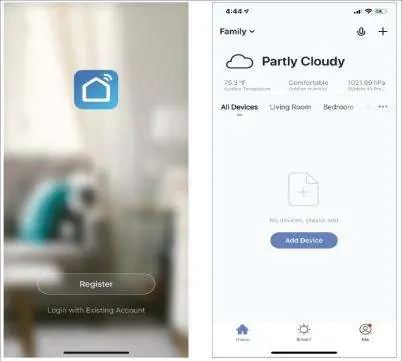
Getting started with the app
Before adding the camera, ensure you have a strong Wi-Fi signal and your network password ready.
- Download the Smart Life app from Google Play or the Apple Store.
- Create an account and follow the on-screen instructions.
- The camera supports two pairing methods: Bluetooth pairing or QR code scanning.
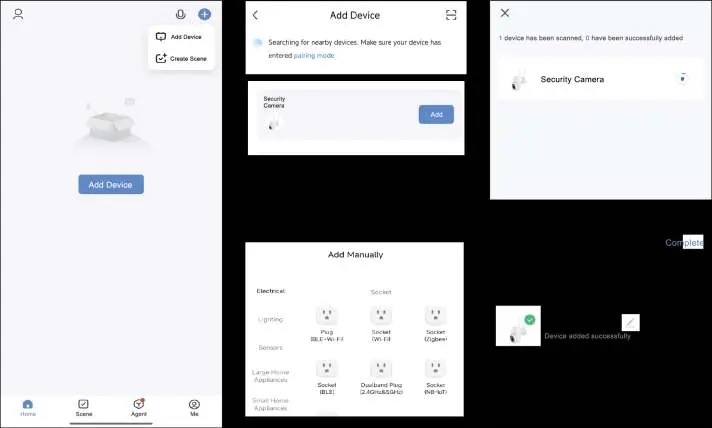
Bluetooth pairing
- Power on the device.
- Press and hold the reset button for 5 seconds until the camera lights blink (pairing mode).
- In the app, tap the '+' icon or 'Add Device' and select the Bluetooth pairing option.
- Select the camera from the list to complete the connection.
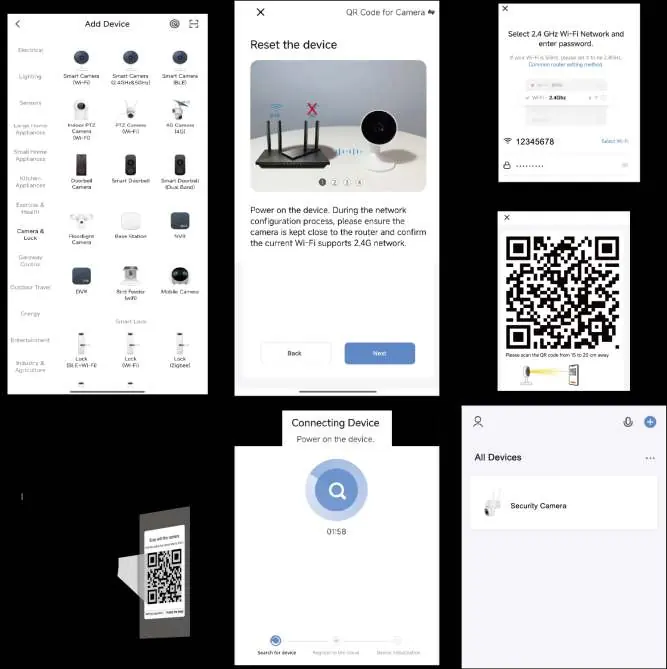
QR code pairing
- Power on the device and wait for the indicator light to blink.
- In the app, select the device and enter your Wi-Fi password.
- Hold the QR code displayed on your phone screen 10–15 cm in front of the camera lens until you hear a sound.
Resetting the camera
If you need to reset the device, locate the reset button on the bottom of the camera. Press and hold it for several seconds until the camera begins to beep.
SD card installation
The microSD card slot is located on the bottom of the camera. The device supports cards up to 128GB in FAT32 format. Ensure the recording switch is enabled in the app settings to start saving footage.
Troubleshooting
If you encounter issues:
- Camera offline: Check if the Wi-Fi router is on, ensure the camera is powered, and verify that the signal strength is at least 2 bars.
- Not recording: Verify the SD card is inserted correctly, the recording switch is enabled in the app, or try reformatting the card (note: this deletes existing data).
- Slow streaming: Ensure your home network is not congested and the camera has a stable Wi-Fi connection.
Practical help
Common problems
Camera is offline
Check if the Wi-Fi router is powered on, ensure the camera is connected to power, and verify signal strength (at least 2 bars recommended).
Camera is not recording
Ensure the microSD card is inserted correctly and the recording switch is enabled in the app settings. If the issue persists, reformat the card (warning: this deletes all data).
Slow live video streaming
Check for network congestion or low Wi-Fi signal strength. Consider using a Wi-Fi extender if the signal is weak.
Before use
- Ensure you have a strong Wi-Fi signal at the installation location.
- Download the Smart Life app.
- Have your Wi-Fi network name and password ready.
- Check that the power adapter is connected to a working outlet.
Specs in practice
- Wi-Fi Compatibility
- Supports both 2.4GHz and 5GHz frequency bands.
Images and diagrams
- The reset button and microSD card slot are located on the bottom of the camera unit.
- Antennas should be positioned pointing upwards for the best signal reception.
Model compatibility
- Requires Smart Life app for operation.
- Supports microSD cards up to 128GB (FAT32 format).

Manual page author
Emily Carter
User documentation editor
Prepares concise manual descriptions and highlights the most useful setup, operation, and maintenance information for readers.