Furniture / Storage Cabinets
User Manual for StyleWell Light Oak Accent Cabinet
Quick guide for assembling and maintaining the StyleWell Light Oak Accent Cabinet. Includes step-by-step assembly instructions, hinge adjustment, wall anchoring, and troubleshooting tips.
Table of contents
Manual images
Click an image to enlargeQuick guide from the manual
This cabinet requires assembly by two people. Do not use power tools, as they may strip or damage the parts. Ensure you have a flat, level surface for assembly and check all packing materials for small parts before discarding the carton. The unit must be anchored to the wall for safety.
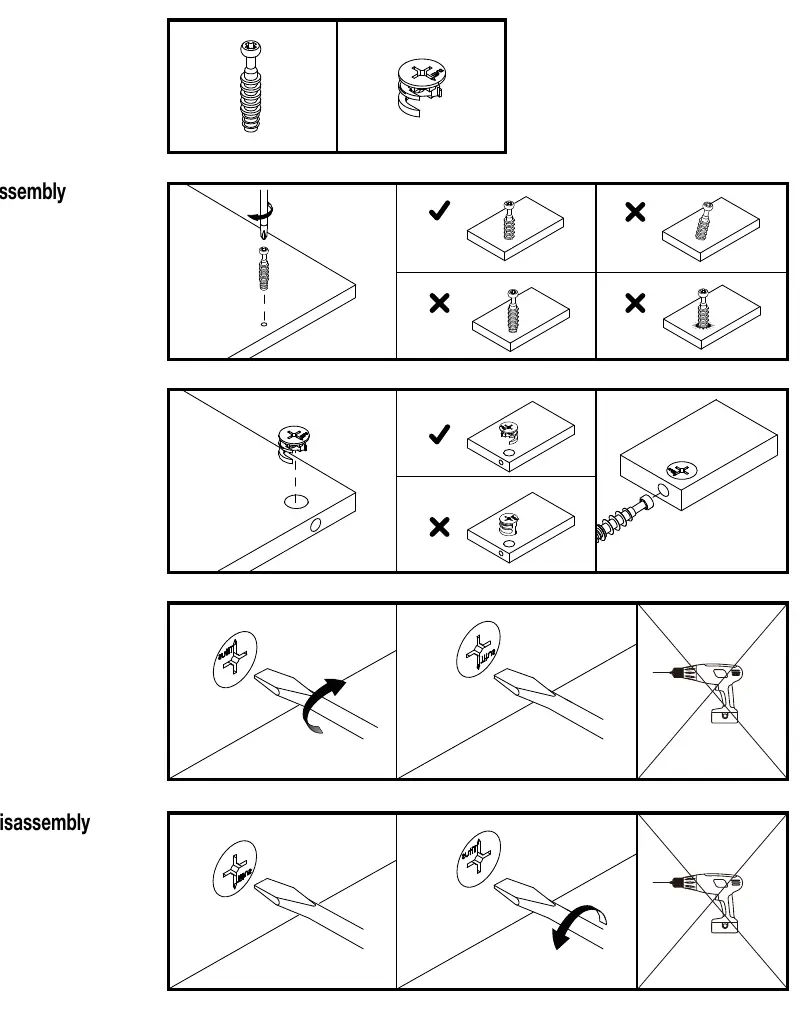
Pre-assembly
Before starting, ensure you have the following tools: safety goggles, a Phillips screwdriver, a slotted screwdriver, and a level. Verify all parts and hardware against the provided lists in the manual. Place wooden parts on a clean, soft surface like a carpet to prevent scratches.
Assembly instructions
- Right/plinth/bottom/fixed panel assembly: Prepare metal parts and attach the plinth and bottom panels.
- Back panel assembly: Prepare the back panels with dowels and attach them to the structure.
- Left panel assembly: Prepare the left panel and attach it to the main structure.
- Top assembly: Attach the top panel using the provided screws and brackets.
- Shelves assembly: Insert shelf supports and place the shelves.
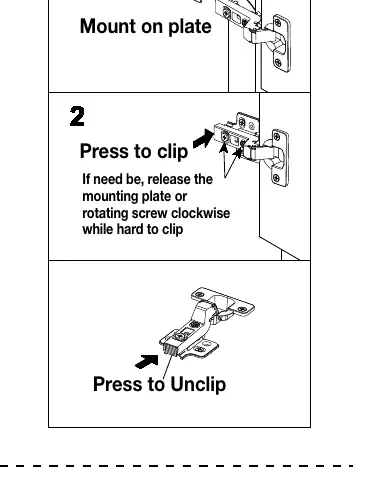
- Attaching doors: Install the door hinges and clip the doors onto the cabinet frame.
- Handle and hinge adjustment: Attach the handles and adjust the hinges for proper alignment.
- Fixing to wall: Drill a hole and anchor the unit to the wall using the provided safety device.
Hinge adjustment
If the doors are not aligned, use the hinge adjustment screws:
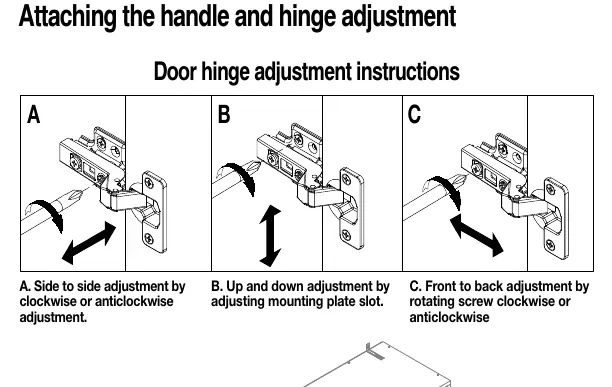
- Side-to-side: Adjust by rotating the screw clockwise or anticlockwise.
- Up-and-down: Adjust by loosening the mounting plate screws and moving the plate.
- Front-to-back: Adjust by rotating the screw clockwise or anticlockwise.
Troubleshooting
If you encounter issues, check the following:
- Drawer issues: Ensure side boards are not assembled backwards and check the frame slide bearing.
- Door alignment: Adjust the euro hinges.
- Stability: Ensure the adjustable center feet levelers are properly set on the bottom of the legs.
Care and maintenance
Keep the product away from direct heat and sunlight to prevent fading. Periodically (every 90 days) check and tighten all screws. Clean with a slightly damp cloth; do not use bleach or abrasive cleaning materials. Never allow liquids to remain on the furniture.
Practical help
Common problems
Drawer cannot be attached
Check if the drawer's two side boards are assembled backwards.
Drawer does not pull in or out smoothly
Check the drawer attached frame slide bearing and ensure it is pulled outside before assembly.
Door cannot be closed or is not flat
Adjust the euro hinge to the appropriate position.
Not all legs touch the ground
Make sure the adjustable center feet levelers are adjusted properly.
Before use
- Ensure two people are available for assembly.
- Do not use power tools to avoid damaging the product.
- Check all packing materials for small parts.
- Use a flat, level surface for assembly.
- Verify all hardware against the parts list.
- Ensure the unit is anchored to the wall.
Specs in practice
- CAM Fastening System
- A locking mechanism using a cam bolt and cam nut; ensure the arrow on the cam nut points toward the bolt before tightening.
Images and diagrams
- Hinge adjustment: Shows three types of adjustments (side-to-side, up-and-down, front-to-back) using specific screws on the hinge mechanism.
Model compatibility
- Not for commercial use.
- Requires wall anchoring for safety in homes with children.

Manual page author
Michael Turner
Technical manual editor
Reviews PDF manuals for structure, safety notes, and practical product details so readers can find the right information quickly.