Automotive / Car Audio
Installation Guide for Taramps 6" Ceiling Speaker 019769-R00
Quick installation guide for the Taramps 6" ceiling speaker. Includes mounting steps, wiring instructions, technical specifications, and warranty information for model 019769-R00.
Table of contents
Manual images
Click an image to enlargeQuick guide from the manual
This guide provides essential information for installing the Taramps 6" ceiling speaker. Before beginning, ensure you have the cardboard cutout template provided with the product. The installation requires basic tools and careful handling to avoid damaging the speaker or the ceiling surface.
Product description
The Taramps 6" ceiling speaker is designed for both residential and commercial environments. It features a modern, borderless design and is constructed from polypropylene material with UV protection for durability.
Installation instructions
- Use the cardboard cutout template included in the packaging to mark the correct position on the plasterboard or ceiling surface.
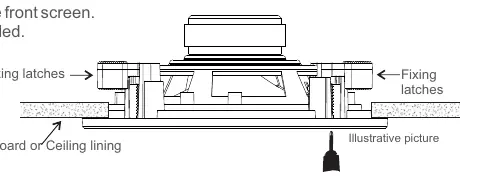
- Carefully remove the front screen using a thin, sharp object like a utility knife or screwdriver. Take care not to damage the plastic parts.
- Connect the wires to the Borne terminal. Ensure the Red wire is connected to the positive (+) terminal and the Black wire to the negative (-) terminal.
- Verify that the 4 fixing latches are positioned inwards. If they are not, adjust them manually.
- Insert the speaker into the prepared opening. Using a screwdriver, tighten the screws slowly and proportionally. The latches will rotate automatically to lock the speaker into position.
- Once the speaker is firm, check the fit and reattach the front screen.
Caution: When using an electrical screwdriver, ensure the torque setting is low. Excessive torque can cause complications for the installation and damage the product.
Installation suggestion
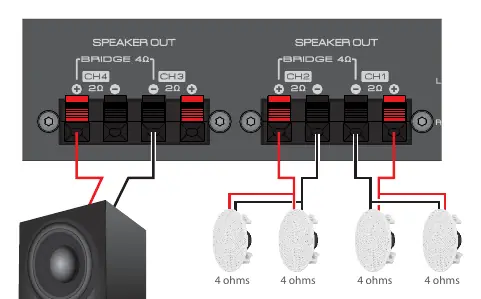
The speaker is compatible with various audio setups. For example, it can be used in a system with a Taramps THS 6000 amplifier and a passive subwoofer. Ensure the amplifier output matches the speaker's nominal impedance of 4 or 8 Ohms.
Technical specifications
- RMS Power: 40 Watts
- Program Power: 80 Watts
- Nominal Impedance: 4 or 8 Ohms
- Frequency Response: 40Hz to 18.000Hz
- Resonance Frequency: 56,911 Hz
- Weight: 1.65lb (0,75Kg)
Warranty information
The product comes with a 15-month warranty from the date of the invoice, which includes the 90-day legal warranty. The warranty covers defects in material or manufacturing processes under normal conditions of use. It does not cover damages caused by improper installation, accidents, humidity, or excessive power/distortion that causes heating above 240 degrees. The original label with the serial number must be present to claim the warranty.
Practical help
Common problems
Speaker is not firm in the ceiling
Ensure the 4 fixing latches are positioned correctly and tighten the screws slowly and proportionally until the latches lock.
Damage during installation
If using an electrical screwdriver, set the torque to a low level to avoid damaging the plastic housing or the ceiling.
Wiring confusion
Connect the Red wire to the positive (+) terminal and the Black wire to the negative (-) terminal on the Borne connector.
Before use
- Locate the cardboard cutout template included in the box.
- Ensure the ceiling material is suitable for embedding the speaker.
- Verify that the 4 fixing latches are positioned inwards before insertion.
- Have a thin, sharp object ready for removing the front screen.
- Check that your amplifier supports 4 or 8 Ohm impedance.
Specs in practice
- Nominal Impedance
- 4 or 8 Ohms; must match the output impedance of your amplifier.
- Frequency Response
- 40Hz to 18.000Hz; the range of sound frequencies the speaker can reproduce.
Images and diagrams
- The installation diagram illustrates how the fixing latches rotate outwards to grip the ceiling material when the screws are tightened.
- The wiring diagram shows how to connect multiple speakers to a central amplifier unit.
Model compatibility
- Compatible with amplifiers supporting 4 or 8 Ohm loads.

Manual page author
Emily Carter
User documentation editor
Prepares concise manual descriptions and highlights the most useful setup, operation, and maintenance information for readers.