Home Appliances / Kitchen Thermometers
User Manual for Taylor 1470N / 1478 Digital Cooking Timer & Thermometer
Quick guide for the Taylor 1470N / 1478 Digital Cooking Timer & Thermometer. Learn how to install batteries, set cooking temperatures, use the timer, and follow safety precautions for accurate food preparation.
Table of contents
Manual images
Click an image to enlargeQuick guide from the manual
The Taylor 1470N / 1478 is a digital cooking thermometer and timer. Before first use, remove the battery strip from the compartment. Always sterilize the metal probe before use and ensure the sensor plug is dry before inserting it into the thermometer to prevent incorrect readings. The device requires 2 AAA batteries.
Safety Precautions
- Always wear a heat-resistant glove when touching the metal probe or cord during or after cooking. Do not touch with bare hands.
- Keep the probe and cord away from children.
- Do not use this thermometer in a microwave oven.
- Do not expose the thermometer to water, direct heat, or direct sunlight.
- Do not use the cord and probe for oven temperatures higher than 200°C (392°F).
- Do not mix old and new batteries or different battery types.
Battery Installation
- Remove the battery compartment cover on the back of the unit.
- Insert 2 AAA (R03) batteries, ensuring correct polarity as marked inside the compartment.
- Replace the cover.
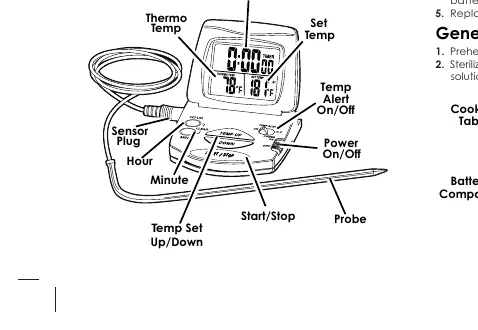
General Operation
Thermometer Mode:
- Turn the unit on using the side switch.
- Select the temperature scale (°F or °C) using the slide switch on the back.
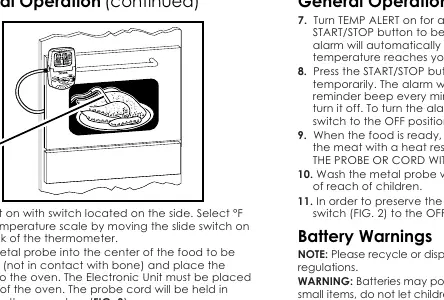
- Insert the metal probe into the center of the food (avoid contact with bone).
- Place the food in the oven; the electronic unit must remain outside the oven. The probe cord is held in place by the oven door.
- Plug the sensor into the thermometer. The internal temperature will appear on the display.
- Use the buttons to adjust time and temperature settings. Press and hold for fast adjustment.
- Press the RESET button on the back to clear all settings.
Timer Mode:
- Turn the unit on.
- Press the HR (Hour) and MIN (Minute) buttons to set the time.
- Press START/STOP to begin timing.
- When the time elapses, the alarm will sound for 1 minute. Press START/STOP to turn it off.
- Press HR and MIN simultaneously to clear the time.
USDA Recommended Internal Cooking Temperatures
For food safety, ensure the following internal temperatures are reached:
- Fresh ground beef, veal, pork: 160°F / 72°C
- Beef, veal, lamb (steaks, roasts): Rare 140°F/60°C, Medium Rare 145°F/63°C, Medium 160°F/72°C, Well Done 170°F/77°C
- Fresh pork (steaks, roasts): Medium 160°F/72°C, Well Done 170°F/77°C
- Ham: Fresh 160°F/72°C, Precooked 140°F/60°C
- Poultry (all types): 165°F/74°C
- Fish: 145°F/63°C
- Stuffing, Leftovers, Casseroles: 165°F/74°C
- Egg dishes: 160°F/72°C
Maintenance
- Wash the metal probe with hot soapy water after each use.
- If the thermometer will not be used for a long period, remove the batteries.
- If readings become dim or irregular, replace the batteries.
Practical help
Common problems
Incorrect temperature reading
Ensure the sensor plug is completely dry before plugging it into the thermometer. Moisture in the opening causes errors.
Readings are dim or irregular
The batteries may be low. Replace both AAA batteries with new ones.
Alarm won't stop
Slide the TEMP ALERT switch to the OFF position.
Before use
- Remove the battery strip from the compartment.
- Sterilize the metal probe.
- Dry the sensor plug with a cloth.
- Set the desired temperature scale (F/C) on the back of the unit.
- Ensure the probe is inserted into the center of the food, not touching bone.
Specs in practice
- Power Source
- 2 x AAA (R03) batteries.
- Temperature Limit
- Do not use the probe in oven temperatures exceeding 200°C (392°F).
Images and diagrams
- FIG 1: Overview of the device, including LCD readout, buttons, and sensor plug location.
- FIG 2: Rear view showing battery compartment, reset button, and F/C switch.
- FIG 3: Illustration of correct probe placement in food inside the oven.
Model compatibility
- Do not use in microwave ovens.
- Electronic unit must be placed outside the oven.

Manual page author
Emily Carter
User documentation editor
Prepares concise manual descriptions and highlights the most useful setup, operation, and maintenance information for readers.