Automotive / Motorcycle Accessories
User Manual for Vevor 17mm Pipe Inspection Camera
Quick guide for the Vevor 17mm Pipe Inspection Camera. Learn how to install the monitor, connect the system, charge the battery, and operate the DVR recording functions.
Table of contents
Quick Guide
This guide provides essential instructions for setting up and operating your Vevor 17mm Pipe Inspection Camera. Ensure you handle the equipment carefully, avoid dropping or pressing it heavily, and always disconnect all cables before storing the device.
Product Components
The system includes the following main components:
- Camera head
- TFT LCD Screen (Monitor)
- Detection cable
- Coil/Reel
- Protective cover
- Charger
- Bracket
- Screwdriver
Charging
When the battery power is low, follow these steps to charge:
- Remove the battery from the box.
- Connect the charger to the battery.
- Connect the charger to an AC 100-240V power outlet.
- The red indicator light signifies charging; the green indicator light signifies that charging is complete.
System Installation
Follow these steps to assemble the system:
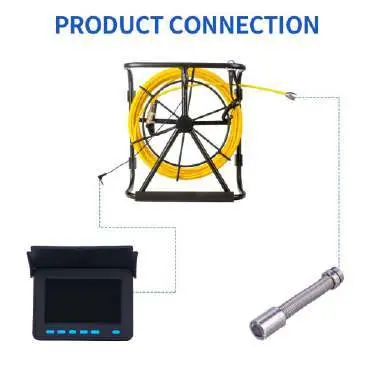
- Turn off the power switch.
- Connect the camera to the cable.
- Connect the camera cable to the switch box.
- Install the monitor onto the bracket using the provided mounting points.
- Ensure the protective cover is securely in place.
Cable Handling: Use the anti-rotation buckle to release the cable line. When coiling the cable back, ensure it passes through the wire hole to prevent tangling.
Operation
The monitor features a 4.3-inch LCD display with DVR recording capabilities. Use the buttons on the front panel to navigate:
- Power: Turn the device on/off.
- Menu: Access settings (Language, Date/Time, Format).
- Mode: Switch between Photo, Video, and Playback modes.
- OK: Confirm selections or start/stop recording.
- Up/Down: Navigate menus or adjust LED brightness.
To record, insert a TF card, enter the menu to format it if necessary, and press the OK button to start and stop recording.
Specifications
- Camera Diameter: 17mm
- Charger: AC100-240V
- Battery: Lithium battery
- Camera Light Source: 6 LEDs with adjustable intensity
- Waterproof Rating: IP68
Manufacturer information
VEVOR
Practical help
Common problems
Battery is low
Remove the battery from the box and connect it to the charger. Wait for the green indicator light.
Cable is tangled or difficult to manage
Use the anti-rotation buckle to release the cable and ensure it passes through the wire hole when coiling.
Cannot record video
Ensure a TF card is inserted and formatted via the Menu settings.
Before use
- Check that the battery is fully charged.
- Ensure all cable connections are secure.
- Clean the camera head with a soft, dry cloth.
- Verify the TF card is inserted for recording.
Images and diagrams
- The monitor features a sun-visor, TF card slot, and charging port on the sides.
- The front panel includes buttons for LED adjustment, Menu, Mode, OK, and Power.
- The cable reel includes an anti-rotation buckle and a wire hole for organized storage.
Model compatibility
- The system is designed for pipeline inspection, including water pipes, air conditioning pipes, and sunken pipes.

Manual page author
Emily Carter
User documentation editor
Prepares concise manual descriptions and highlights the most useful setup, operation, and maintenance information for readers.